> ## Documentation Index
> Fetch the complete documentation index at: https://help.jetpack3pl.com/llms.txt
> Use this file to discover all available pages before exploring further.
# Editing a Warehouse Receiving Order (WRO)
> Learn how to update your WRO details including fulfillment centers, product quantities, and shipping information before your inventory arrives at Jetpack.
Sometimes you need to make changes to a Warehouse Receiving Order after creating it—whether it's updating quantities, changing the destination fulfillment center, or adding forgotten products. Jetpack makes it easy to edit WROs, but there are specific conditions and steps to follow.
## When You Can Edit a WRO
WRO editing is available when your shipment meets these criteria:
**Status**: WRO must be in "Awaiting Arrival" status
**Timing**: Before your shipment arrives at the fulfillment center
You can only edit a WRO if it is in the AWAITING ARRIVAL status and shipped using prepaid labels. Plan changes early to avoid complications.
***
## What You Can Edit
### Basic Shipping Information
* **Fulfillment Center**: Change the destination hub or FC
* **Estimated Arrival Date**: Update timing expectations
* **PO Number**: Modify your internal reference number
### Product Details
* **Product Quantities**: Increase or decrease units per SKU
* **Product List**: Add new products or remove items entirely
* **Lot Information**: Update lot numbers and expiration dates
* **Box Configuration**: Modify how products are packed across boxes
When you change product quantities or lot information, the box configuration will reset and need to be updated again to reflect your changes.
***
## Quick Edits: Shipping Details Only
Use this fast and easy edit button for simple changes to fulfillment center, arrival date, or PO number.
Go to **Receiving > Receiving Orders** and click the WRO ID link to open the WRO details page.
On the WRO details page, click **Edit** under the Shipping Details panel.
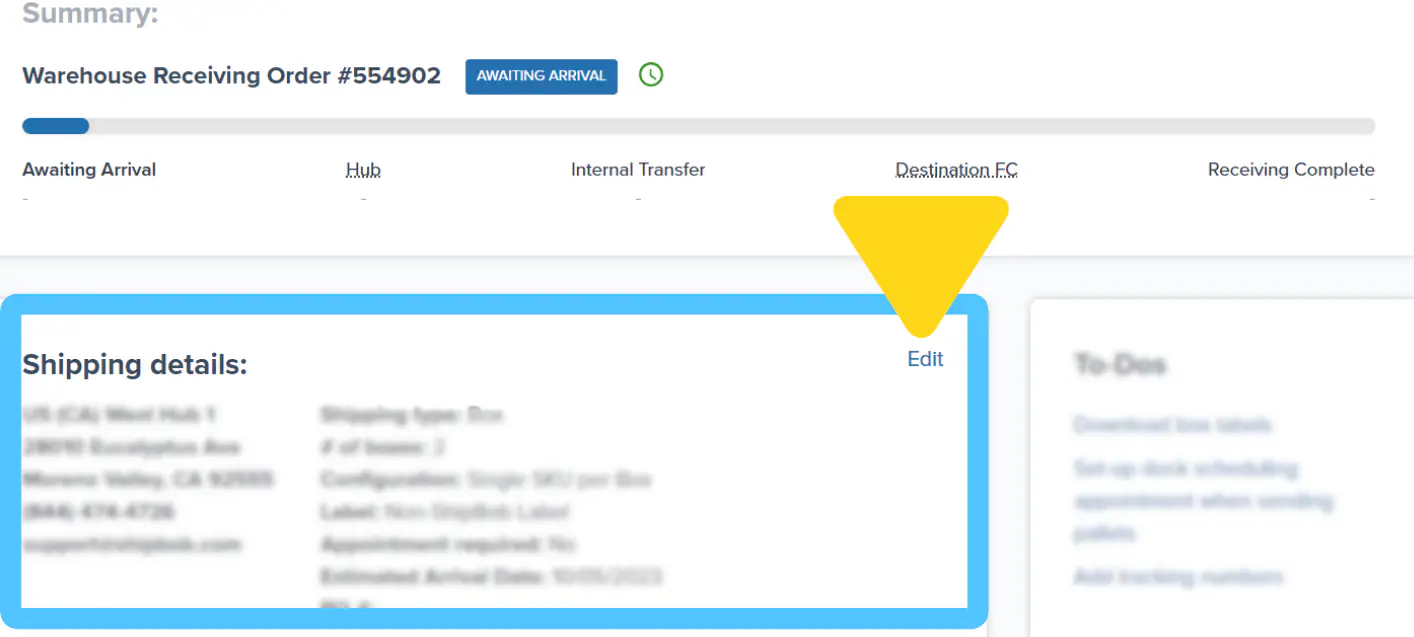 Update the desired fields in the popup window:
* Select new **Fulfillment Center** from dropdown
* Adjust **Estimated Arrival Date**
* Modify **PO Number** reference
Click **Save** to confirm your updates.
If changing the destination fulfillment center, ensure this matches the address on your shipping labels to avoid delivery issues.
***
## Comprehensive Edits: Product Changes
For more complex changes involving products, quantities, or box configurations:
Navigate to **Receiving > Receiving Orders** and click the WRO ID. Then click **Actions** at the top right of the WRO details page and choose **Edit** from the dropdown menu.
Update the desired fields in the popup window:
* Select new **Fulfillment Center** from dropdown
* Adjust **Estimated Arrival Date**
* Modify **PO Number** reference
Click **Save** to confirm your updates.
If changing the destination fulfillment center, ensure this matches the address on your shipping labels to avoid delivery issues.
***
## Comprehensive Edits: Product Changes
For more complex changes involving products, quantities, or box configurations:
Navigate to **Receiving > Receiving Orders** and click the WRO ID. Then click **Actions** at the top right of the WRO details page and choose **Edit** from the dropdown menu.
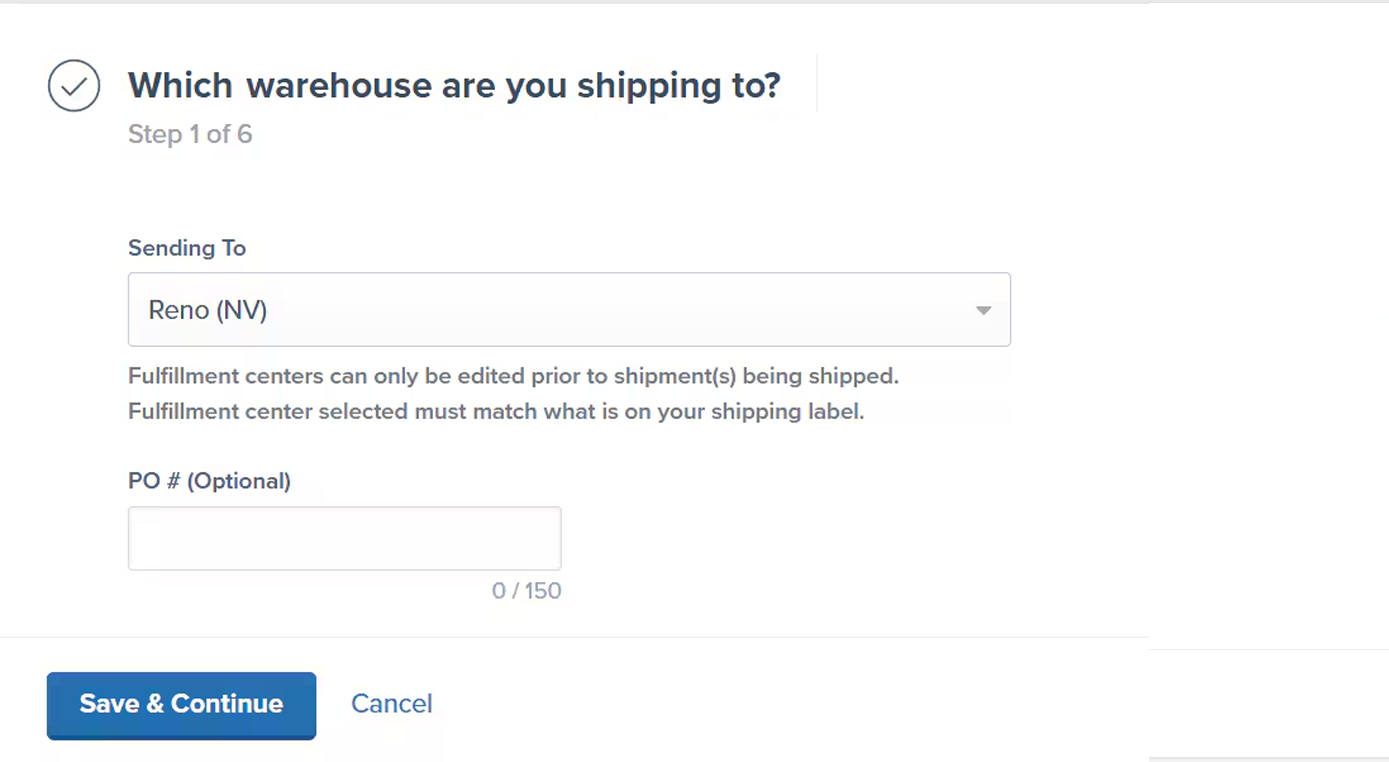 Review and update **Fulfillment Center** if needed, modify **PO Number** if required, then click **Save & Continue**.
Unlike creating new WROs, edits are not saved as drafts. You must complete the entire process or your changes will be lost.
Make comprehensive product changes:
**Adding Products:**
* Use the search bar to find and add new SKUs
* Enter quantities for each new product
**Removing Products:**
* Click the trash can icon next to products you want to remove
**Updating Quantities:**
* Modify the "Quantity to Send" for existing products
* Consider impact on box configuration when changing quantities
Review and update **Fulfillment Center** if needed, modify **PO Number** if required, then click **Save & Continue**.
Unlike creating new WROs, edits are not saved as drafts. You must complete the entire process or your changes will be lost.
Make comprehensive product changes:
**Adding Products:**
* Use the search bar to find and add new SKUs
* Enter quantities for each new product
**Removing Products:**
* Click the trash can icon next to products you want to remove
**Updating Quantities:**
* Modify the "Quantity to Send" for existing products
* Consider impact on box configuration when changing quantities
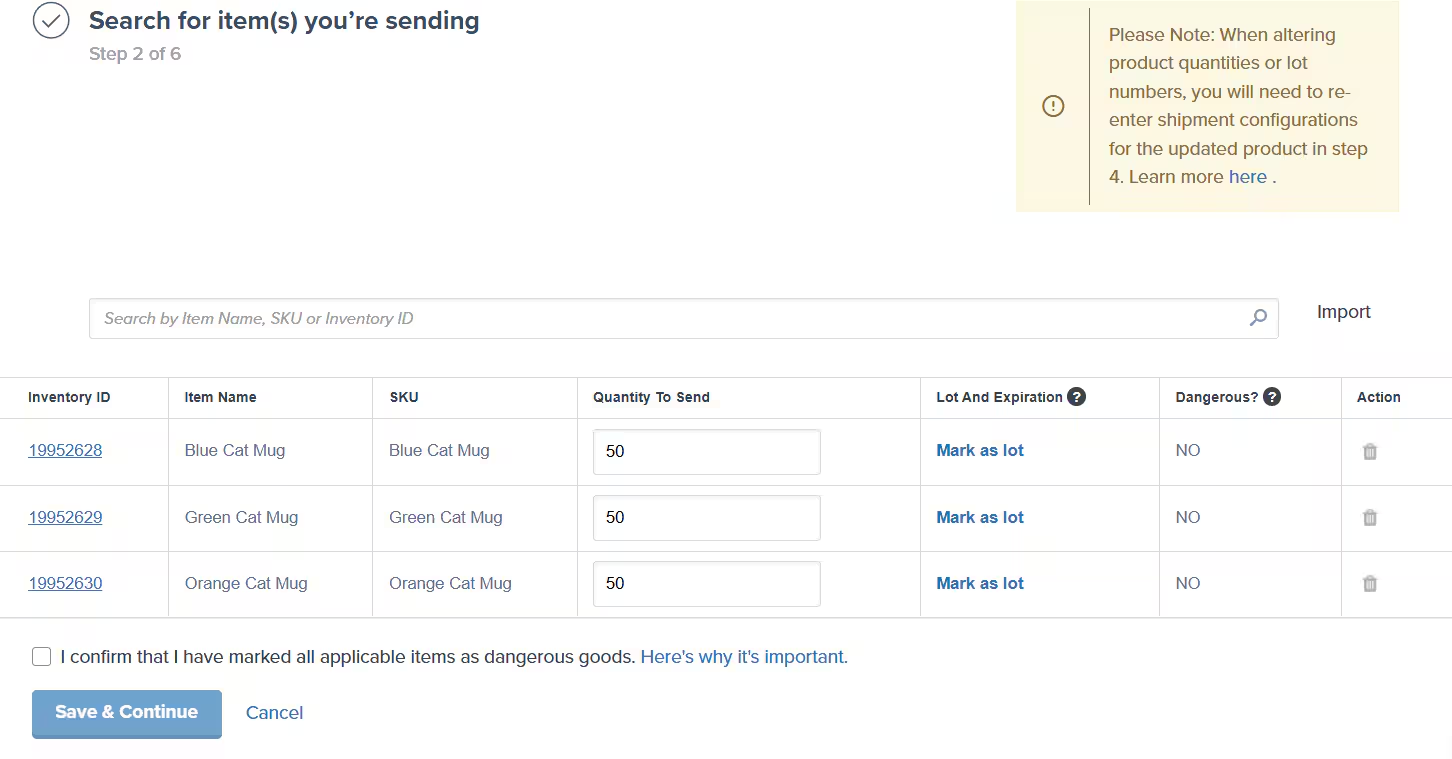 **Lot Information Updates:**
* Update lot numbers for tracked products
* Correct expiration dates using MM/DD/YYYY format
* Remember: lot changes will reset box configuration
Click **Save & Continue** when product updates are complete.
In step 4 of the WRO flow you'd add shipping type and inventory configuration, and these cannot be changed during editing, so click **Continue** to proceed to box configuration.
Update your box/pallet configuration for each box/pallet:
* **Update Product Distribution**: Reflect quantity changes across boxes
* **Verify Box Counts**: Ensure total boxes match your actual shipment
* **Check Weight/Dimensions**: Update if box contents have changed significantly
**Lot Information Updates:**
* Update lot numbers for tracked products
* Correct expiration dates using MM/DD/YYYY format
* Remember: lot changes will reset box configuration
Click **Save & Continue** when product updates are complete.
In step 4 of the WRO flow you'd add shipping type and inventory configuration, and these cannot be changed during editing, so click **Continue** to proceed to box configuration.
Update your box/pallet configuration for each box/pallet:
* **Update Product Distribution**: Reflect quantity changes across boxes
* **Verify Box Counts**: Ensure total boxes match your actual shipment
* **Check Weight/Dimensions**: Update if box contents have changed significantly
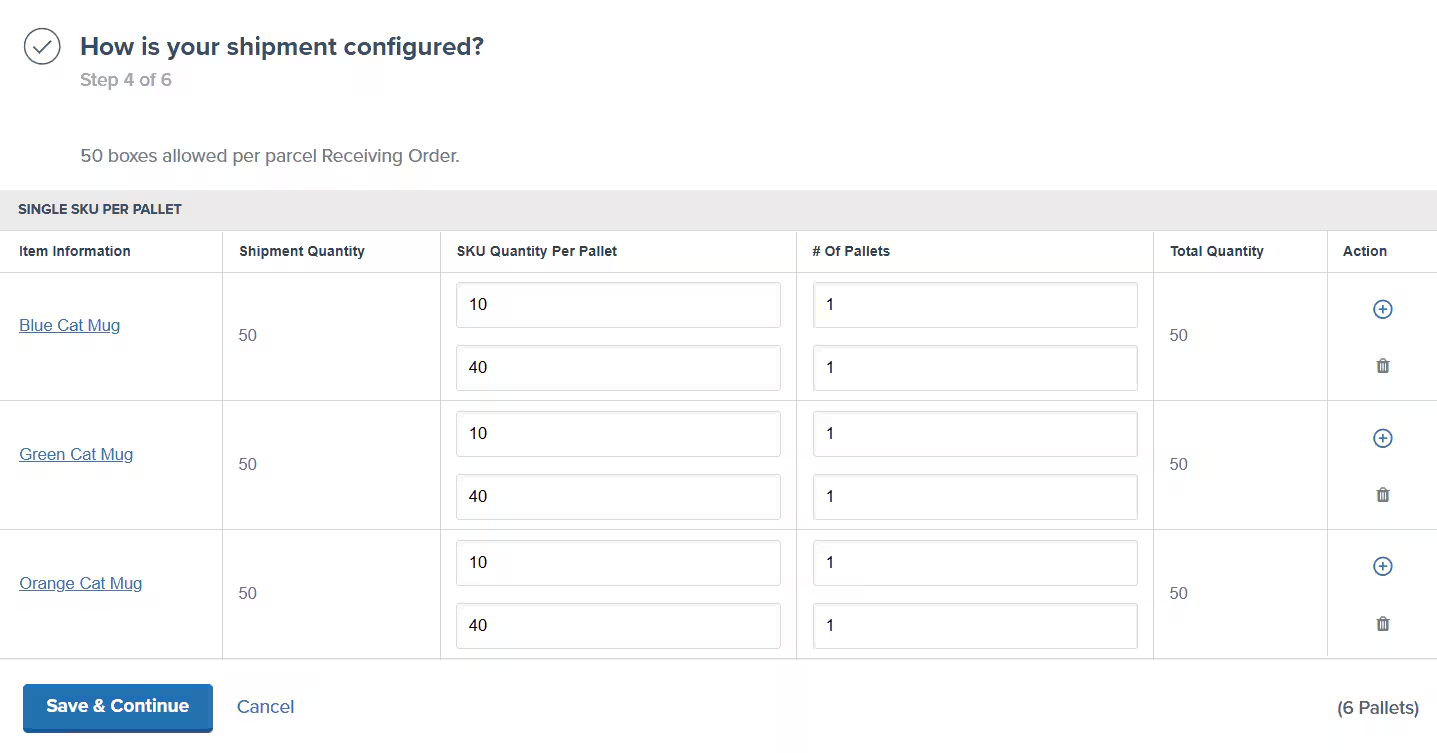 Click **Save & Continue** to proceed.
* **Quantity Changes**: Any modification to product quantities
* **Lot Updates**: Changes to lot numbers or expiration dates
* **Product Changes**: Adding or removing products from the WRO
Review and update:
* **Estimated Delivery Date**: Confirm arrival timing
* **Bill of Lading (BOL)**: Upload if required for your shipment
Click **Save & Continue** to move to final review.
Carefully review all changes:
* Verify product quantities and lot information
* Confirm box configuration matches your actual shipment
* Check fulfillment center and timing details
Click **Submit Changes** when everything looks correct.
A popup will appear for final confirmation. Click **Confirm** to finalize all changes, download updated box labels by clicking **Download Box Labels**, then click **Done** to return to your updated WRO.
If you made changes that affect box contents, print and attach the new box labels to ensure proper receiving at the fulfillment center.
***
## Let's Dive Deeper
Back to the main guide on our receiving process
Learn how to create Warehouse Receiving Orders to send inventory
Track and manage WROs with real-time status updates
Resolve shipments that don't match WROs
Streamline WRO creation with CSV templates
Prevent the seven most common WRO errors
Click **Save & Continue** to proceed.
* **Quantity Changes**: Any modification to product quantities
* **Lot Updates**: Changes to lot numbers or expiration dates
* **Product Changes**: Adding or removing products from the WRO
Review and update:
* **Estimated Delivery Date**: Confirm arrival timing
* **Bill of Lading (BOL)**: Upload if required for your shipment
Click **Save & Continue** to move to final review.
Carefully review all changes:
* Verify product quantities and lot information
* Confirm box configuration matches your actual shipment
* Check fulfillment center and timing details
Click **Submit Changes** when everything looks correct.
A popup will appear for final confirmation. Click **Confirm** to finalize all changes, download updated box labels by clicking **Download Box Labels**, then click **Done** to return to your updated WRO.
If you made changes that affect box contents, print and attach the new box labels to ensure proper receiving at the fulfillment center.
***
## Let's Dive Deeper
Back to the main guide on our receiving process
Learn how to create Warehouse Receiving Orders to send inventory
Track and manage WROs with real-time status updates
Resolve shipments that don't match WROs
Streamline WRO creation with CSV templates
Prevent the seven most common WRO errors

Questions? Contact Jetpack Care.
If you have any questions or run into issues, you can always contact Jetpack Care for help. Our team is always here to assist via Slack, phone, or email!