> ## Documentation Index
> Fetch the complete documentation index at: https://help.jetpack3pl.com/llms.txt
> Use this file to discover all available pages before exploring further.
# Shipment Details Page
> View complete order information on an easy, visual timeline. Edit customer details, manage products, and perform actions on individual shipments from one comprehensive page.
The Shipment Details page is your comprehensive view into every aspect of an individual order. From this single page, you can view the complete order timeline, edit customer information and order items, manage attachments, and perform actions like adding signature requirements or generating return labels—all without leaving the order context.
## Accessing the Shipment Details Page
From the Jetpack dashboard, click **Orders** on the left-hand navigation bar, then select **All Orders**.
Click on any **Shipment ID** (hyperlinked in blue) to open the full Shipment Details page.
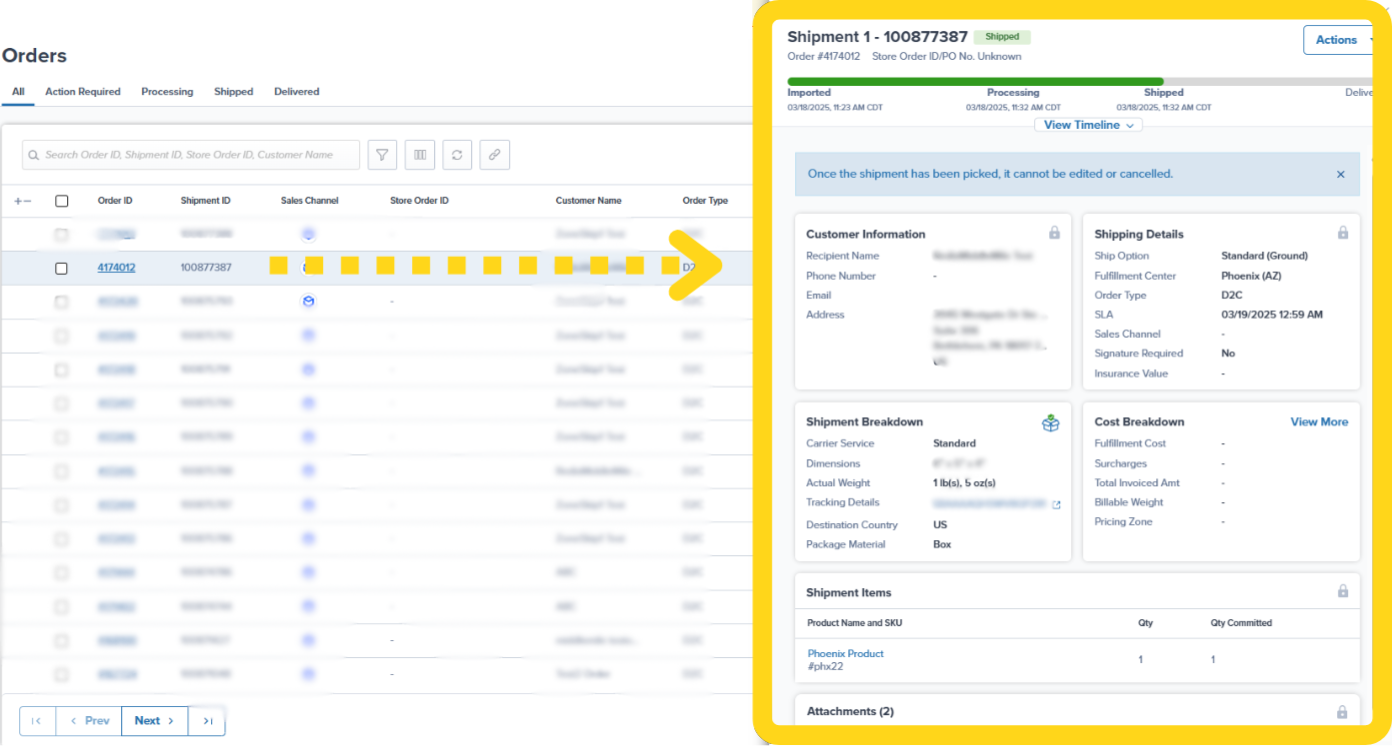 Alternatively, you can click a Shipment ID directly from the [Orders page](/fulfillment/order-management) to open the Shipment Details panel on the right side without navigating away.
***
## What You Can Do from the Shipment Details Page
The Shipment Details page provides comprehensive order management capabilities:
* **Check order status** - View current status and complete fulfillment timeline
* **View detailed timeline** - See every event from order import to delivery
* **Edit customer information** - Update recipient name, address, email, and phone (before picking)
* **Edit order items** - Add or remove products and adjust quantities (before picking)
* **Manage attachments** - Upload documents like custom packing slips or special instructions (before picking)
* **Perform actions** - Split orders, generate return labels, add signature requirements, and more
**Important**: Most editing capabilities are locked once an order reaches the Picked status to prevent changes after our warehouse team has begun physical fulfillment.
***
## Understanding the Shipment Details Page Layout
The Shipment Details page is organized into 7 key panels that provide comprehensive order information. Understanding these panels helps you quickly find the information you need and know what actions you can take.
***
## 1. Shipment Timeline Panel
The Timeline panel displays the order's current status and complete fulfillment journey.
### What This Panel Shows
* **Shipment ID** - Unique identifier in the Jetpack dashboard
* **Current Status** - Where the order is in the fulfillment workflow (Processing, Picked, Shipped, Delivered, etc.)
* **Timeline Events** - Key milestones from order creation to delivery
* **Fulfillment SLA Badge** - Indicates whether order is on track to meet service level agreement
* **Shipment Upgrade Badge** - Green badge appears if Jetpack upgraded the shipping option at no extra cost to you
* **Store Order ID** - Order number from your integrated ecommerce store (if available)
Alternatively, you can click a Shipment ID directly from the [Orders page](/fulfillment/order-management) to open the Shipment Details panel on the right side without navigating away.
***
## What You Can Do from the Shipment Details Page
The Shipment Details page provides comprehensive order management capabilities:
* **Check order status** - View current status and complete fulfillment timeline
* **View detailed timeline** - See every event from order import to delivery
* **Edit customer information** - Update recipient name, address, email, and phone (before picking)
* **Edit order items** - Add or remove products and adjust quantities (before picking)
* **Manage attachments** - Upload documents like custom packing slips or special instructions (before picking)
* **Perform actions** - Split orders, generate return labels, add signature requirements, and more
**Important**: Most editing capabilities are locked once an order reaches the Picked status to prevent changes after our warehouse team has begun physical fulfillment.
***
## Understanding the Shipment Details Page Layout
The Shipment Details page is organized into 7 key panels that provide comprehensive order information. Understanding these panels helps you quickly find the information you need and know what actions you can take.
***
## 1. Shipment Timeline Panel
The Timeline panel displays the order's current status and complete fulfillment journey.
### What This Panel Shows
* **Shipment ID** - Unique identifier in the Jetpack dashboard
* **Current Status** - Where the order is in the fulfillment workflow (Processing, Picked, Shipped, Delivered, etc.)
* **Timeline Events** - Key milestones from order creation to delivery
* **Fulfillment SLA Badge** - Indicates whether order is on track to meet service level agreement
* **Shipment Upgrade Badge** - Green badge appears if Jetpack upgraded the shipping option at no extra cost to you
* **Store Order ID** - Order number from your integrated ecommerce store (if available)
 ### Understanding the Timeline
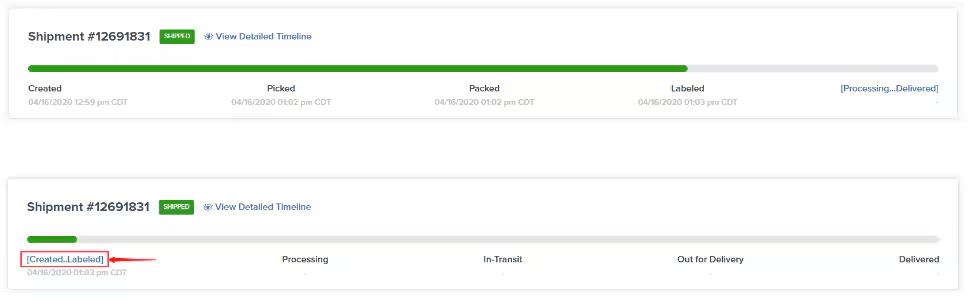
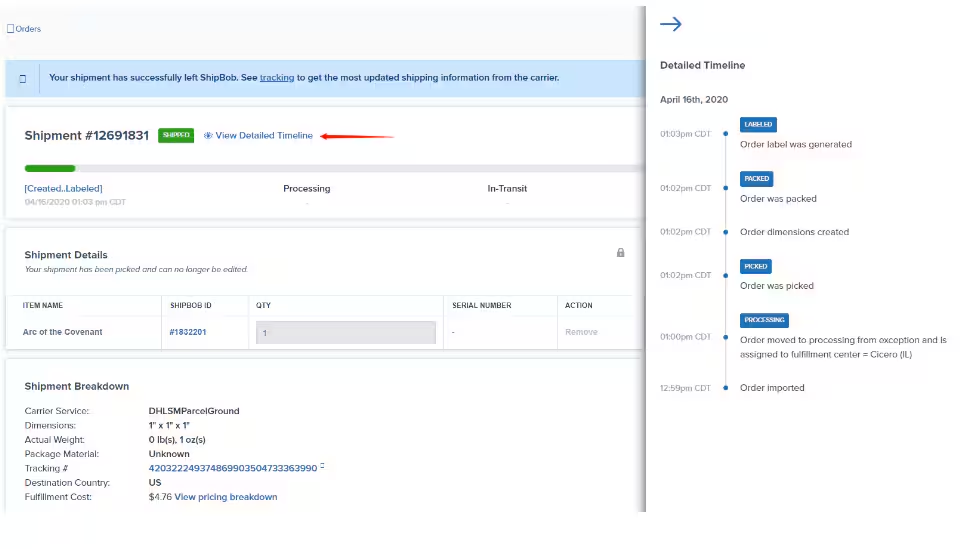
The timeline shows key events in chronological order:
* **Order Imported** - When the order entered Jetpack
* **Processing** - Order entered the fulfillment queue
* **Picked** - Products picked from inventory
* **Packed** - Order packed into shipping package
* **Labeled** - Shipping label generated
* **Shipped** - Order handed off to carrier
* **In-Transit** - Carrier scanned and transporting package
* **Out For Delivery** - Package on delivery vehicle
* **Delivered** - Successfully delivered to customer
**Viewing Detailed Timeline**: Click **View Detailed Timeline** or expand previous events by clicking the **Picked..Labeled** link to see all intermediate steps and timestamps.
### Understanding the Timeline
The timeline shows key events in chronological order:
* **Order Imported** - When the order entered Jetpack
* **Processing** - Order entered the fulfillment queue
* **Picked** - Products picked from inventory
* **Packed** - Order packed into shipping package
* **Labeled** - Shipping label generated
* **Shipped** - Order handed off to carrier
* **In-Transit** - Carrier scanned and transporting package
* **Out For Delivery** - Package on delivery vehicle
* **Delivered** - Successfully delivered to customer
**Viewing Detailed Timeline**: Click **View Detailed Timeline** or expand previous events by clicking the **Picked..Labeled** link to see all intermediate steps and timestamps.
 ### When Tracking Information Appears
Once the order status moves to Shipped and a tracking ID is assigned, the timeline updates with:
* Carrier name (UPS, FedEx, USPS, etc.)
* Tracking number (clickable to view carrier's tracking page)
* Detailed carrier tracking events
***
## 2. Shipment Details Panel
The Shipment Details panel lists all products included in the order, along with quantities and tracking information.
### What This Panel Shows
* **Product List** - All items in the shipment with names and quantities
* **Serial Numbers** - If applicable, shows scanned serial numbers
* **Lot Numbers** - If configured as a lot product, shows lot information
* **Expiration Dates** - If applicable, shows expiration dates for lot products
### Editing Order Items
You can edit order items until the order is picked:
Click the **Remove** button next to the item listing, then confirm the removal.
Delete the old quantity in the quantity field, enter the new quantity, then save your changes.
### When Tracking Information Appears
Once the order status moves to Shipped and a tracking ID is assigned, the timeline updates with:
* Carrier name (UPS, FedEx, USPS, etc.)
* Tracking number (clickable to view carrier's tracking page)
* Detailed carrier tracking events
***
## 2. Shipment Details Panel
The Shipment Details panel lists all products included in the order, along with quantities and tracking information.
### What This Panel Shows
* **Product List** - All items in the shipment with names and quantities
* **Serial Numbers** - If applicable, shows scanned serial numbers
* **Lot Numbers** - If configured as a lot product, shows lot information
* **Expiration Dates** - If applicable, shows expiration dates for lot products
### Editing Order Items
You can edit order items until the order is picked:
Click the **Remove** button next to the item listing, then confirm the removal.
Delete the old quantity in the quantity field, enter the new quantity, then save your changes.
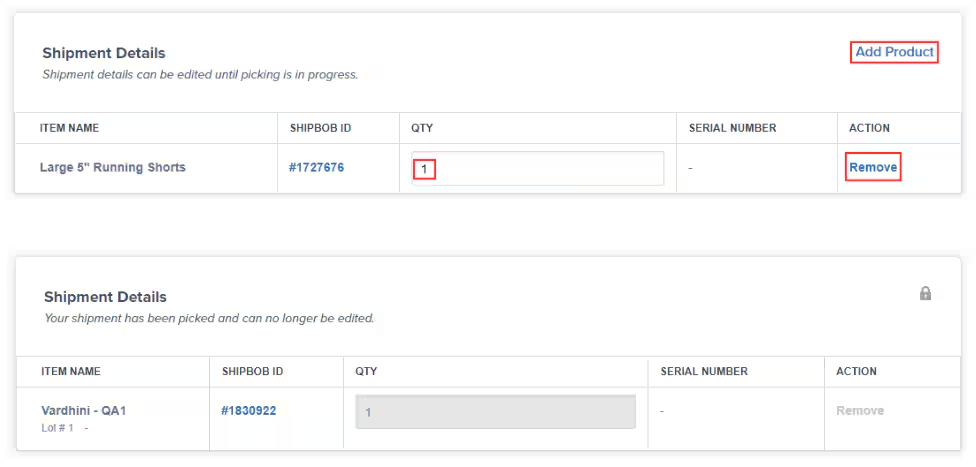 Click **Add Item**, search by SKU ID or product name, select the relevant products, then click **Add Items**.
### When Editing Is Locked
Once the order reaches the **Picked** status:
* A **lock icon** appears on this panel
* All editing capabilities are disabled
* Additional details like serial numbers, lot numbers, and expiration dates become visible (if applicable)
**Why editing is locked**: Our warehouse team has already physically picked and verified the products. Changes at this stage could result in fulfillment errors or delays.
***
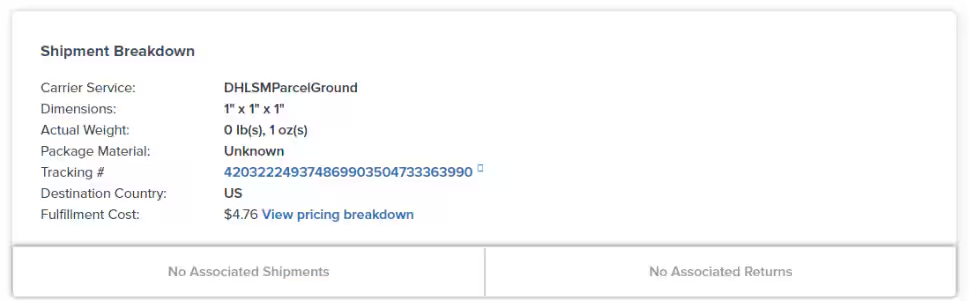
## 3. Shipment Breakdown Panel
The Shipment Breakdown panel provides shipping details, package information, and cost breakdown.
### What This Panel Shows
| Information | What It Tells You |
| ------------------------ | ------------------------------------------------------------------------ |
| **Carrier Service** | Chosen shipping carrier and service level (e.g., UPS Ground, FedEx 2Day) |
| **Tracking Number** | Clickable tracking number that opens carrier's tracking page |
| **Shipment Dimensions** | Package length, width, and height |
| **Shipment Weight** | Total package weight including products and packaging materials |
| **Destination Country** | Country where the shipment is being delivered |
| **Fulfillment Cost** | Total cost for fulfilling this order (click for itemized breakdown) |
| **Associated Shipments** | Links to related shipments (split shipments or return orders) |
Click **Add Item**, search by SKU ID or product name, select the relevant products, then click **Add Items**.
### When Editing Is Locked
Once the order reaches the **Picked** status:
* A **lock icon** appears on this panel
* All editing capabilities are disabled
* Additional details like serial numbers, lot numbers, and expiration dates become visible (if applicable)
**Why editing is locked**: Our warehouse team has already physically picked and verified the products. Changes at this stage could result in fulfillment errors or delays.
***
## 3. Shipment Breakdown Panel
The Shipment Breakdown panel provides shipping details, package information, and cost breakdown.
### What This Panel Shows
| Information | What It Tells You |
| ------------------------ | ------------------------------------------------------------------------ |
| **Carrier Service** | Chosen shipping carrier and service level (e.g., UPS Ground, FedEx 2Day) |
| **Tracking Number** | Clickable tracking number that opens carrier's tracking page |
| **Shipment Dimensions** | Package length, width, and height |
| **Shipment Weight** | Total package weight including products and packaging materials |
| **Destination Country** | Country where the shipment is being delivered |
| **Fulfillment Cost** | Total cost for fulfilling this order (click for itemized breakdown) |
| **Associated Shipments** | Links to related shipments (split shipments or return orders) |
 ### Understanding Package Dimensions and Weight
**Dimensions and weight appear after the order is packed.** Until packing is complete, you'll see a placeholder message indicating this information is not yet available.
These measurements are used to:
* Calculate accurate shipping costs
* Determine which carrier services are available
* Verify dimensional weight pricing if applicable
Learn more about how package dimensions affect shipping costs in our [Package Size and Weight Policies](/fulfillment/tools-techniques/package-size-weight-policies) guide.
### Viewing Cost Breakdown
Click the **fulfillment cost** link to view an itemized breakdown including:
* Picking fees
* Packing fees
* Shipping costs
* Any additional services (insurance, signature, etc.)
***
## 4. Customer Information Panel
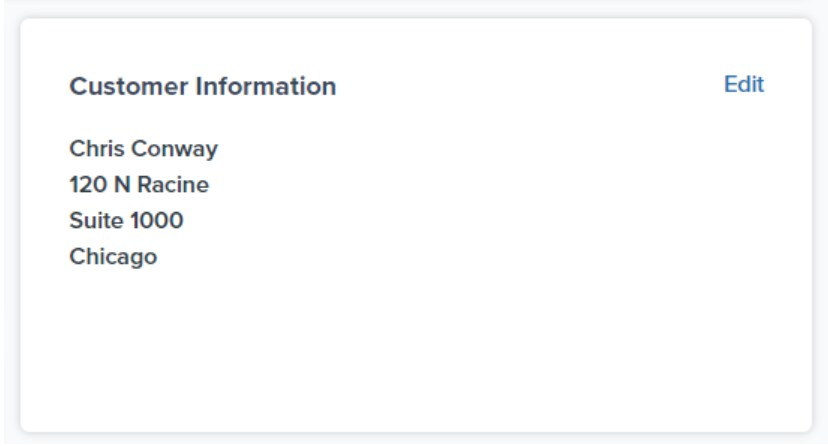
The Customer Information panel displays recipient details for the shipment.
### What This Panel Shows
* **Recipient Name** - Customer's full name
* **Shipping Address** - Complete street address, unit number, city, state/province, zip/postcode, and country
* **Email Address** - Customer's email (if provided)
* **Phone Number** - Customer's phone number (if provided)
### Understanding Package Dimensions and Weight
**Dimensions and weight appear after the order is packed.** Until packing is complete, you'll see a placeholder message indicating this information is not yet available.
These measurements are used to:
* Calculate accurate shipping costs
* Determine which carrier services are available
* Verify dimensional weight pricing if applicable
Learn more about how package dimensions affect shipping costs in our [Package Size and Weight Policies](/fulfillment/tools-techniques/package-size-weight-policies) guide.
### Viewing Cost Breakdown
Click the **fulfillment cost** link to view an itemized breakdown including:
* Picking fees
* Packing fees
* Shipping costs
* Any additional services (insurance, signature, etc.)
***
## 4. Customer Information Panel
The Customer Information panel displays recipient details for the shipment.
### What This Panel Shows
* **Recipient Name** - Customer's full name
* **Shipping Address** - Complete street address, unit number, city, state/province, zip/postcode, and country
* **Email Address** - Customer's email (if provided)
* **Phone Number** - Customer's phone number (if provided)
 ### Editing Customer Information
You can edit customer information until the order is picked:
Click **Edit** (hyperlinked) on the Customer Information panel.
Update any of the recipient's information:
* Name
* Shipping address (street, unit, city, state, zip, country)
* Email address
* Phone number
Click **Save** to apply the updates.
**Important for Action Required orders**: If an order is in Action Required status due to an invalid address, it will automatically move back to Processing when you update the address to a valid one.
### When Editing Is Locked
Once the order is picked:
* A **lock icon** appears on this panel
* Customer information cannot be modified
* This prevents address changes after the package has been labeled and is ready to ship
***
## 5. Shipping Details Panel
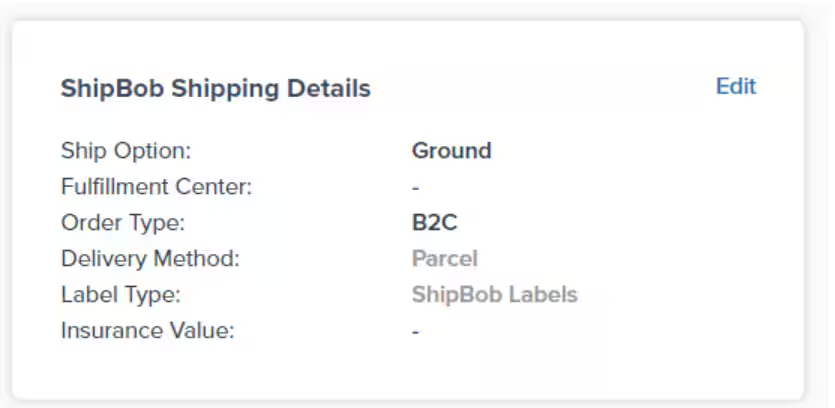
The Jetpack Shipping Details panel shows fulfillment and shipping configuration for the order, including details on which ShipBob shipping services were used..
### What This Panel Shows
| Field | What It Tells You |
| ---------------------- | -------------------------------------------------------------------- |
| **Ship Option** | Selected shipping speed (Standard, Expedited, Overnight, etc.) |
| **Fulfillment Center** | Which FC is processing or processed this order |
| **Order Type** | Classification (B2C, B2B, Kitting, etc.) |
| **Delivery Method** | How the package will be delivered (Standard Delivery, Freight, etc.) |
| **Label Type** | Type of shipping label generated |
| **Insurance Value** | Declared value for shipping insurance (with link to details) |
### Editing Customer Information
You can edit customer information until the order is picked:
Click **Edit** (hyperlinked) on the Customer Information panel.
Update any of the recipient's information:
* Name
* Shipping address (street, unit, city, state, zip, country)
* Email address
* Phone number
Click **Save** to apply the updates.
**Important for Action Required orders**: If an order is in Action Required status due to an invalid address, it will automatically move back to Processing when you update the address to a valid one.
### When Editing Is Locked
Once the order is picked:
* A **lock icon** appears on this panel
* Customer information cannot be modified
* This prevents address changes after the package has been labeled and is ready to ship
***
## 5. Shipping Details Panel
The Jetpack Shipping Details panel shows fulfillment and shipping configuration for the order, including details on which ShipBob shipping services were used..
### What This Panel Shows
| Field | What It Tells You |
| ---------------------- | -------------------------------------------------------------------- |
| **Ship Option** | Selected shipping speed (Standard, Expedited, Overnight, etc.) |
| **Fulfillment Center** | Which FC is processing or processed this order |
| **Order Type** | Classification (B2C, B2B, Kitting, etc.) |
| **Delivery Method** | How the package will be delivered (Standard Delivery, Freight, etc.) |
| **Label Type** | Type of shipping label generated |
| **Insurance Value** | Declared value for shipping insurance (with link to details) |
 ### Editing Shipping Details
Only select fields in this panel are editable before the order is picked:
**To change the Fulfillment Center:**
Click **Edit** on the Jetpack Shipping Details panel.
Select a different fulfillment center from the dropdown list, then click **Save**.
**To add or modify Insurance Value:**
Click **Edit** on the Jetpack Shipping Details panel.
Under **Order Value for Insurance Value**, enter a numeric value, then click **Save**.
Insurance is calculated at 1.875% of the indicated value and added to the order's invoice. Learn more about [adding insurance to orders](/fulfillment/terms-and-slas/insurance-options).
**To modify Ship Option:**
Click **Edit** on the Jetpack Shipping Details panel.
Choose **Ship Option Type**:
* **ShipBob Optimized** - Jetpack optimizes the shipping method based on your chosen speed (Overnight, Expedited, or Standard)
* **Carrier Specific** - Choose a specific carrier and service level (e.g., UPS and UPS SurePost)
Click **Save** to apply the update.
**Note**: Account-level ship option mapping may override your changes. If you have a carrier-specific mapping in place (e.g., DHL for Priority), it may override the chosen ship option if it's more cost-effective.
### When Editing Is Locked
After the order is picked:
* A **lock icon** appears
* All fields become read-only
* The assigned fulfillment center and insurance value cannot be changed
***
## 6. Order Import Details Panel
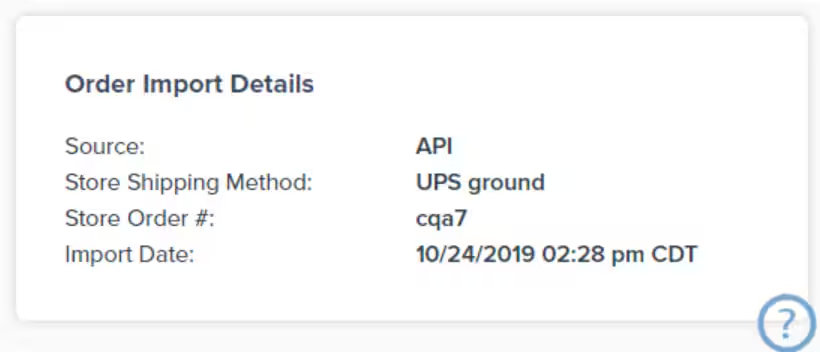
The Order Import Details panel shows how the order entered Jetpack and its source information.
### What This Panel Shows
* **Order Source** - Where the order came from (Shopify, Amazon, WooCommerce, Manual, etc.)
* **Import Date** - Date and time the order was imported or created in Jetpack
* **Store Shipping Method** - Shipping method name as displayed in your ecommerce store
* **Store Order ID** - Order number from your integrated store (if applicable)
This panel is **read-only** and cannot be edited. It provides a permanent record of the order's origin and import details.
### Editing Shipping Details
Only select fields in this panel are editable before the order is picked:
**To change the Fulfillment Center:**
Click **Edit** on the Jetpack Shipping Details panel.
Select a different fulfillment center from the dropdown list, then click **Save**.
**To add or modify Insurance Value:**
Click **Edit** on the Jetpack Shipping Details panel.
Under **Order Value for Insurance Value**, enter a numeric value, then click **Save**.
Insurance is calculated at 1.875% of the indicated value and added to the order's invoice. Learn more about [adding insurance to orders](/fulfillment/terms-and-slas/insurance-options).
**To modify Ship Option:**
Click **Edit** on the Jetpack Shipping Details panel.
Choose **Ship Option Type**:
* **ShipBob Optimized** - Jetpack optimizes the shipping method based on your chosen speed (Overnight, Expedited, or Standard)
* **Carrier Specific** - Choose a specific carrier and service level (e.g., UPS and UPS SurePost)
Click **Save** to apply the update.
**Note**: Account-level ship option mapping may override your changes. If you have a carrier-specific mapping in place (e.g., DHL for Priority), it may override the chosen ship option if it's more cost-effective.
### When Editing Is Locked
After the order is picked:
* A **lock icon** appears
* All fields become read-only
* The assigned fulfillment center and insurance value cannot be changed
***
## 6. Order Import Details Panel
The Order Import Details panel shows how the order entered Jetpack and its source information.
### What This Panel Shows
* **Order Source** - Where the order came from (Shopify, Amazon, WooCommerce, Manual, etc.)
* **Import Date** - Date and time the order was imported or created in Jetpack
* **Store Shipping Method** - Shipping method name as displayed in your ecommerce store
* **Store Order ID** - Order number from your integrated store (if applicable)
This panel is **read-only** and cannot be edited. It provides a permanent record of the order's origin and import details.
 ***
## 7. Attachments Panel
The Attachments panel displays documents associated with the order and allows you to upload additional files.
### What This Panel Shows
* **Packing Slip** - Standard or custom packing slip included with the order
* **Shipping Label** - Carrier label (appears only after the order is labeled)
* **Custom Attachments** - Any documents you've uploaded (invoices, special instructions, BOLs, etc.)
***
## 7. Attachments Panel
The Attachments panel displays documents associated with the order and allows you to upload additional files.
### What This Panel Shows
* **Packing Slip** - Standard or custom packing slip included with the order
* **Shipping Label** - Carrier label (appears only after the order is labeled)
* **Custom Attachments** - Any documents you've uploaded (invoices, special instructions, BOLs, etc.)
 ### Uploading Attachments
You can upload attachments before the order is picked:
On the Attachments panel, click **Upload** or **Add Attachment**.
Select the file from your computer.
Add a description or label for the attachment (optional).
Click **Save** or **Upload** to attach the file to the order.
Common attachment use cases:
* Custom packing slips with branding or special messaging
* Commercial invoices for international shipments
* Bill of Lading (BOL) for B2B freight orders
* Special handling instructions for warehouse team
* Return authorization forms
Learn more about [uploading order attachments](/fulfillment/b2b/upload-order-attachments).
### When Editing Is Locked
Once the order is picked:
* A **lock icon** appears
* Attachments can no longer be modified or removed
* You cannot upload new attachments
The packing slip and shipping label remain viewable and downloadable even after editing is locked.
***
## Additional Actions from the Shipment Details Page
Beyond viewing and editing order information, the Shipment Details page lets you perform several important actions.
### Available Actions
| Action | What It Does | When Available |
| -------------------------------------- | -------------------------------------------------------------------- | --------------- |
| **Split Order** | Divide the order into multiple shipments to ship products separately | Before picking |
| **Generate Return Labels** | Create prepaid return shipping labels for the customer | After shipping |
| **Add Signature Required Instruction** | Apply a signature requirement for delivery (additional fees apply) | Before labeling |
| **Copy Order** | Create a duplicate order with the same products and details | Anytime |
| **Cancel Order** | Cancel the order and unreserve inventory | Before shipping |
| **Put Order On Hold** | Temporarily pause fulfillment and optionally unreserve inventory | Before picking |
Learn more about these actions:
* [Editing Orders](/fulfillment/order-management/editing-orders) - Complete guide to modifying order details
* [Splitting Orders With Action Required](/fulfillment/d2c/splitting-orders) - How and when to split orders
* [Add/Remove Signature Requirement](/fulfillment/account-setup/shipping-preferences/signature) - Signature service details
***
## Shipment Details Page FAQs
Order editing is locked once the order reaches the **Picked** status. At this point, our warehouse team has already physically picked the products from inventory and verified them against the order.
Allowing changes after picking could result in fulfillment errors, shipping delays, or incorrect shipments to customers. If you need to make changes to a picked order, contact Jetpack Care for assistance.
Yes, but only **before the order is picked**. Once you see the lock icon on the Jetpack Shipping Details panel, the fulfillment center can no longer be changed.
To change the fulfillment center:
1. Click **Edit** on the Jetpack Shipping Details panel
2. Select a different FC from the dropdown
3. Click **Save**
Note that changing the fulfillment center may affect shipping costs and delivery times depending on the FC's proximity to the customer.
**Store Order ID** is the order number from your ecommerce platform (e.g., Shopify order #1234). This is how your customer identifies the order.
**Shipment ID** is the unique identifier Jetpack assigns to each individual package. If an order is split into multiple boxes, each box gets its own Shipment ID, but they all share the same Store Order ID.
**Example**: Store Order #1234 might become Shipment IDs 100877388 and 100877389 if split into 2 packages.
Look for the **green shipment upgrade badge** on the Shipment Timeline panel. This badge appears when Jetpack has upgraded your shipping option at no extra charge to you.
Common upgrade scenarios:
* Upgrading Standard to Expedited to meet delivery commitments
* Upgrading Expedited to 2-Day to compensate for processing delays
* Using a faster carrier service when it's more cost-effective
Yes, but only **after the order is picked**. Serial numbers, lot numbers, and expiration dates are scanned during the picking and packing process.
Once visible in the Shipment Details panel, this information becomes part of the permanent order record and can be viewed or exported at any time.
If an order is in **Action Required** status due to an **invalid or incomplete address**, updating the address to a valid one will **automatically move the order back to Processing**.
Jetpack validates addresses in real-time. Once a valid address is detected, the order is released from Action Required and enters the fulfillment queue.
***
## Let's Dive Deeper
Navigate and filter all your orders with customizable views
Complete guide to modifying order details
Resolve issues preventing order fulfillment
Understand every status in the fulfillment workflow
Learn when and how to split orders into multiple shipments
Request kitting, de-kitting, and other inventory tasks
### Uploading Attachments
You can upload attachments before the order is picked:
On the Attachments panel, click **Upload** or **Add Attachment**.
Select the file from your computer.
Add a description or label for the attachment (optional).
Click **Save** or **Upload** to attach the file to the order.
Common attachment use cases:
* Custom packing slips with branding or special messaging
* Commercial invoices for international shipments
* Bill of Lading (BOL) for B2B freight orders
* Special handling instructions for warehouse team
* Return authorization forms
Learn more about [uploading order attachments](/fulfillment/b2b/upload-order-attachments).
### When Editing Is Locked
Once the order is picked:
* A **lock icon** appears
* Attachments can no longer be modified or removed
* You cannot upload new attachments
The packing slip and shipping label remain viewable and downloadable even after editing is locked.
***
## Additional Actions from the Shipment Details Page
Beyond viewing and editing order information, the Shipment Details page lets you perform several important actions.
### Available Actions
| Action | What It Does | When Available |
| -------------------------------------- | -------------------------------------------------------------------- | --------------- |
| **Split Order** | Divide the order into multiple shipments to ship products separately | Before picking |
| **Generate Return Labels** | Create prepaid return shipping labels for the customer | After shipping |
| **Add Signature Required Instruction** | Apply a signature requirement for delivery (additional fees apply) | Before labeling |
| **Copy Order** | Create a duplicate order with the same products and details | Anytime |
| **Cancel Order** | Cancel the order and unreserve inventory | Before shipping |
| **Put Order On Hold** | Temporarily pause fulfillment and optionally unreserve inventory | Before picking |
Learn more about these actions:
* [Editing Orders](/fulfillment/order-management/editing-orders) - Complete guide to modifying order details
* [Splitting Orders With Action Required](/fulfillment/d2c/splitting-orders) - How and when to split orders
* [Add/Remove Signature Requirement](/fulfillment/account-setup/shipping-preferences/signature) - Signature service details
***
## Shipment Details Page FAQs
Order editing is locked once the order reaches the **Picked** status. At this point, our warehouse team has already physically picked the products from inventory and verified them against the order.
Allowing changes after picking could result in fulfillment errors, shipping delays, or incorrect shipments to customers. If you need to make changes to a picked order, contact Jetpack Care for assistance.
Yes, but only **before the order is picked**. Once you see the lock icon on the Jetpack Shipping Details panel, the fulfillment center can no longer be changed.
To change the fulfillment center:
1. Click **Edit** on the Jetpack Shipping Details panel
2. Select a different FC from the dropdown
3. Click **Save**
Note that changing the fulfillment center may affect shipping costs and delivery times depending on the FC's proximity to the customer.
**Store Order ID** is the order number from your ecommerce platform (e.g., Shopify order #1234). This is how your customer identifies the order.
**Shipment ID** is the unique identifier Jetpack assigns to each individual package. If an order is split into multiple boxes, each box gets its own Shipment ID, but they all share the same Store Order ID.
**Example**: Store Order #1234 might become Shipment IDs 100877388 and 100877389 if split into 2 packages.
Look for the **green shipment upgrade badge** on the Shipment Timeline panel. This badge appears when Jetpack has upgraded your shipping option at no extra charge to you.
Common upgrade scenarios:
* Upgrading Standard to Expedited to meet delivery commitments
* Upgrading Expedited to 2-Day to compensate for processing delays
* Using a faster carrier service when it's more cost-effective
Yes, but only **after the order is picked**. Serial numbers, lot numbers, and expiration dates are scanned during the picking and packing process.
Once visible in the Shipment Details panel, this information becomes part of the permanent order record and can be viewed or exported at any time.
If an order is in **Action Required** status due to an **invalid or incomplete address**, updating the address to a valid one will **automatically move the order back to Processing**.
Jetpack validates addresses in real-time. Once a valid address is detected, the order is released from Action Required and enters the fulfillment queue.
***
## Let's Dive Deeper
Navigate and filter all your orders with customizable views
Complete guide to modifying order details
Resolve issues preventing order fulfillment
Understand every status in the fulfillment workflow
Learn when and how to split orders into multiple shipments
Request kitting, de-kitting, and other inventory tasks

Questions? Contact Jetpack Care.
If you have any questions or run into issues, you can always contact Jetpack Care for help. Our team is always here to assist via Slack, phone, or email!