> ## Documentation Index
> Fetch the complete documentation index at: https://help.jetpack3pl.com/llms.txt
> Use this file to discover all available pages before exploring further.
# Automation Rules Page
> View, manage, and control automation rules that customize order processing based on conditions like order value, tags, shipping method, and destination.
The Automation Rules page is where you view and manage all the automation rules applied to your account. Automation rules let you customize the order fulfillment experience by automatically performing actions based on specific conditions—like adding a gift to high-value orders, requiring signatures for expensive shipments, or routing orders to specific fulfillment centers based on tags.
## What Are Automation Rules?
Automation rules enable you to customize and streamline order processing by specifying an action that occurs automatically when specific conditions are met.
Every automation rule has three components:
1. **Trigger**: Specifies when the rule applies. In Jetpack, the trigger is always **order import** (when an order enters the system from an integration).
2. **Action**: Specifies what happens when the rule is met. Examples: add a product to the order, request signature at delivery, assign a specific fulfillment center.
3. **Conditions** (optional): Specifies restrictions that must be met for the action to occur. Examples: order total over \$100, order contains specific tag, shipping to specific country.
**Example Rule**: "When an order is imported **with the tag 'VIP'** (condition) and **order total is over \$100** (condition), **add a free gift card** (action) to the order."
Learn more about creating and configuring automation rules in our [Automation Rules](/fulfillment/rules-customization-kitting/automation-rules) guide.
***
## Accessing the Automation Rules Page
From the left-hand navigation bar, click **Orders** to expand the Orders menu.
In the expanded menu, click **Rules** to view all rule types.
On the Rules page, locate the **Automation Rules** tile and click **Manage Rule**.
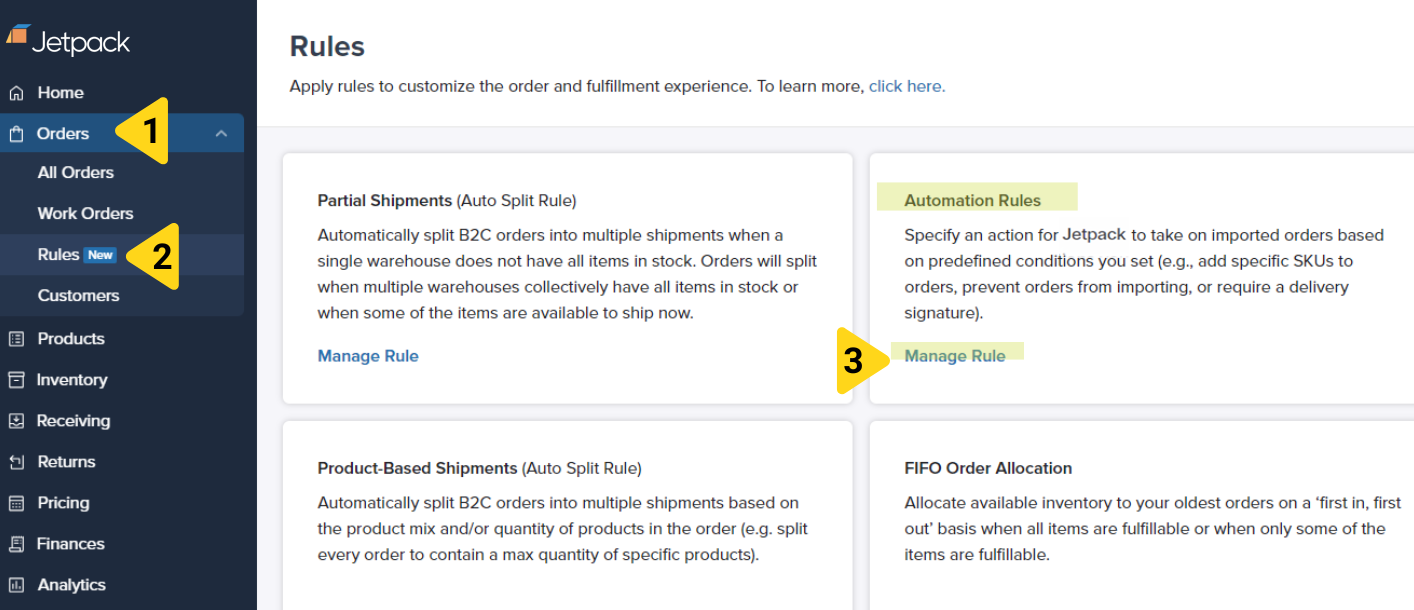 You'll be redirected to the Automation Rules page where you can view and manage all automation rules.
***
## What You Can View on the Automation Rules Page
The Automation Rules page displays all automation rules configured for your account, including:
* **Rule Name** - Descriptive name for the rule
* **Status** - Whether the rule is currently enabled or disabled
* **Action** - What the rule does (add product, require signature, etc.)
* **Conditions** - What criteria must be met for the rule to trigger
* **Integration/Platform** - Which integrations the rule applies to
***
## Viewing Rule Details
On the Automation Rules page, find the rule you want to view in the list of configured rules.
You'll be redirected to the Automation Rules page where you can view and manage all automation rules.
***
## What You Can View on the Automation Rules Page
The Automation Rules page displays all automation rules configured for your account, including:
* **Rule Name** - Descriptive name for the rule
* **Status** - Whether the rule is currently enabled or disabled
* **Action** - What the rule does (add product, require signature, etc.)
* **Conditions** - What criteria must be met for the rule to trigger
* **Integration/Platform** - Which integrations the rule applies to
***
## Viewing Rule Details
On the Automation Rules page, find the rule you want to view in the list of configured rules.
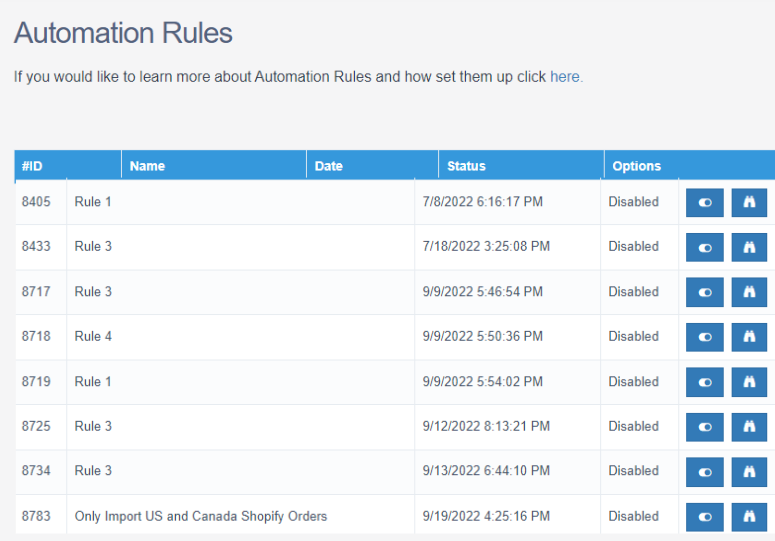 Click the **binocular icon** (view/details icon) in the Options column next to the rule. A details panel or popup will display the complete rule configuration, including:
* Complete list of conditions
* The action that will be performed
* Which integrations/platforms the rule applies to
* When the rule was created and last modified
***
## Enabling and Disabling Rules
You can activate or deactivate rules without deleting them, giving you flexibility to pause rules temporarily.
On the Automation Rules page, find the rule in the list of configured rules.
Click the **toggle icon** in the Options column next to the rule. The status updates immediately:
* **Green/On** = Rule is active and will be applied to orders
* **Grey/Off** = Rule is disabled and will not be applied
**When to disable a rule**:
* Testing a new fulfillment workflow without the rule interfering
* Temporarily pausing seasonal rules (e.g., holiday gift additions)
* Troubleshooting order processing issues
* Making changes to inventory or product configurations that affect the rule
**Important**: Newly created rules appear **disabled by default**. Review the rule carefully and enable it when you're ready to use it.
***
## Supported Actions
The Jetpack dashboard supports five automation rule actions:
| Action | What It Does |
| ----------------------------------------- | ------------------------------------------------------------------------------ |
| **Add X product to orders** | Automatically adds a specific SKU to orders meeting the conditions |
| **Ignore orders** | Prevents orders from being imported into Jetpack (order will not be fulfilled) |
| **Request signature at delivery** | Applies signature requirement to orders (additional fees apply) |
| **Exclude gift messages from orders** | Prevents gift messages from printing on packing slips for specific orders |
| **Set the fulfillment center assignment** | Routes orders to a specific FC based on conditions |
***
## Supported Conditions
Conditions vary depending on your ecommerce platform. The Jetpack dashboard supports eight conditions:
| Condition | What It Checks | Supported Platforms |
| -------------------------- | -------------------------------------------------------- | -------------------------------------------------------------------------------------------------------------------- |
| **Order Total in Dollars** | Total amount paid (including tax and additional charges) | BigCommerce, Developer API, eBay, ShipStation, Shopify, Squarespace, WooCommerce, NetSuite |
| **Tags** | Matches a specific tag on the order | Developer API, eBay, ShipStation, Shopify, WooCommerce, NetSuite, Squarespace (must match verbatim) |
| **Notes** | Matches specific order note text | ShipStation only |
| **MarketPlace Source** | Specific to ShipStation rules | eBay |
| **Total Item Quantity** | Total items or bundles per order | BigCommerce, eBay, ShipStation, Shopify, Squarespace, WooCommerce, NetSuite (applies to bundles as count of bundles) |
| **Shipping Method** | Shipping method text as shown in the store | Developer API, eBay, Shopify, Squarespace |
| **Customer Order Count** | Total number of orders per customer per store | ShipStation only |
| **Shipping Country Code** | Two-letter country code (e.g., US) | Amazon, BigCommerce, Developer API, eBay, ShipStation, Shopify, Squarespace, WooCommerce, NetSuite |
***
## Creating or Modifying Rules
**Important**: You cannot create or edit automation rules directly from the Automation Rules page. All rule creation and modification must be done by Jetpack Care. You can, however, create and manage [destination-based rules.](/fulfillment/rules-customization-kitting/destination-based-rules)
### How to Request a New Rule or Modification
Use Slack or email to reach Jetpack Care.
Give Jetpack Care the following information:
* **Action** you want performed (from the supported actions list above)
* **Conditions** that should trigger the action (from the supported conditions list above)
* **Integration/platform** the rule should apply to
* **Rule name** (descriptive name to identify the rule)
Jetpack Care will create the rule and it will appear on your Automation Rules page as **disabled by default**.
Review the rule carefully, test it if needed using [Automatic Processing Pause](/fulfillment/account-setup/shipping-preferences/automatic-processing-pause), and **enable it when ready**.
### Important Guidelines for Requesting Rules
When requesting automation rules, keep these guidelines in mind:
| Guideline | Details |
| -------------------------- | -------------------------------------------------------------------------------------------------------------------------------------------------------------------------------------------------------------------------------------------------- |
| **Rule Scope** | Automation rules apply only to orders imported via ecommerce integrations. Rules do NOT apply to manually created orders or bulk Excel uploads. |
| **Platform Application** | If you have multiple stores on the same ecommerce platform, the same rules apply across all stores. |
| **Rule Specificity** | Rules cannot be created for specific items in the cart (e.g., "add product X if the order contains product Y"). Use the Tags condition instead for such scenarios. |
| **Testing Rules** | After a rule is created, enable [Automatic Processing Pause](/fulfillment/account-setup/shipping-preferences/automatic-processing-pause) and test with a sample order. If the rule isn't working as expected, disable it and contact Jetpack Care. |
| **Rule Hierarchy** | There is no hierarchy between multiple rules. If conditions are met for multiple rules, all corresponding actions will be executed. |
| **Avoid Double Negatives** | Avoid using double negative conditions (e.g., "if the order doesn't contain tag X"). This can cause confusion and unexpected behavior. |
***
## Automation Rules Page FAQs
No, all automation rule creation and modification must be done by Jetpack Care. This ensures rules are configured correctly and won't cause unintended order processing issues.
To request a new rule or modify an existing one, use Slack or email.
All newly created rules appear **disabled by default** as a safety measure. This gives you the opportunity to:
* Review the rule configuration
* Enable [Automatic Processing Pause](/fulfillment/account-setup/shipping-preferences/automatic-processing-pause) for testing
* Test the rule with a sample order
* Verify it works as expected before it affects live orders
Once you've reviewed and tested the rule, use the toggle to enable it.
No, automation rules only apply to orders **imported via ecommerce integrations**. They do not apply to:
* Manually created orders (created directly in the Jetpack dashboard)
* Bulk Excel uploads
* API orders (unless specified in rule configuration)
If you need specific actions for manually created orders, you'll need to configure them manually during order creation.
No, automation rules cannot be created for specific items in the cart. However, you can achieve this by using **order tags**:
1. In your ecommerce platform, create an automation that adds a specific tag when an order contains the target product
2. Create a Jetpack automation rule with the **Tags** condition that matches that tag
3. Set the action to add the desired product
**Example**: If a Shopify order contains Product A, tag it with "add-gift". Then create a Jetpack rule: "If order has tag 'add-gift', add Product B."
If multiple automation rules have conditions that are all met by a single order, **all corresponding actions will be executed**. There is no hierarchy or priority system.
**Example**: If you have two rules:
* Rule 1: "If order total > \$100, add free gift card"
* Rule 2: "If order has tag 'VIP', require signature"
And an order has both a total over \$100 AND the VIP tag, both actions will occur (gift card added AND signature required).
Yes! Follow this recommended testing process:
After Jetpack Care creates your rule, it will appear on your Automation Rules page as disabled.
Navigate to your account settings and enable [Automatic Processing Pause](/fulfillment/account-setup/shipping-preferences/automatic-processing-pause) to prevent test orders from being fulfilled.
On the Automation Rules page, toggle the rule to the enabled state.
Create a test order that meets the rule's conditions, then verify the rule worked as expected by checking if the action was applied correctly.
* **If correct**: Disable Automatic Processing Pause to resume normal fulfillment
* **If incorrect**: Disable the rule and contact Jetpack Care for adjustments
This prevents the rule from affecting live orders during testing.
***
## Let's Dive Deeper
Navigate and filter all your orders with customizable views
Complete guide to creating and using automation rules
Route orders to specific FCs based on destination
Automatically split orders by destination or conditions
Test rules safely with processing pause
View complete order information and actions
Click the **binocular icon** (view/details icon) in the Options column next to the rule. A details panel or popup will display the complete rule configuration, including:
* Complete list of conditions
* The action that will be performed
* Which integrations/platforms the rule applies to
* When the rule was created and last modified
***
## Enabling and Disabling Rules
You can activate or deactivate rules without deleting them, giving you flexibility to pause rules temporarily.
On the Automation Rules page, find the rule in the list of configured rules.
Click the **toggle icon** in the Options column next to the rule. The status updates immediately:
* **Green/On** = Rule is active and will be applied to orders
* **Grey/Off** = Rule is disabled and will not be applied
**When to disable a rule**:
* Testing a new fulfillment workflow without the rule interfering
* Temporarily pausing seasonal rules (e.g., holiday gift additions)
* Troubleshooting order processing issues
* Making changes to inventory or product configurations that affect the rule
**Important**: Newly created rules appear **disabled by default**. Review the rule carefully and enable it when you're ready to use it.
***
## Supported Actions
The Jetpack dashboard supports five automation rule actions:
| Action | What It Does |
| ----------------------------------------- | ------------------------------------------------------------------------------ |
| **Add X product to orders** | Automatically adds a specific SKU to orders meeting the conditions |
| **Ignore orders** | Prevents orders from being imported into Jetpack (order will not be fulfilled) |
| **Request signature at delivery** | Applies signature requirement to orders (additional fees apply) |
| **Exclude gift messages from orders** | Prevents gift messages from printing on packing slips for specific orders |
| **Set the fulfillment center assignment** | Routes orders to a specific FC based on conditions |
***
## Supported Conditions
Conditions vary depending on your ecommerce platform. The Jetpack dashboard supports eight conditions:
| Condition | What It Checks | Supported Platforms |
| -------------------------- | -------------------------------------------------------- | -------------------------------------------------------------------------------------------------------------------- |
| **Order Total in Dollars** | Total amount paid (including tax and additional charges) | BigCommerce, Developer API, eBay, ShipStation, Shopify, Squarespace, WooCommerce, NetSuite |
| **Tags** | Matches a specific tag on the order | Developer API, eBay, ShipStation, Shopify, WooCommerce, NetSuite, Squarespace (must match verbatim) |
| **Notes** | Matches specific order note text | ShipStation only |
| **MarketPlace Source** | Specific to ShipStation rules | eBay |
| **Total Item Quantity** | Total items or bundles per order | BigCommerce, eBay, ShipStation, Shopify, Squarespace, WooCommerce, NetSuite (applies to bundles as count of bundles) |
| **Shipping Method** | Shipping method text as shown in the store | Developer API, eBay, Shopify, Squarespace |
| **Customer Order Count** | Total number of orders per customer per store | ShipStation only |
| **Shipping Country Code** | Two-letter country code (e.g., US) | Amazon, BigCommerce, Developer API, eBay, ShipStation, Shopify, Squarespace, WooCommerce, NetSuite |
***
## Creating or Modifying Rules
**Important**: You cannot create or edit automation rules directly from the Automation Rules page. All rule creation and modification must be done by Jetpack Care. You can, however, create and manage [destination-based rules.](/fulfillment/rules-customization-kitting/destination-based-rules)
### How to Request a New Rule or Modification
Use Slack or email to reach Jetpack Care.
Give Jetpack Care the following information:
* **Action** you want performed (from the supported actions list above)
* **Conditions** that should trigger the action (from the supported conditions list above)
* **Integration/platform** the rule should apply to
* **Rule name** (descriptive name to identify the rule)
Jetpack Care will create the rule and it will appear on your Automation Rules page as **disabled by default**.
Review the rule carefully, test it if needed using [Automatic Processing Pause](/fulfillment/account-setup/shipping-preferences/automatic-processing-pause), and **enable it when ready**.
### Important Guidelines for Requesting Rules
When requesting automation rules, keep these guidelines in mind:
| Guideline | Details |
| -------------------------- | -------------------------------------------------------------------------------------------------------------------------------------------------------------------------------------------------------------------------------------------------- |
| **Rule Scope** | Automation rules apply only to orders imported via ecommerce integrations. Rules do NOT apply to manually created orders or bulk Excel uploads. |
| **Platform Application** | If you have multiple stores on the same ecommerce platform, the same rules apply across all stores. |
| **Rule Specificity** | Rules cannot be created for specific items in the cart (e.g., "add product X if the order contains product Y"). Use the Tags condition instead for such scenarios. |
| **Testing Rules** | After a rule is created, enable [Automatic Processing Pause](/fulfillment/account-setup/shipping-preferences/automatic-processing-pause) and test with a sample order. If the rule isn't working as expected, disable it and contact Jetpack Care. |
| **Rule Hierarchy** | There is no hierarchy between multiple rules. If conditions are met for multiple rules, all corresponding actions will be executed. |
| **Avoid Double Negatives** | Avoid using double negative conditions (e.g., "if the order doesn't contain tag X"). This can cause confusion and unexpected behavior. |
***
## Automation Rules Page FAQs
No, all automation rule creation and modification must be done by Jetpack Care. This ensures rules are configured correctly and won't cause unintended order processing issues.
To request a new rule or modify an existing one, use Slack or email.
All newly created rules appear **disabled by default** as a safety measure. This gives you the opportunity to:
* Review the rule configuration
* Enable [Automatic Processing Pause](/fulfillment/account-setup/shipping-preferences/automatic-processing-pause) for testing
* Test the rule with a sample order
* Verify it works as expected before it affects live orders
Once you've reviewed and tested the rule, use the toggle to enable it.
No, automation rules only apply to orders **imported via ecommerce integrations**. They do not apply to:
* Manually created orders (created directly in the Jetpack dashboard)
* Bulk Excel uploads
* API orders (unless specified in rule configuration)
If you need specific actions for manually created orders, you'll need to configure them manually during order creation.
No, automation rules cannot be created for specific items in the cart. However, you can achieve this by using **order tags**:
1. In your ecommerce platform, create an automation that adds a specific tag when an order contains the target product
2. Create a Jetpack automation rule with the **Tags** condition that matches that tag
3. Set the action to add the desired product
**Example**: If a Shopify order contains Product A, tag it with "add-gift". Then create a Jetpack rule: "If order has tag 'add-gift', add Product B."
If multiple automation rules have conditions that are all met by a single order, **all corresponding actions will be executed**. There is no hierarchy or priority system.
**Example**: If you have two rules:
* Rule 1: "If order total > \$100, add free gift card"
* Rule 2: "If order has tag 'VIP', require signature"
And an order has both a total over \$100 AND the VIP tag, both actions will occur (gift card added AND signature required).
Yes! Follow this recommended testing process:
After Jetpack Care creates your rule, it will appear on your Automation Rules page as disabled.
Navigate to your account settings and enable [Automatic Processing Pause](/fulfillment/account-setup/shipping-preferences/automatic-processing-pause) to prevent test orders from being fulfilled.
On the Automation Rules page, toggle the rule to the enabled state.
Create a test order that meets the rule's conditions, then verify the rule worked as expected by checking if the action was applied correctly.
* **If correct**: Disable Automatic Processing Pause to resume normal fulfillment
* **If incorrect**: Disable the rule and contact Jetpack Care for adjustments
This prevents the rule from affecting live orders during testing.
***
## Let's Dive Deeper
Navigate and filter all your orders with customizable views
Complete guide to creating and using automation rules
Route orders to specific FCs based on destination
Automatically split orders by destination or conditions
Test rules safely with processing pause
View complete order information and actions

Questions? Contact Jetpack Care.
If you have any questions or run into issues, you can always contact Jetpack Care for help. Our team is always here to assist via Slack, phone, or email!