> ## Documentation Index
> Fetch the complete documentation index at: https://help.jetpack3pl.com/llms.txt
> Use this file to discover all available pages before exploring further.
# Orders Page
> Master your order management with customizable views, advanced filtering, bulk actions, and real-time tracking across all your D2C and B2B shipments.
The Orders page is your command center for tracking and managing every shipment flowing through your fulfillment network. Whether you're monitoring hundreds of daily D2C orders or coordinating complex B2B shipments, this page gives you complete visibility into order statuses, carrier details, customer information, and fulfillment costs—all in one customizable interface.
## What You Can Do from the Orders Page
The Orders page provides comprehensive order management capabilities:
* **Sync, import, and create orders** - Automatically pull orders from integrations or [create them manually](/fulfillment/b2b/creating-manual-b2b-orders)
* **Search and filter orders** - Find specific orders or groups using powerful search and filtering tools
* **Customize your view** - Choose between Order View and Shipment View, select visible columns, and save custom filtered views
* **Perform bulk actions** - Apply actions to multiple orders at once, including holds, cancellations, and inventory management
* **Export order data** - Download up to a million lines of order data with expanded column options
* **Access shipment details** - Click any Order ID to open a details panel without leaving the page
***
## Understanding Orders vs. Shipments
Before diving into the Orders page, it's important to understand the distinction between orders and shipments:
**Order**: The complete record of everything purchased by your customer, including all shipping information and products. Orders are pulled in through an [integration](/fulfillment/account-setup/integrating-store) or [created manually](/fulfillment/b2b/creating-manual-b2b-orders).
**Shipment**: The individual package(s) being shipped to fulfill an order. When an order requires multiple boxes to ship all products, our packing team splits it during the packing process. Each package results in a separate shipment with its own tracking number.
**Example**: If 2 boxes are required to ship a customer's order, you'll see 1 order in the Jetpack dashboard and 2 shipments.
The Orders page lets you toggle between **Order View** (showing orders with a column indicating how many shipments were created) and **Shipment View** (showing each individual shipment separately).
***
## Accessing the Orders Page
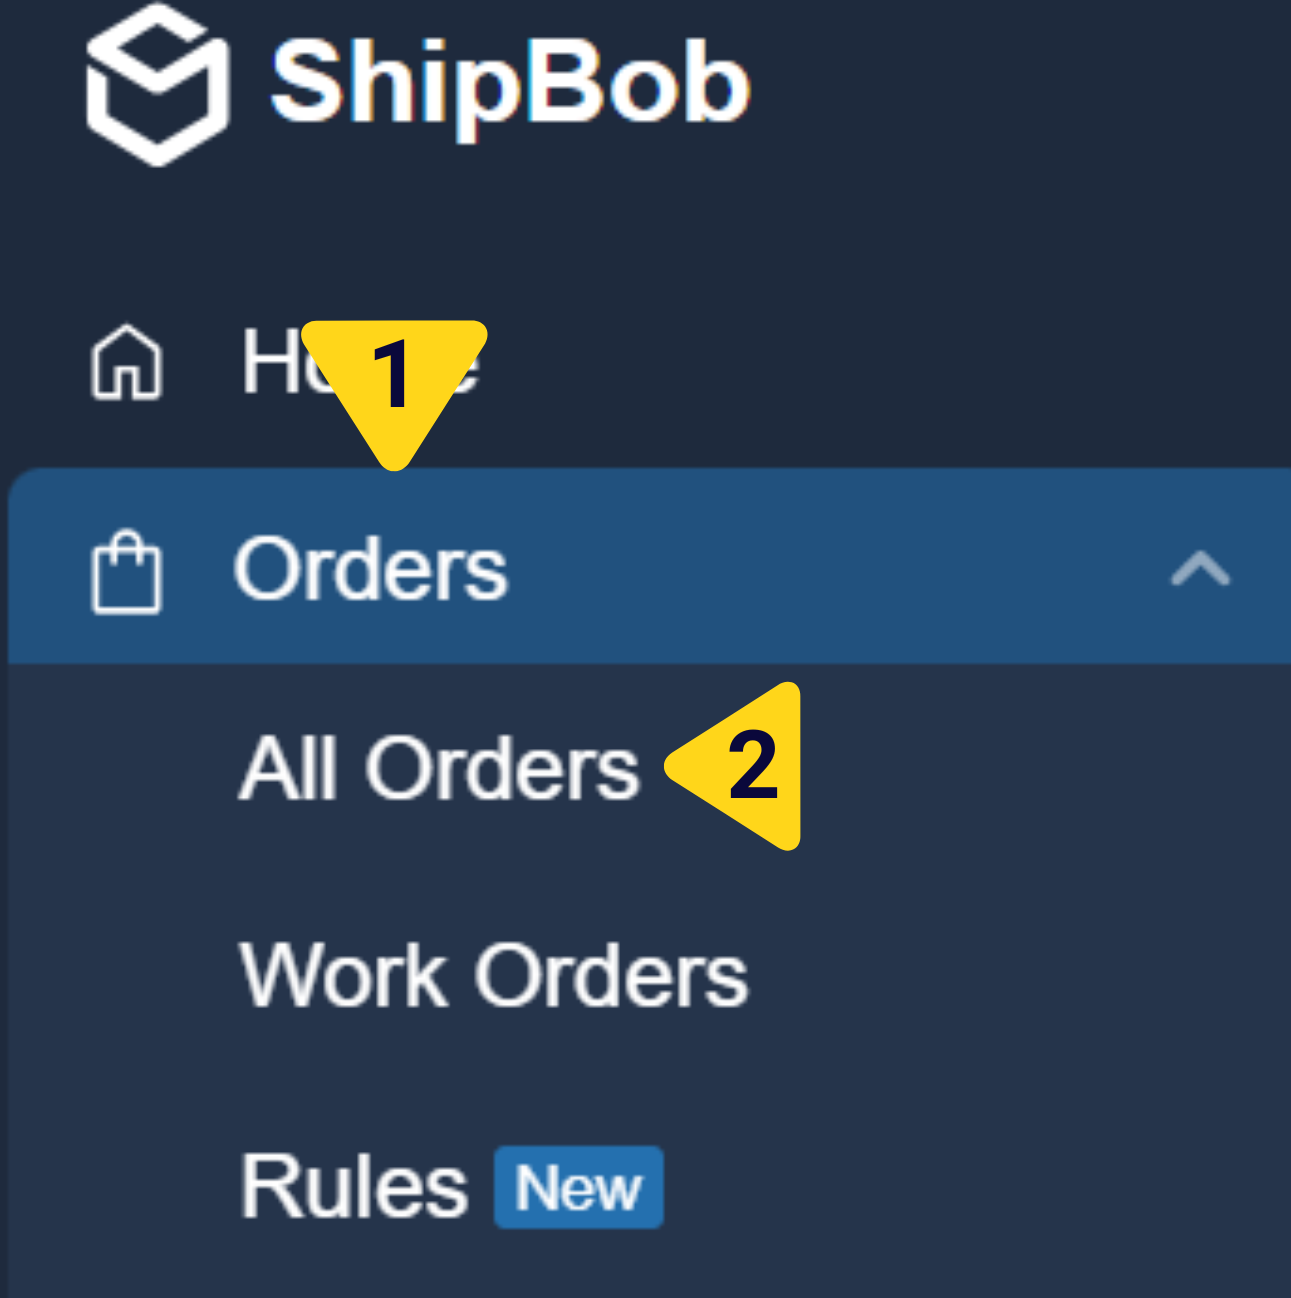
From the Jetpack dashboard, click **Orders** on the left-hand navigation bar. Additional menu options will appear.
Click **All Orders** from the menu.
 ***
## Order View vs. Shipment View
The Orders page offers two distinct viewing modes to match your workflow needs.
### Order View
***
## Order View vs. Shipment View
The Orders page offers two distinct viewing modes to match your workflow needs.
### Order View
 Order View displays each store order as a single row, regardless of how many shipments were created to fulfill it. This view is ideal when you need to:
* Track orders as your customers see them
* Understand order splitting patterns
* Match orders to store records using Store Order IDs
* Review total order fulfillment costs
The **# of Shipments** column shows how many packages were created for each order. Click the arrow to the left of the Order ID to expand and view the individual shipments created for that order.
### Shipment View
Order View displays each store order as a single row, regardless of how many shipments were created to fulfill it. This view is ideal when you need to:
* Track orders as your customers see them
* Understand order splitting patterns
* Match orders to store records using Store Order IDs
* Review total order fulfillment costs
The **# of Shipments** column shows how many packages were created for each order. Click the arrow to the left of the Order ID to expand and view the individual shipments created for that order.
### Shipment View
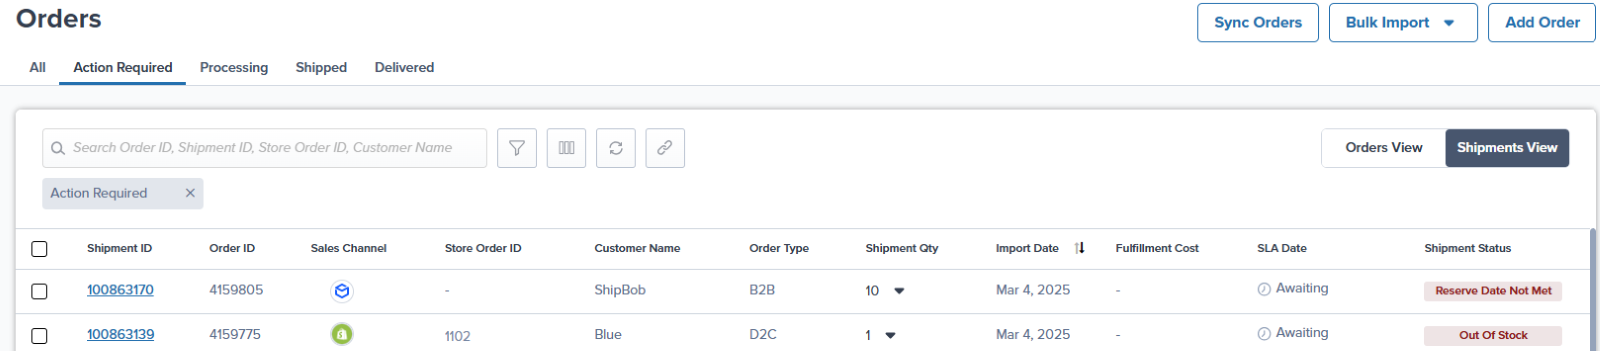 Shipment View displays each individual shipment as a separate row. This view is ideal when you need to:
* Track carrier performance and delivery times
* Monitor individual tracking numbers
* Review package-level dimensions and weights
* Analyze per-shipment fulfillment costs
Shipment View provides similar functionality to the legacy Orders page, with enhanced data points and customization options.
### Switching Between Views
Switching between views is easily done via the toggle at the top right of the orders page.
***
## Understanding the Orders Page Layout
The Orders page is organized with several key interface elements:
* **Top Navigation Bar** - Shows the 5 default view tabs (All, Action Required, Processing, Shipped, Delivered) plus any custom saved views
* **Search Bar** - Located below the navigation, allows searching by Order ID, Shipment ID, Store Order ID, Customer Name, or Tracking Number
* **Action Buttons** - Filter icon, column customization icon, refresh, and Save New View button
* **View Toggle** - Switch between Orders View and Shipments View in the top right
* **Data Table** - Displays orders/shipments with customizable columns
* **Shipment Details Panel** - Slides in from the right when you click an Order ID
***
## Customizing Your View
One of the most powerful features of the Orders page is the ability to customize exactly what information you see.
### Available Columns
The Orders page now includes expanded data columns you can add to your view:
| Column | What It Shows |
| -------------------------- | ------------------------------------------------------------------ |
| **Order ID / Shipment ID** | Unique identifier in the Jetpack dashboard (always visible) |
| **Store Order ID** | Unique order number from your integrated ecommerce store |
| **Import Date** | Date and time the order was imported or created |
| **Ship Date** | Date the order received its "Order Picked Up" log from the carrier |
| **Delivery Date** | Date the order was delivered to the customer |
| **Source** | How the order was created (integration, manual, API, bulk upload) |
| **Sales Channel** | The store or marketplace where the order originated |
| **Ingestion Channel** | How the order entered Jetpack (store integration, API, or manual) |
| **Order Type** | Order classification (B2C, B2B, Kitting, etc.) |
| **Customer** | Recipient's name |
| **Fulfillment Center** | Which FC is processing or processed the shipment |
| **Ship Option** | Selected shipping speed (Standard, Expedited, Overnight, etc.) |
| **Carrier** | Assigned shipping carrier (UPS, FedEx, USPS, etc.) |
| **Tracking ID** | Carrier tracking number (appears after labeling) |
| **Fulfillment Cost** | Total cost charged for order fulfillment |
| **Order Status** | Current status in the fulfillment workflow |
| **# of Shipments** | How many packages were created (Order View only) |
**Pro tip**: Hover your cursor over information in any column to see additional details. For example, hovering over Order Status reveals more context about why an order is in that status.
### Customizing Columns
Click the **3-column icon** at the top right of the page.
In the **Customize Columns** panel, check the boxes next to columns you want to include. Click and drag the **2x3 dot icon** (to the right of each column option) to rearrange column order.
Shipment View displays each individual shipment as a separate row. This view is ideal when you need to:
* Track carrier performance and delivery times
* Monitor individual tracking numbers
* Review package-level dimensions and weights
* Analyze per-shipment fulfillment costs
Shipment View provides similar functionality to the legacy Orders page, with enhanced data points and customization options.
### Switching Between Views
Switching between views is easily done via the toggle at the top right of the orders page.
***
## Understanding the Orders Page Layout
The Orders page is organized with several key interface elements:
* **Top Navigation Bar** - Shows the 5 default view tabs (All, Action Required, Processing, Shipped, Delivered) plus any custom saved views
* **Search Bar** - Located below the navigation, allows searching by Order ID, Shipment ID, Store Order ID, Customer Name, or Tracking Number
* **Action Buttons** - Filter icon, column customization icon, refresh, and Save New View button
* **View Toggle** - Switch between Orders View and Shipments View in the top right
* **Data Table** - Displays orders/shipments with customizable columns
* **Shipment Details Panel** - Slides in from the right when you click an Order ID
***
## Customizing Your View
One of the most powerful features of the Orders page is the ability to customize exactly what information you see.
### Available Columns
The Orders page now includes expanded data columns you can add to your view:
| Column | What It Shows |
| -------------------------- | ------------------------------------------------------------------ |
| **Order ID / Shipment ID** | Unique identifier in the Jetpack dashboard (always visible) |
| **Store Order ID** | Unique order number from your integrated ecommerce store |
| **Import Date** | Date and time the order was imported or created |
| **Ship Date** | Date the order received its "Order Picked Up" log from the carrier |
| **Delivery Date** | Date the order was delivered to the customer |
| **Source** | How the order was created (integration, manual, API, bulk upload) |
| **Sales Channel** | The store or marketplace where the order originated |
| **Ingestion Channel** | How the order entered Jetpack (store integration, API, or manual) |
| **Order Type** | Order classification (B2C, B2B, Kitting, etc.) |
| **Customer** | Recipient's name |
| **Fulfillment Center** | Which FC is processing or processed the shipment |
| **Ship Option** | Selected shipping speed (Standard, Expedited, Overnight, etc.) |
| **Carrier** | Assigned shipping carrier (UPS, FedEx, USPS, etc.) |
| **Tracking ID** | Carrier tracking number (appears after labeling) |
| **Fulfillment Cost** | Total cost charged for order fulfillment |
| **Order Status** | Current status in the fulfillment workflow |
| **# of Shipments** | How many packages were created (Order View only) |
**Pro tip**: Hover your cursor over information in any column to see additional details. For example, hovering over Order Status reveals more context about why an order is in that status.
### Customizing Columns
Click the **3-column icon** at the top right of the page.
In the **Customize Columns** panel, check the boxes next to columns you want to include. Click and drag the **2x3 dot icon** (to the right of each column option) to rearrange column order.
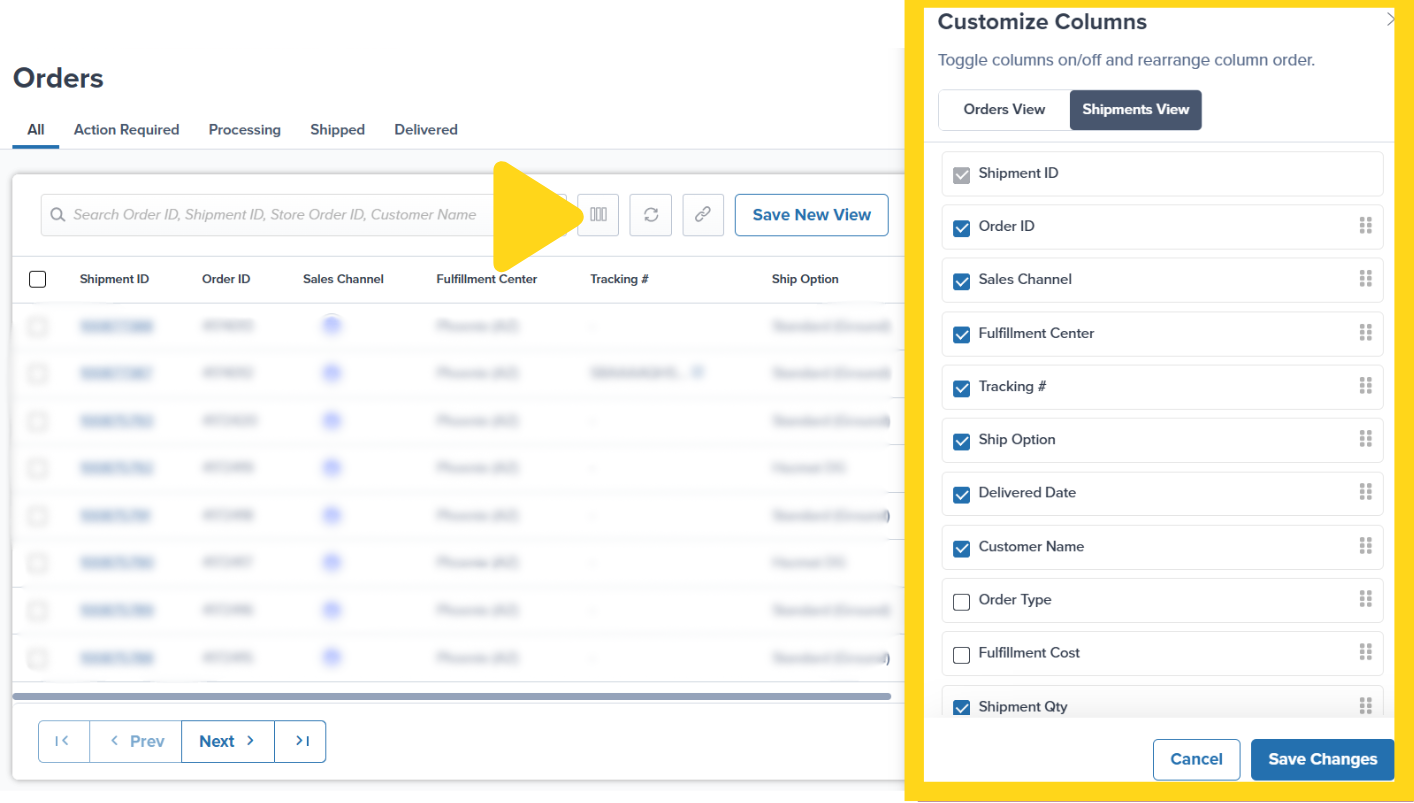 Click **Save Changes**.
You can also adjust column widths by clicking and dragging the column width icon that appears when hovering over column headers.
***
## Filtering Your Orders
The Orders page offers powerful filtering capabilities to help you segment orders based on specific criteria.
### Accessing Filters
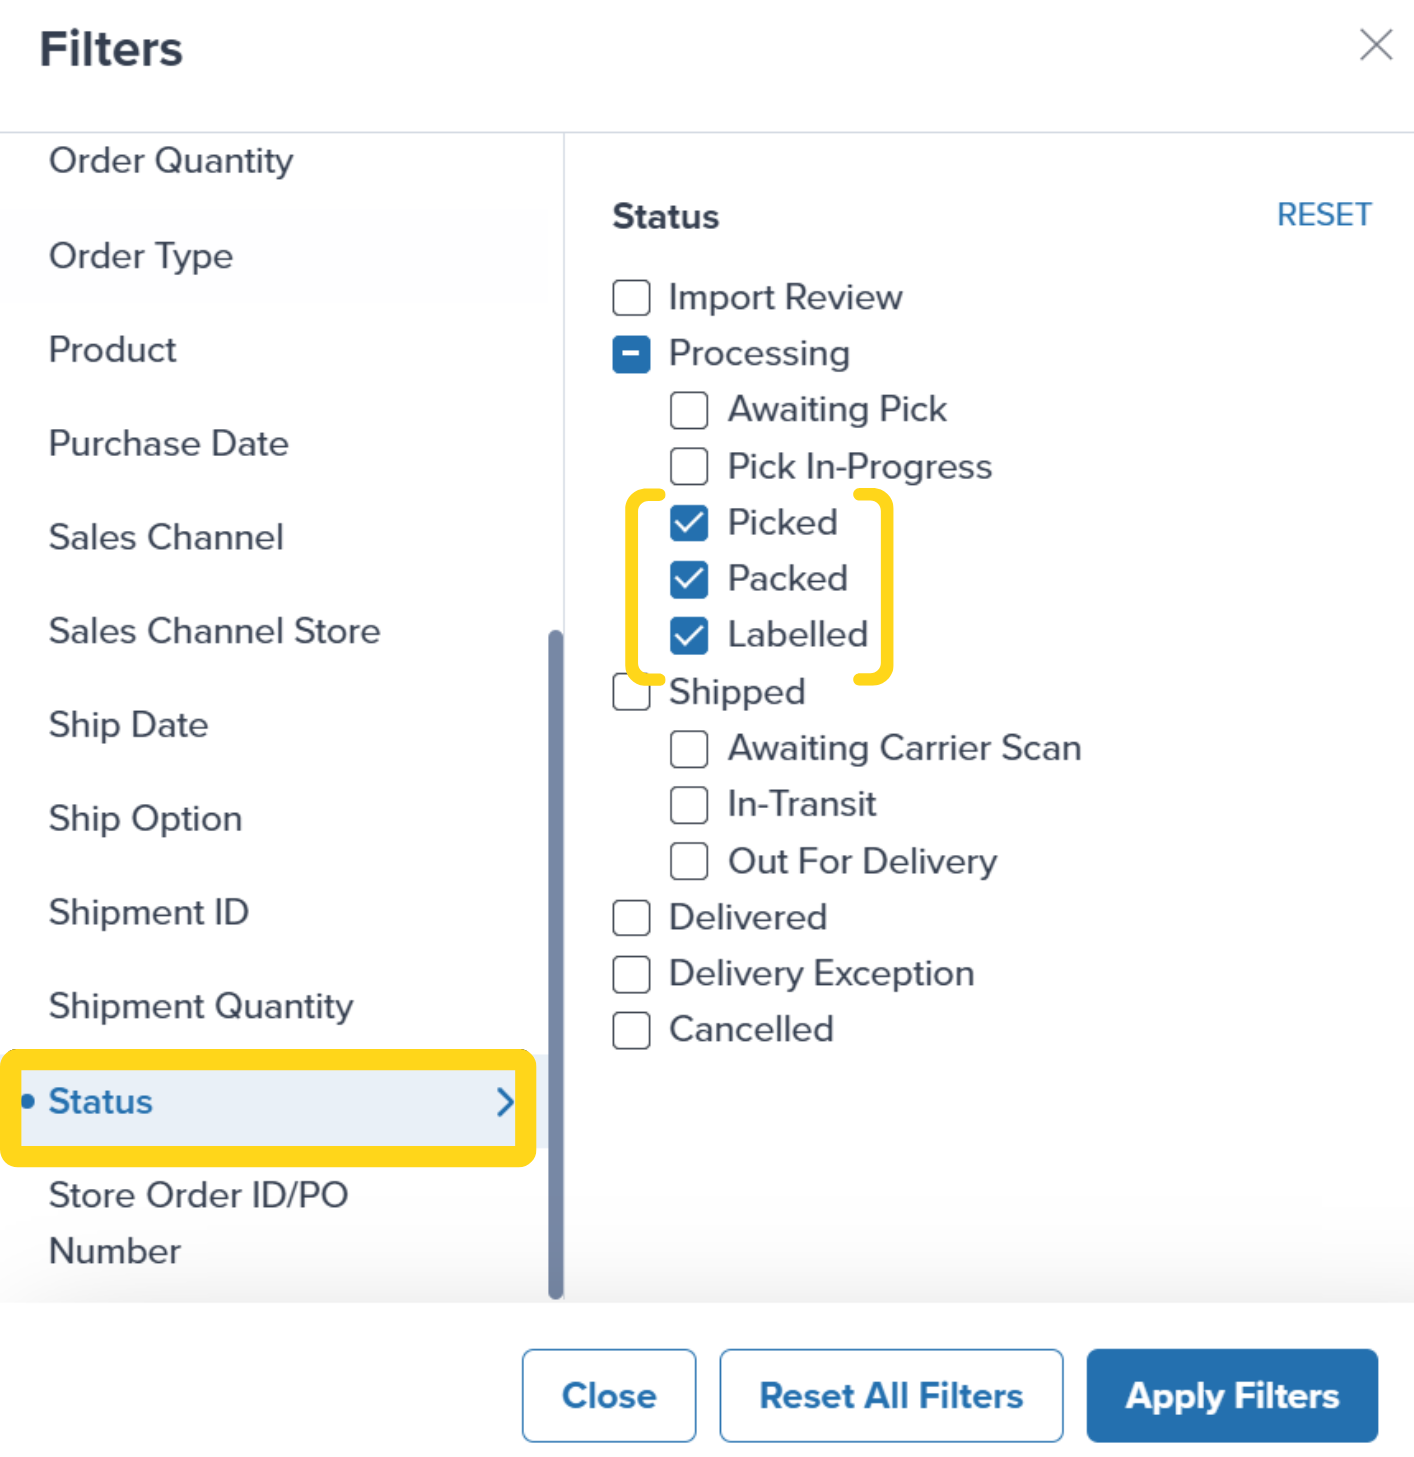
Click the **funnel icon** at the top right of the page. The **Filters** panel will slide open from the right side.
Click **Save Changes**.
You can also adjust column widths by clicking and dragging the column width icon that appears when hovering over column headers.
***
## Filtering Your Orders
The Orders page offers powerful filtering capabilities to help you segment orders based on specific criteria.
### Accessing Filters
Click the **funnel icon** at the top right of the page. The **Filters** panel will slide open from the right side.
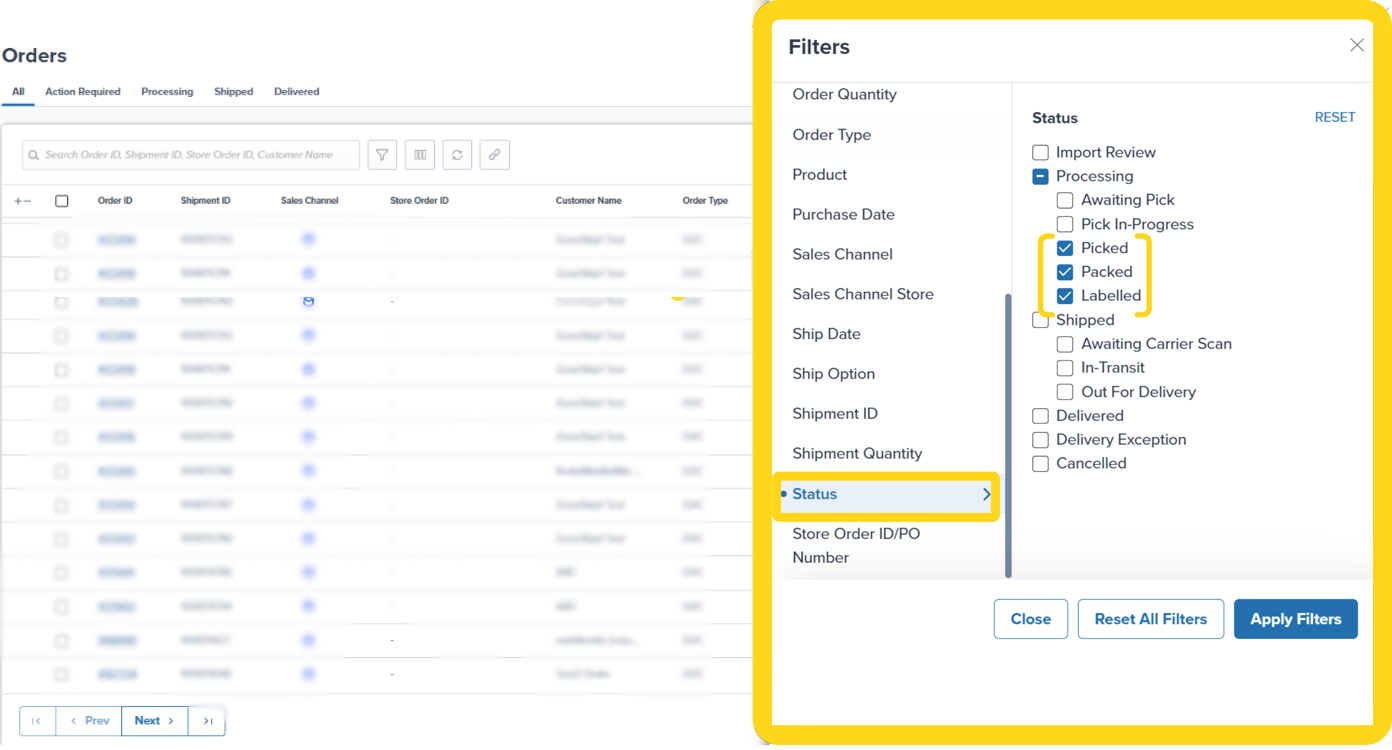 In the left column of the filter panel, click the category you want to filter by (such as Customer, Delivered Date, Destination Country, or Status).
In the right column, select or enter your specific filter criteria. An **active indicator dot** appears next to any filter category that has active criteria applied.
In the left column of the filter panel, click the category you want to filter by (such as Customer, Delivered Date, Destination Country, or Status).
In the right column, select or enter your specific filter criteria. An **active indicator dot** appears next to any filter category that has active criteria applied.
 ### Available Filter Categories
| Filter Category | What You Can Filter By |
| ------------------------- | -------------------------------------------------- |
| **Action Required** | Specific issues preventing fulfillment |
| **Customer** | Customer name or email address |
| **Delivered Date** | Date range when orders were delivered |
| **Destination Country** | Country where orders are shipping |
| **Fulfillment Center** | Which FC is processing orders |
| **Import Date** | Date range when orders entered Jetpack |
| **Ingestion Channel** | How orders were created (integration, manual, API) |
| **Order Type** | Order classification (B2C, B2B, Kitting, etc.) |
| **Sales Channel** | Store or marketplace source |
| **Ship Date** | Date range when orders shipped |
| **Ship Option** | Shipping speed selected |
| **Status** | Order/shipment status in fulfillment workflow |
| **Store Shipping Method** | Shipping method name as shown in your store |
| **Tracking ID** | Specific carrier tracking numbers |
### Common Filtering Scenarios
Here are practical examples of how to use filters effectively:
**View orders with tracking numbers that haven't shipped yet:**
* Apply Status filter → Check **Labeled**
**Filter by store source (Shopify, Amazon, etc.):**
* Apply Sales Channel filter → Check desired sources (Amazon, Shopify, etc.)
**View all labeled and shipped orders:**
* Apply Status filter → Check **Labeled, Awaiting Carrier Scan, In-Transit, Out For Delivery, Delivered, Delivery Exception**
**View picked orders awaiting shipment:**
* Apply Status filter → Check **Picked, Packed, Labeled**
**View orders with dimensions awaiting shipment:**
* Apply Status filter → Check **Packed, Labeled**
**View orders that completed fulfillment:**
* Apply Status filter → Check **Awaiting Carrier Scan**
***
## Saving Custom Views
After customizing your columns and applying filters, you can save your configuration as a named view for quick access later.
### Creating a Saved View
Choose which columns to display and apply any filters to narrow down the orders shown (such as specific fulfillment centers, date ranges, or order statuses).
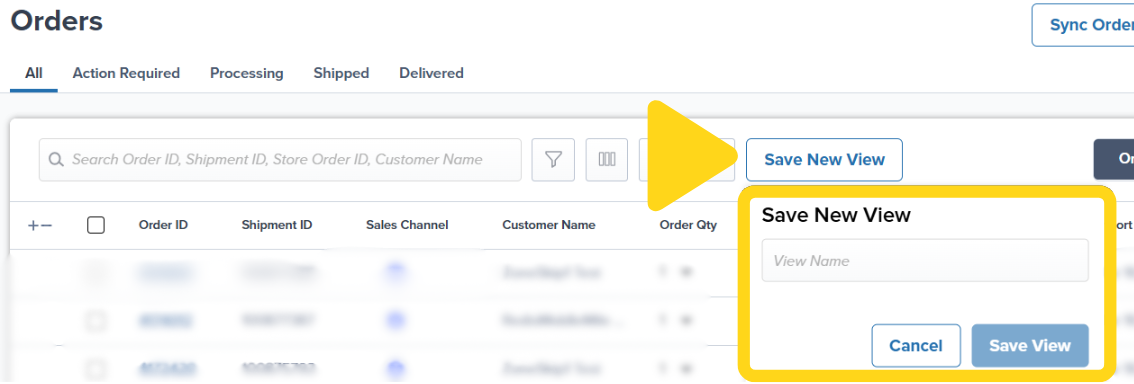
Click the **Save New View** button, enter a name for the view in the **View Name** textbox, then click **Save View**.
Your saved view will be added to the top navigation bar on the Orders page for one-click access.
### Available Filter Categories
| Filter Category | What You Can Filter By |
| ------------------------- | -------------------------------------------------- |
| **Action Required** | Specific issues preventing fulfillment |
| **Customer** | Customer name or email address |
| **Delivered Date** | Date range when orders were delivered |
| **Destination Country** | Country where orders are shipping |
| **Fulfillment Center** | Which FC is processing orders |
| **Import Date** | Date range when orders entered Jetpack |
| **Ingestion Channel** | How orders were created (integration, manual, API) |
| **Order Type** | Order classification (B2C, B2B, Kitting, etc.) |
| **Sales Channel** | Store or marketplace source |
| **Ship Date** | Date range when orders shipped |
| **Ship Option** | Shipping speed selected |
| **Status** | Order/shipment status in fulfillment workflow |
| **Store Shipping Method** | Shipping method name as shown in your store |
| **Tracking ID** | Specific carrier tracking numbers |
### Common Filtering Scenarios
Here are practical examples of how to use filters effectively:
**View orders with tracking numbers that haven't shipped yet:**
* Apply Status filter → Check **Labeled**
**Filter by store source (Shopify, Amazon, etc.):**
* Apply Sales Channel filter → Check desired sources (Amazon, Shopify, etc.)
**View all labeled and shipped orders:**
* Apply Status filter → Check **Labeled, Awaiting Carrier Scan, In-Transit, Out For Delivery, Delivered, Delivery Exception**
**View picked orders awaiting shipment:**
* Apply Status filter → Check **Picked, Packed, Labeled**
**View orders with dimensions awaiting shipment:**
* Apply Status filter → Check **Packed, Labeled**
**View orders that completed fulfillment:**
* Apply Status filter → Check **Awaiting Carrier Scan**
***
## Saving Custom Views
After customizing your columns and applying filters, you can save your configuration as a named view for quick access later.
### Creating a Saved View
Choose which columns to display and apply any filters to narrow down the orders shown (such as specific fulfillment centers, date ranges, or order statuses).
Click the **Save New View** button, enter a name for the view in the **View Name** textbox, then click **Save View**.
Your saved view will be added to the top navigation bar on the Orders page for one-click access.
 ### Default Views
The Orders page includes 5 default views that cannot be modified:
* **All** - Shows all orders regardless of status
* **Action Required** - Orders that need attention before fulfillment
* **Processing** - Orders currently being picked, packed, and shipped
* **Shipped** - Orders that have left the fulfillment center
* **Delivered** - Orders successfully delivered to customers
### Editing Saved Views
Click the saved view name from the top navigation bar to load it.
Modify the visible columns, column order, or applied filters as needed.
Click **Save/Edit View** and confirm your changes.
**Note**: You cannot modify the 5 default views. Any changes you make while viewing a default view must be saved as a new custom view.
***
## Searching for Orders
The search bar at the top of the Orders page lets you quickly locate specific orders or groups of orders.
### Single Order Search
Simply enter any of the following identifiers in the search bar:
* Shipment ID
* Store Order ID
* Customer name
* Tracking number
### Bulk Order Search
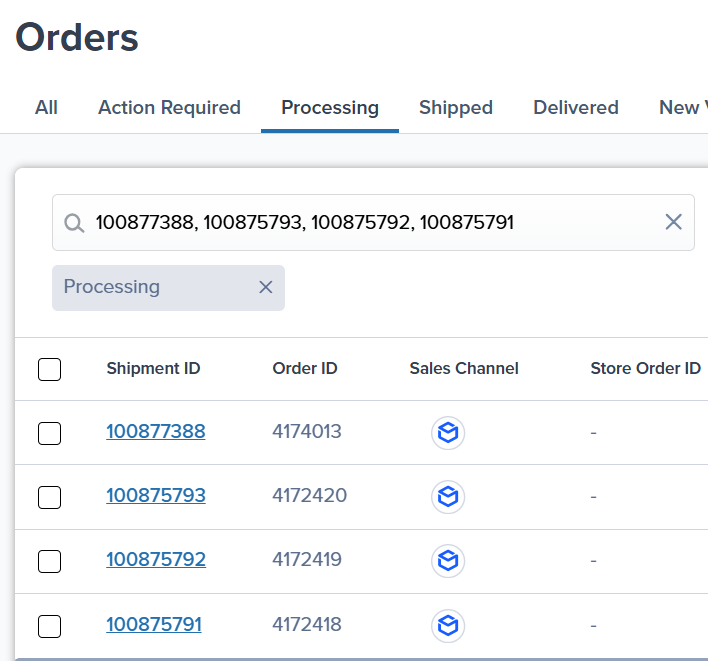
To search for multiple orders at once, separate each Order ID or Shipment ID with a **comma and a space**.
**Example**: `100877388, 100875793, 100875792, 100875791`
This bulk search feature is particularly useful when you need to perform actions on a specific group of orders or verify a list of order statuses.
### Default Views
The Orders page includes 5 default views that cannot be modified:
* **All** - Shows all orders regardless of status
* **Action Required** - Orders that need attention before fulfillment
* **Processing** - Orders currently being picked, packed, and shipped
* **Shipped** - Orders that have left the fulfillment center
* **Delivered** - Orders successfully delivered to customers
### Editing Saved Views
Click the saved view name from the top navigation bar to load it.
Modify the visible columns, column order, or applied filters as needed.
Click **Save/Edit View** and confirm your changes.
**Note**: You cannot modify the 5 default views. Any changes you make while viewing a default view must be saved as a new custom view.
***
## Searching for Orders
The search bar at the top of the Orders page lets you quickly locate specific orders or groups of orders.
### Single Order Search
Simply enter any of the following identifiers in the search bar:
* Shipment ID
* Store Order ID
* Customer name
* Tracking number
### Bulk Order Search
To search for multiple orders at once, separate each Order ID or Shipment ID with a **comma and a space**.
**Example**: `100877388, 100875793, 100875792, 100875791`
This bulk search feature is particularly useful when you need to perform actions on a specific group of orders or verify a list of order statuses.
 **Tip**: If you need to reformat a list of orders from separate lines into the proper search format, you can use a text editor like Notepad++ to quickly add the necessary separators between IDs.
**Multi-Page Selection Limitation**: If your bulk search results span multiple pages on the Orders page, you cannot select all orders across multiple pages using the select all checkbox at once. You must navigate to each page and select orders individually. The orders selected on previous pages will remain checked, and the selection counter (under the search bar) will increase as you select more.
***
## Understanding Order Statuses
Order statuses tell you where each order is in the fulfillment workflow. The Orders page displays the current status under the **Status** column, and you can hover over any status to see additional context.
### Primary Order Statuses
| Status | What It Means |
| ------------------------- | --------------------------------------------------------------------------------------------------------- |
| **Action Required** | Order cannot be fulfilled until an issue is resolved (replaces the legacy On-Hold and Exception statuses) |
| **Processing** | Order is being picked, packed, and prepared for shipment |
| **Picked** | Products have been picked from inventory and are ready for packing |
| **Packed** | Order has been packed and package dimensions are recorded |
| **Labeled** | Shipping label has been generated; order is ready to hand off to carrier |
| **Awaiting Carrier Scan** | Order has been handed to carrier but not yet scanned into their system |
| **In-Transit** | Carrier has scanned and is transporting the package |
| **Out For Delivery** | Package is on the delivery vehicle for final delivery |
| **Delivered** | Package has been successfully delivered to the customer |
| **Delivery Exception** | Carrier encountered an issue during delivery (incorrect address, damaged package, etc.) |
### Action Required Status
The **Action Required** status combines all conditions that prevent an order from being fulfilled. This consolidated status makes it easier to identify and resolve issues holding up your orders.
Common Action Required reasons include:
* Invalid or incomplete shipping address
* Insufficient inventory to fulfill the order
* Manual hold placed on the order
* Payment or pricing verification needed
* Customs documentation required for international shipments
Click into any order with Action Required status to view the specific issue and how to resolve it. Learn more about [orders requiring action](/fulfillment/d2c/orders-action-required).
### SLA and Upgrade Badges
In addition to the order status, you may see badges indicating:
* **Fulfillment SLA badge** - Shows whether the order is on track to meet the fulfillment service level agreement
* **Shipment upgrade badge** - A green badge appears when Jetpack has upgraded the shipping option at no extra charge to you
***
## Accessing Shipment Details
The Orders page includes a convenient **Shipment Details panel** that lets you view complete order information without navigating away from the page.
### Opening the Details Panel
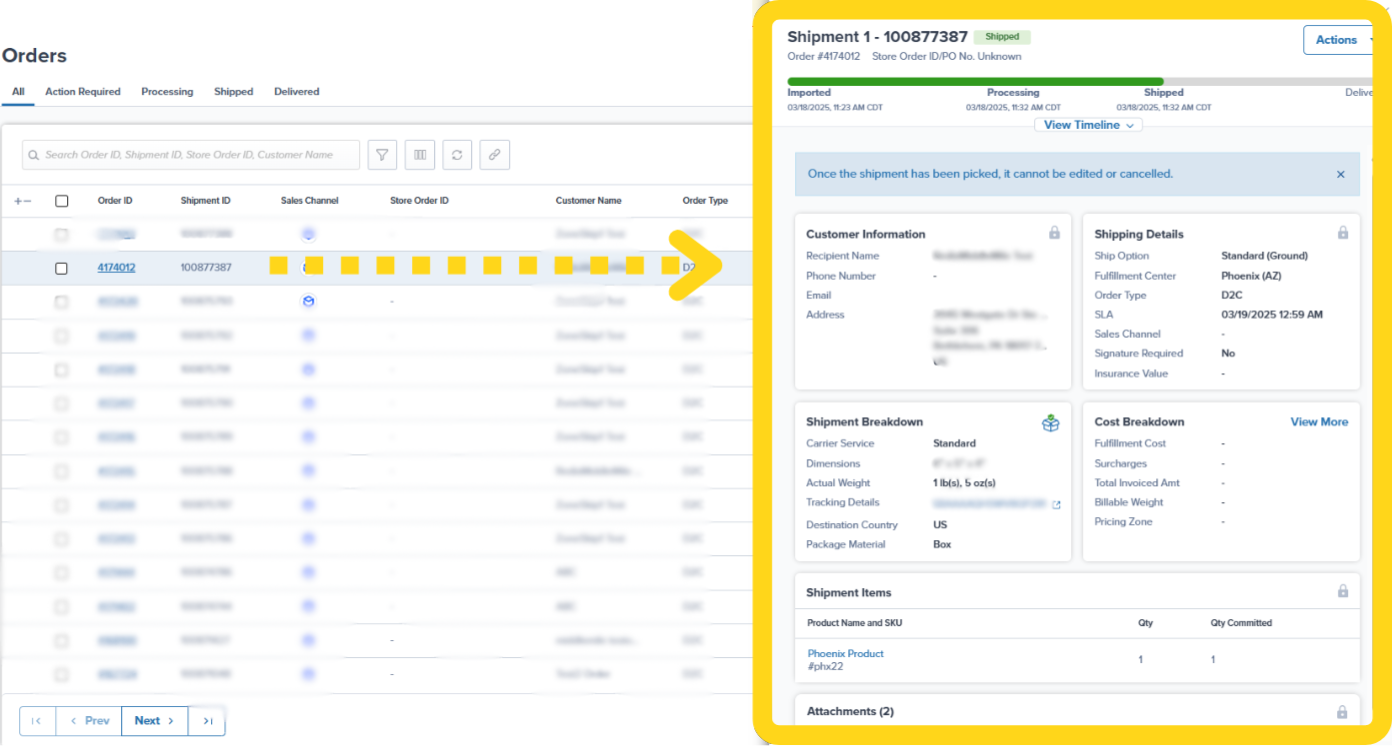
Click any **Order ID** (hyperlinked) to expand the Shipment Details panel on the right side of the page. This panel displays:
* **Customer Information** - Name, address, email, phone
* **Shipping Details** - Carrier, service level, tracking number
* **Shipment Breakdown** - Products, quantities, dimensions, weight
* **Cost Breakdown** - Itemized fulfillment costs
* **Timeline** - Complete order timeline from import to delivery
* **Attachments** - Packing slips, shipping labels, and uploaded documents
From the details panel, you can also perform actions like [editing order information](/fulfillment/order-management/editing-orders), adding signature requirements, or generating return labels.
**Tip**: If you need to reformat a list of orders from separate lines into the proper search format, you can use a text editor like Notepad++ to quickly add the necessary separators between IDs.
**Multi-Page Selection Limitation**: If your bulk search results span multiple pages on the Orders page, you cannot select all orders across multiple pages using the select all checkbox at once. You must navigate to each page and select orders individually. The orders selected on previous pages will remain checked, and the selection counter (under the search bar) will increase as you select more.
***
## Understanding Order Statuses
Order statuses tell you where each order is in the fulfillment workflow. The Orders page displays the current status under the **Status** column, and you can hover over any status to see additional context.
### Primary Order Statuses
| Status | What It Means |
| ------------------------- | --------------------------------------------------------------------------------------------------------- |
| **Action Required** | Order cannot be fulfilled until an issue is resolved (replaces the legacy On-Hold and Exception statuses) |
| **Processing** | Order is being picked, packed, and prepared for shipment |
| **Picked** | Products have been picked from inventory and are ready for packing |
| **Packed** | Order has been packed and package dimensions are recorded |
| **Labeled** | Shipping label has been generated; order is ready to hand off to carrier |
| **Awaiting Carrier Scan** | Order has been handed to carrier but not yet scanned into their system |
| **In-Transit** | Carrier has scanned and is transporting the package |
| **Out For Delivery** | Package is on the delivery vehicle for final delivery |
| **Delivered** | Package has been successfully delivered to the customer |
| **Delivery Exception** | Carrier encountered an issue during delivery (incorrect address, damaged package, etc.) |
### Action Required Status
The **Action Required** status combines all conditions that prevent an order from being fulfilled. This consolidated status makes it easier to identify and resolve issues holding up your orders.
Common Action Required reasons include:
* Invalid or incomplete shipping address
* Insufficient inventory to fulfill the order
* Manual hold placed on the order
* Payment or pricing verification needed
* Customs documentation required for international shipments
Click into any order with Action Required status to view the specific issue and how to resolve it. Learn more about [orders requiring action](/fulfillment/d2c/orders-action-required).
### SLA and Upgrade Badges
In addition to the order status, you may see badges indicating:
* **Fulfillment SLA badge** - Shows whether the order is on track to meet the fulfillment service level agreement
* **Shipment upgrade badge** - A green badge appears when Jetpack has upgraded the shipping option at no extra charge to you
***
## Accessing Shipment Details
The Orders page includes a convenient **Shipment Details panel** that lets you view complete order information without navigating away from the page.
### Opening the Details Panel
Click any **Order ID** (hyperlinked) to expand the Shipment Details panel on the right side of the page. This panel displays:
* **Customer Information** - Name, address, email, phone
* **Shipping Details** - Carrier, service level, tracking number
* **Shipment Breakdown** - Products, quantities, dimensions, weight
* **Cost Breakdown** - Itemized fulfillment costs
* **Timeline** - Complete order timeline from import to delivery
* **Attachments** - Packing slips, shipping labels, and uploaded documents
From the details panel, you can also perform actions like [editing order information](/fulfillment/order-management/editing-orders), adding signature requirements, or generating return labels.
 Learn more about all available information and actions on the [Shipment Details Page](/fulfillment/order-management/shipment-details-page).
***
## Performing Bulk Actions
The Orders page makes it easy to perform actions on multiple orders simultaneously.
### Selecting Orders for Bulk Actions
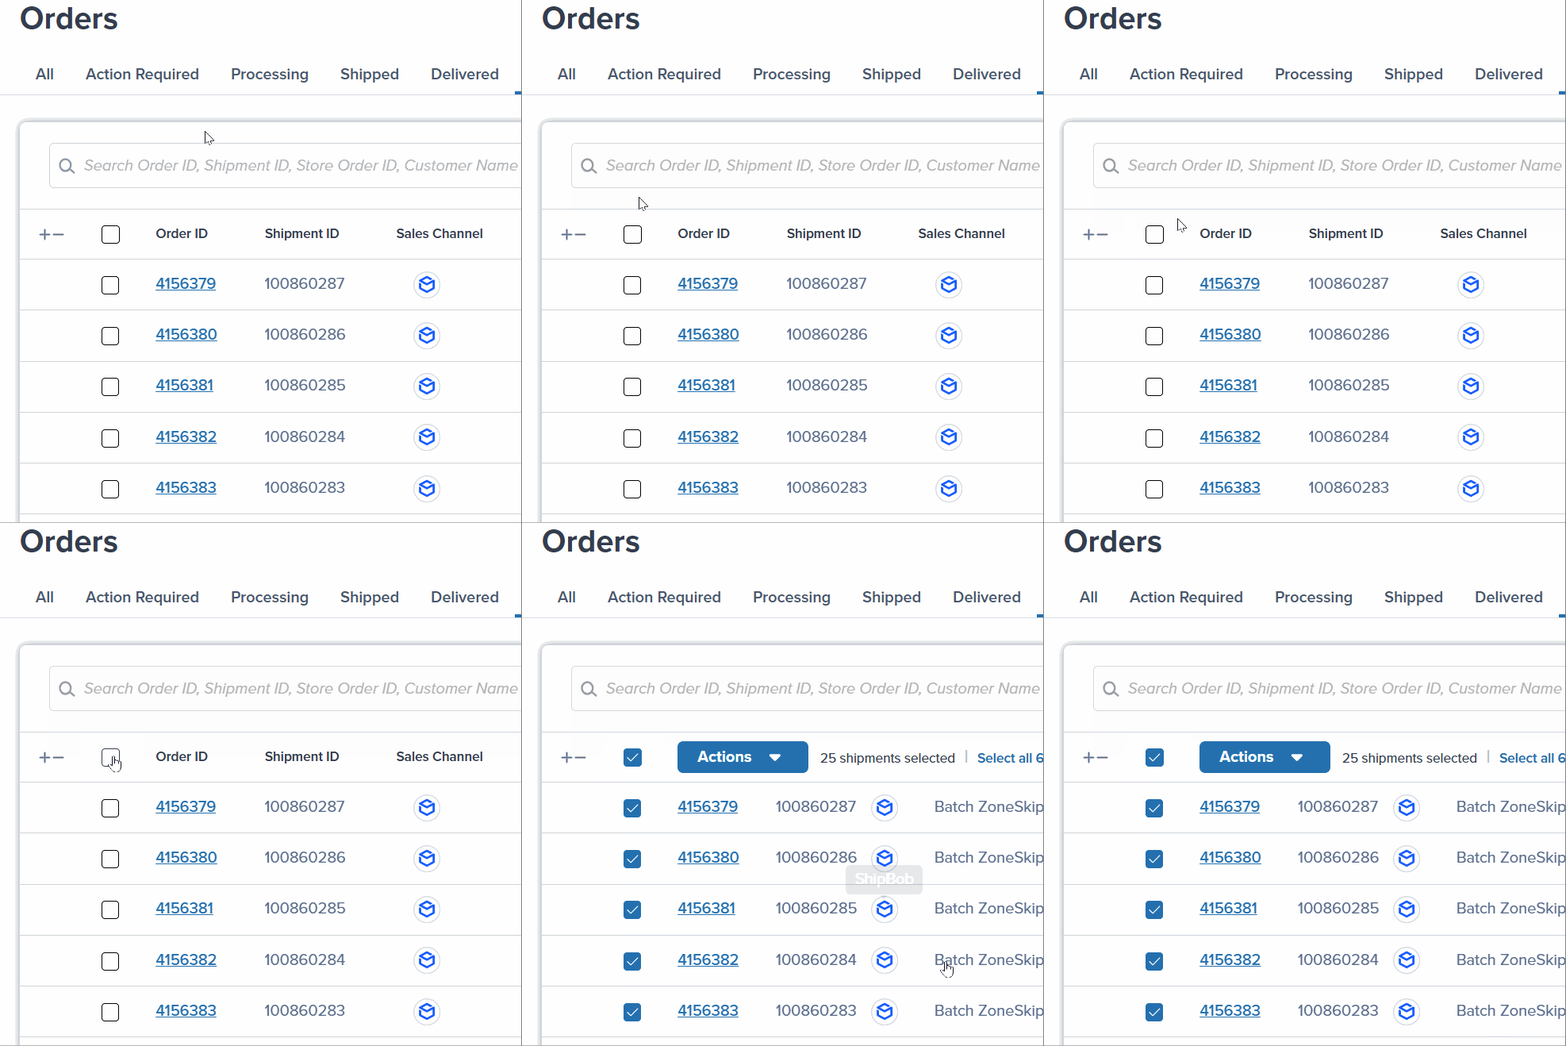
Check the box to the left of each Order ID you want to include. The **Actions** button will appear at the top of the page showing how many orders are selected.
**To select all orders on the current page:** Check the box in the header row (next to the column headers).
To select all orders under the current view/filter across all pages:
1. Select at least one order by checking its box
2. Click the **Select all # shipments** hyperlink that appears
3. All orders matching your current view/filter will be selected, even across multiple pages
Learn more about all available information and actions on the [Shipment Details Page](/fulfillment/order-management/shipment-details-page).
***
## Performing Bulk Actions
The Orders page makes it easy to perform actions on multiple orders simultaneously.
### Selecting Orders for Bulk Actions
Check the box to the left of each Order ID you want to include. The **Actions** button will appear at the top of the page showing how many orders are selected.
**To select all orders on the current page:** Check the box in the header row (next to the column headers).
To select all orders under the current view/filter across all pages:
1. Select at least one order by checking its box
2. Click the **Select all # shipments** hyperlink that appears
3. All orders matching your current view/filter will be selected, even across multiple pages
 ### Available Bulk Actions
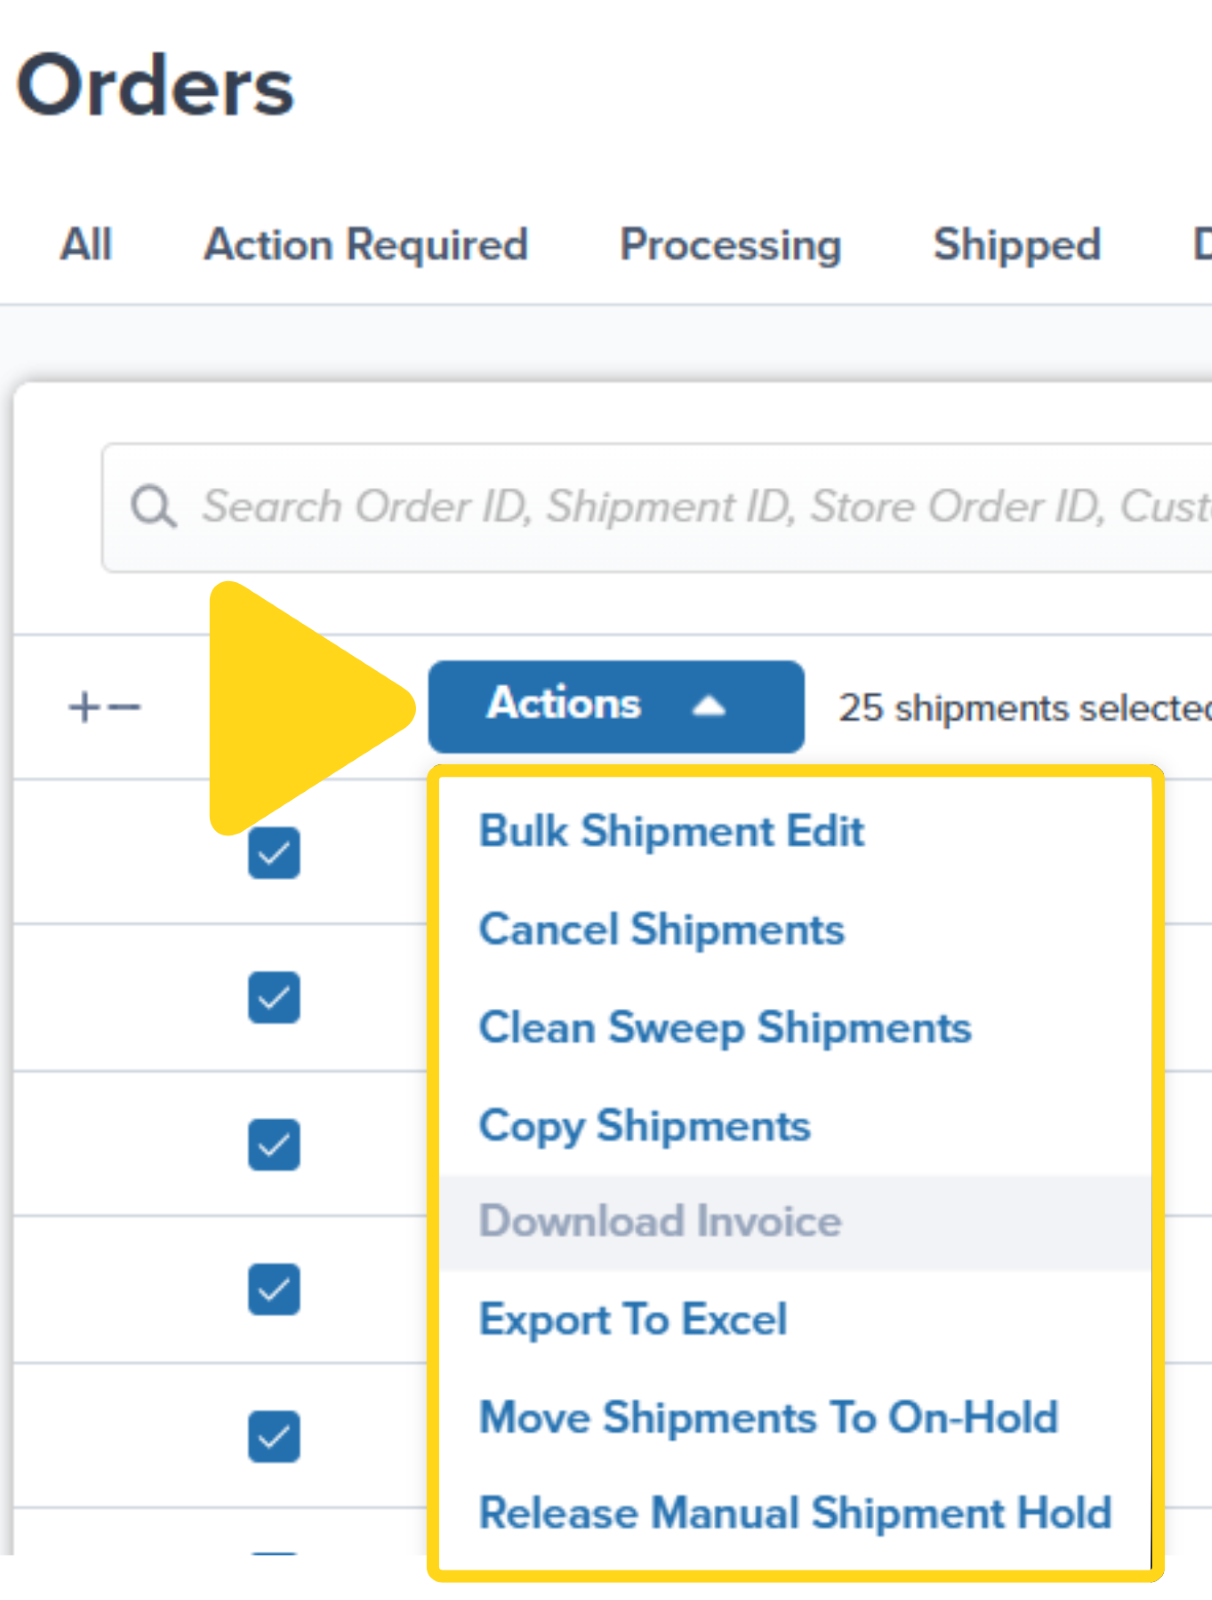
Once you've selected orders, click the **Actions** button to see available bulk actions:
| Action | What It Does |
| -------------------------------- | ------------------------------------------------------------------ |
| **Move Shipments To On-Hold** | Places selected orders on hold and optionally unreserves inventory |
| **Release Manual Shipment Hold** | Releases orders from on-hold status back to processing |
| **Cancel Shipments** | Cancels selected orders and unreserves inventory |
| **Export To Excel** | Downloads selected orders as a CSV file |
| **Add Signature Required** | Applies signature requirement to selected orders |
| **Change Fulfillment Center** | Reassigns orders to a different fulfillment center |
### Available Bulk Actions
Once you've selected orders, click the **Actions** button to see available bulk actions:
| Action | What It Does |
| -------------------------------- | ------------------------------------------------------------------ |
| **Move Shipments To On-Hold** | Places selected orders on hold and optionally unreserves inventory |
| **Release Manual Shipment Hold** | Releases orders from on-hold status back to processing |
| **Cancel Shipments** | Cancels selected orders and unreserves inventory |
| **Export To Excel** | Downloads selected orders as a CSV file |
| **Add Signature Required** | Applies signature requirement to selected orders |
| **Change Fulfillment Center** | Reassigns orders to a different fulfillment center |
 ### Unreserving Inventory from Orders
To unreserve inventory from orders without permanently canceling them:
1. Select the desired orders
2. Click **Actions** → **Move Shipments To On-Hold**
3. In the dialog, select **Un-reserve Inventory** from the dropdown
4. Confirm the action
After unreserving inventory, you can immediately release the orders back to processing by selecting **Actions** → **Release Manual Shipment Hold**.
Learn more about bulk actions in our [Bulk Actions on Orders](/fulfillment/tools-techniques/bulk-actions-on-orders) guide.
***
## Exporting Order Data
The Orders page lets you export order data to analyze outside the dashboard or share with your team.
### Export Capabilities
* **Export up to 1 million lines of data** in a single download
* **Expanded column options** including Order Tags, Ship Option, Sales Channel Store, Store Shipping Method, and SKU
* **Export specific orders, current page, or all filtered results**
### How to Export
1. Apply filters or select specific orders you want to export
2. Click the **Actions** button at the top right of the page
3. Select **Export To Excel** from the dropdown
4. Choose your export scope:
* **Current Selection** - Only checked orders
* **Current Page** - All orders on the current page
* **All Orders with Current Filters** - All orders matching your filters (across all pages)
5. Click **Export Orders**
You'll receive an email with a download link for your CSV file.
Learn more about the export process and available data fields in our [Exporting Your Order Data](/fulfillment/order-management/exporting-order-data) guide.
***
## Data Retention and Historical Orders
**Orders in Shipped status are available on the Orders page for 14 months** from the date the order shipped (according to the order's timeline in the Jetpack dashboard).
After 14 months, shipped orders are removed from the dashboard. To retrieve data for orders older than 14 months, contact Jetpack Care via Slack.
**Tip**: Regularly export your historical order data if you need to maintain records beyond 14 months. Learn more about [exporting order data](/fulfillment/order-management/exporting-order-data).
***
## Orders Page FAQs
Order View displays each store order as a single row, while Shipment View displays each individual package as a separate row. If orders were split into multiple shipments during packing, Shipment View will show more rows than Order View.
**Example**: If you have 100 orders and 10 of them were split into 2 shipments each, you'll see 100 rows in Order View and 110 rows in Shipment View.
**Sales Channel** shows where the order originated (e.g., Shopify, Amazon, WooCommerce) - the marketplace or store where your customer placed the order.
**Ingestion Channel** shows how the order entered Jetpack (Store Integration, API, or Manual) - the technical method used to create the order in the dashboard.
**Example**: An order might have Sales Channel = "Shopify" and Ingestion Channel = "Store Integration" if it automatically synced from your Shopify store.
No, saved filter views from the legacy Orders page do not automatically transfer to the new Orders page. You'll need to recreate your custom views using the new filtering and customization features.
The good news: The new Orders page offers more powerful filtering options and column choices than the legacy version, so you can create even more useful views.
To find potentially delayed orders, use the Status filter:
1. Click the **funnel icon** to open filters
2. Select the **Status** category
3. Check **Processing** - Shows orders that have labels but haven't received initial carrier scans
4. Check **In-Transit** - Shows orders still on their way that may be delayed
5. Check **Delivery Exception** - Shows orders that cannot be delivered due to address issues or package damage
You can combine these status filters to see all orders that may require attention.
The new **Action Required** status consolidates the legacy On-Hold and Exception statuses into a single, more intuitive status. This makes it easier to identify all orders that cannot be fulfilled and understand what action you need to take.
When you click into an order with Action Required status, you'll see the specific reason why the order is blocked and how to resolve it.
Yes! After selecting at least one order, click the **Select all # shipments** link that appears. This will select all orders matching your current view/filter, even if they span multiple pages.
**Important**: The number shown reflects the total count of orders matching your filters. Make sure your filters are correct before performing bulk actions on large datasets.
***
## Let's Dive Deeper
Explore all information and actions available for individual orders
Learn what order details can be modified and when
Master the export process and understand available data fields
Resolve common issues preventing order fulfillment
Efficiently manage multiple orders simultaneously
Understand every status in the fulfillment workflow
### Unreserving Inventory from Orders
To unreserve inventory from orders without permanently canceling them:
1. Select the desired orders
2. Click **Actions** → **Move Shipments To On-Hold**
3. In the dialog, select **Un-reserve Inventory** from the dropdown
4. Confirm the action
After unreserving inventory, you can immediately release the orders back to processing by selecting **Actions** → **Release Manual Shipment Hold**.
Learn more about bulk actions in our [Bulk Actions on Orders](/fulfillment/tools-techniques/bulk-actions-on-orders) guide.
***
## Exporting Order Data
The Orders page lets you export order data to analyze outside the dashboard or share with your team.
### Export Capabilities
* **Export up to 1 million lines of data** in a single download
* **Expanded column options** including Order Tags, Ship Option, Sales Channel Store, Store Shipping Method, and SKU
* **Export specific orders, current page, or all filtered results**
### How to Export
1. Apply filters or select specific orders you want to export
2. Click the **Actions** button at the top right of the page
3. Select **Export To Excel** from the dropdown
4. Choose your export scope:
* **Current Selection** - Only checked orders
* **Current Page** - All orders on the current page
* **All Orders with Current Filters** - All orders matching your filters (across all pages)
5. Click **Export Orders**
You'll receive an email with a download link for your CSV file.
Learn more about the export process and available data fields in our [Exporting Your Order Data](/fulfillment/order-management/exporting-order-data) guide.
***
## Data Retention and Historical Orders
**Orders in Shipped status are available on the Orders page for 14 months** from the date the order shipped (according to the order's timeline in the Jetpack dashboard).
After 14 months, shipped orders are removed from the dashboard. To retrieve data for orders older than 14 months, contact Jetpack Care via Slack.
**Tip**: Regularly export your historical order data if you need to maintain records beyond 14 months. Learn more about [exporting order data](/fulfillment/order-management/exporting-order-data).
***
## Orders Page FAQs
Order View displays each store order as a single row, while Shipment View displays each individual package as a separate row. If orders were split into multiple shipments during packing, Shipment View will show more rows than Order View.
**Example**: If you have 100 orders and 10 of them were split into 2 shipments each, you'll see 100 rows in Order View and 110 rows in Shipment View.
**Sales Channel** shows where the order originated (e.g., Shopify, Amazon, WooCommerce) - the marketplace or store where your customer placed the order.
**Ingestion Channel** shows how the order entered Jetpack (Store Integration, API, or Manual) - the technical method used to create the order in the dashboard.
**Example**: An order might have Sales Channel = "Shopify" and Ingestion Channel = "Store Integration" if it automatically synced from your Shopify store.
No, saved filter views from the legacy Orders page do not automatically transfer to the new Orders page. You'll need to recreate your custom views using the new filtering and customization features.
The good news: The new Orders page offers more powerful filtering options and column choices than the legacy version, so you can create even more useful views.
To find potentially delayed orders, use the Status filter:
1. Click the **funnel icon** to open filters
2. Select the **Status** category
3. Check **Processing** - Shows orders that have labels but haven't received initial carrier scans
4. Check **In-Transit** - Shows orders still on their way that may be delayed
5. Check **Delivery Exception** - Shows orders that cannot be delivered due to address issues or package damage
You can combine these status filters to see all orders that may require attention.
The new **Action Required** status consolidates the legacy On-Hold and Exception statuses into a single, more intuitive status. This makes it easier to identify all orders that cannot be fulfilled and understand what action you need to take.
When you click into an order with Action Required status, you'll see the specific reason why the order is blocked and how to resolve it.
Yes! After selecting at least one order, click the **Select all # shipments** link that appears. This will select all orders matching your current view/filter, even if they span multiple pages.
**Important**: The number shown reflects the total count of orders matching your filters. Make sure your filters are correct before performing bulk actions on large datasets.
***
## Let's Dive Deeper
Explore all information and actions available for individual orders
Learn what order details can be modified and when
Master the export process and understand available data fields
Resolve common issues preventing order fulfillment
Efficiently manage multiple orders simultaneously
Understand every status in the fulfillment workflow

Questions? Contact Jetpack Care.
If you have any questions or run into issues, you can always contact Jetpack Care for help. Our team is always here to assist via Slack, phone, or email!