> ## Documentation Index
> Fetch the complete documentation index at: https://help.jetpack3pl.com/llms.txt
> Use this file to discover all available pages before exploring further.
# Editing MIQ Transfer Plans
> Understand MultiHub IQ transfer plans and learn how to review and edit them in the dashboard or with bulk Excel templates to customize inventory distribution across fulfillment centers.
MultiHub IQ (MIQ) automatically generates optimized transfer plans that determine how your inbound inventory will be distributed across fulfillment centers. These plans are based on demand forecasting, historical sales data, and regional optimization—but you retain full control to adjust them. This guide explains what transfer plans are, how to review them, and how to edit them through the dashboard interface or bulk update via Excel templates.
Whether you're responding to a regional promotional campaign, stocking a new fulfillment center for a product launch, or rebalancing inventory based on market shifts, you can customize transfer plans as long as you make changes before your shipment arrives at the Hero Hub.
***
## Understanding the Editing Window
Transfer plans can be modified from the moment your [WRO is created](/fulfillment/sending-inventory/creating-wro) until your shipment arrives at the Hero Hub for receiving.
**Key Timeline Points**:
| Stage | Can Edit? | Why? |
| -------------------------- | --------- | --------------------------------------------------------------- |
| **WRO Created** | ✅ Yes | Transfer plan generated but shipment hasn't arrived |
| **In Transit to Hero Hub** | ✅ Yes | Shipment en route, plan still flexible |
| **Arrived at Hero Hub** | ❌ No | Receiving has begun, inventory is being counted and reorganized |
| **Processing at Hero Hub** | ❌ No | Operations team executing the locked transfer plan |
| **Distributed to FCs** | ❌ No | Inventory already shipped to destination fulfillment centers |
The **Review/Edit by Date** shown on your WRO details page indicates when the editing window closes. After this date, the transfer plan locks and executes. If you anticipate needing adjustments (seasonal campaigns, new product launches, regional promotions), review the auto-generated plan immediately after WRO creation.
***
## Why You Might Edit Transfer Plans
While MIQ's algorithm optimizes for overall network efficiency, specific business scenarios may warrant manual adjustments:
**Common Editing Scenarios**:
* **Regional Promotions**: Allocating extra inventory to fulfillment centers serving regions with planned advertising campaigns
* **New Product Launches**: Stocking specific fulfillment centers for coordinated market rollouts
* **Seasonal Demand Shifts**: Anticipating demand patterns not yet reflected in historical data (e.g., new holiday products)
* **Strategic Inventory Positioning**: Testing new markets or expanding into regions with limited historical order data
* **Rebalancing After Stockouts**: Prioritizing fulfillment centers that recently experienced stockouts
For strategic guidance on when to accept MIQ recommendations vs. editing manually, see [Jetpack MIQ Best Practices](/fulfillment/multi-hub-iq/miq-best-practices).
***
## Editing Transfer Plans in the Dashboard
The dashboard editor allows you to adjust individual SKU allocations across fulfillment centers with real-time validation.
From the WRO details page, locate the **Inventory Distribution tile** showing your transfer plan summary, then click the **Edit button** under the tile heading.
Review the auto-generated allocation for each SKU across fulfillment centers. Hover over the information icon (ⓘ) next to any SKU to see why MIQ suggested that specific split.
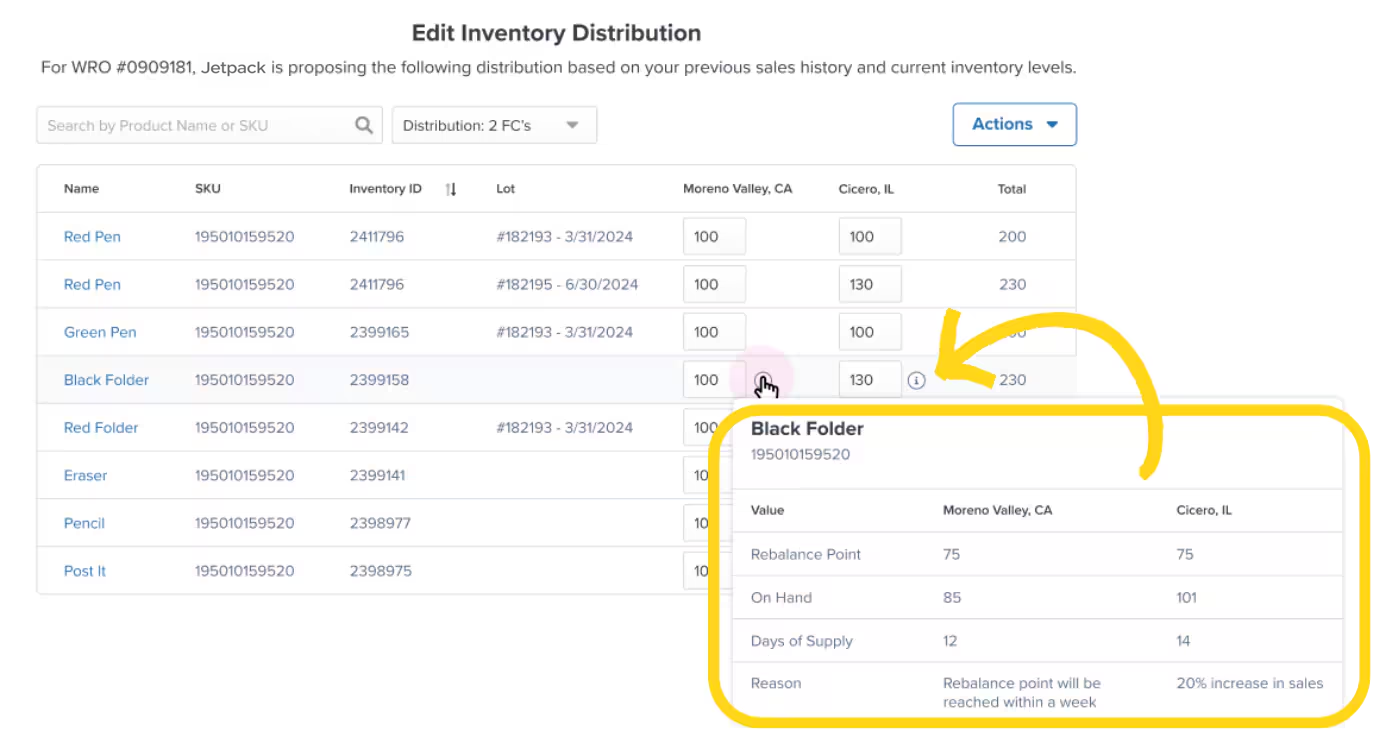 Input your desired quantities in the text boxes for each fulfillment center. Ensure your total matches the Expected Quantity shown in the plan (totals must equal across all FCs).
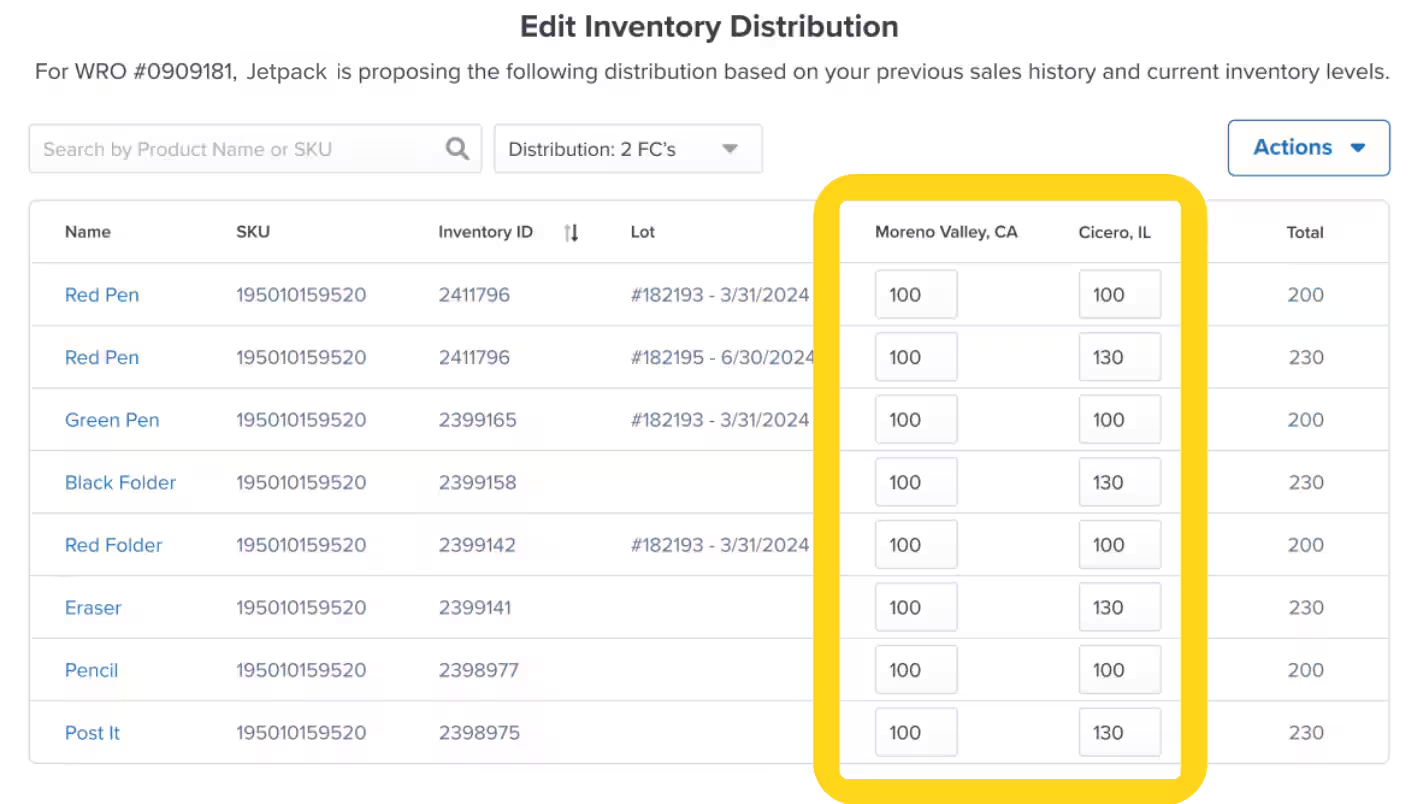 Click **Update Inventory Distribution** to save your changes.
 ### Validation and Error Handling
If your edited quantities don't match the expected total, the system prevents saving and highlights errors:
| Error Type | What Happens | How to Fix |
| ---------------------- | ---------------------------------- | --------------------------------------------------------------- |
| **Sum Mismatch** | Text boxes turn red, save disabled | Adjust quantities so all FCs sum to the Expected Quantity total |
| **Invalid Characters** | Field rejects input | Enter only numeric values (no letters or special characters) |
| **Negative Values** | Field rejects input | All quantities must be zero or positive integers |
### Validation and Error Handling
If your edited quantities don't match the expected total, the system prevents saving and highlights errors:
| Error Type | What Happens | How to Fix |
| ---------------------- | ---------------------------------- | --------------------------------------------------------------- |
| **Sum Mismatch** | Text boxes turn red, save disabled | Adjust quantities so all FCs sum to the Expected Quantity total |
| **Invalid Characters** | Field rejects input | Enter only numeric values (no letters or special characters) |
| **Negative Values** | Field rejects input | All quantities must be zero or positive integers |
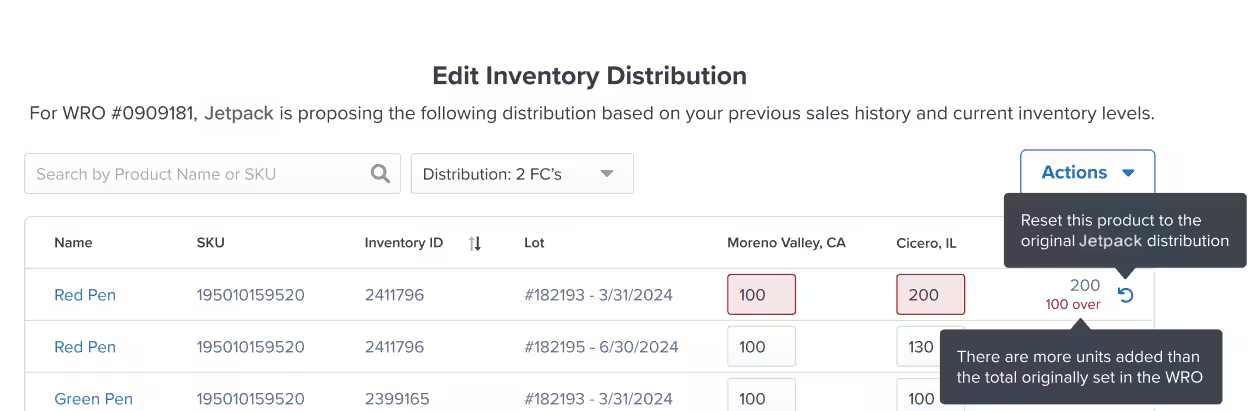 **Reset Functionality**: If you make mistakes or want to start over, click the **reset icon** (counterclockwise arrow) to revert to the original MIQ-generated plan without saving.
***
## Bulk Editing Transfer Plans with Excel
For WROs with many SKUs or complex allocation changes, bulk editing via Excel template saves time and reduces manual entry errors.
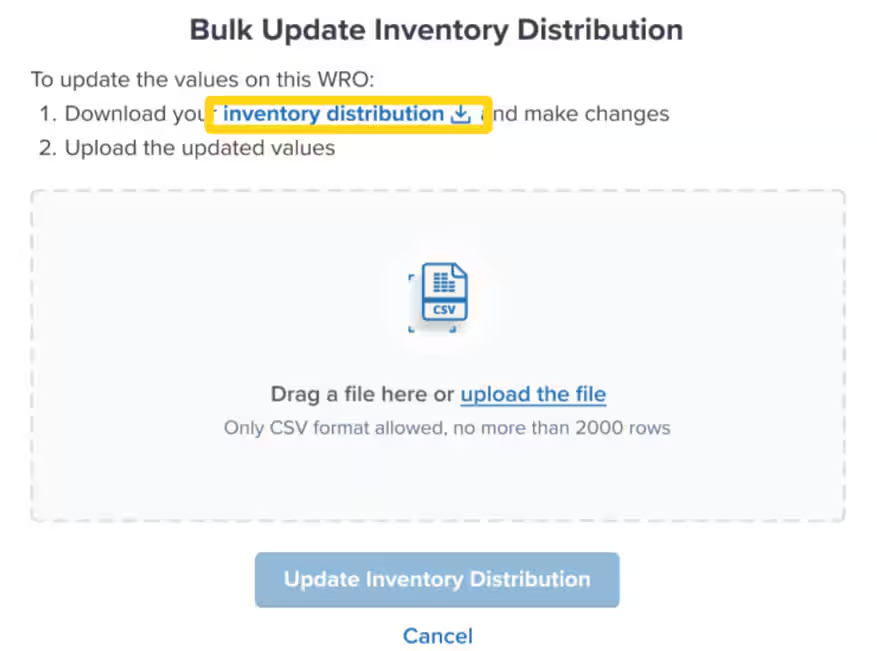
From the WRO details page, click **Edit** under the Inventory Distribution tile, then click the **Actions button** at the top right of the editor and select **Bulk Update** from the dropdown menu.
**Reset Functionality**: If you make mistakes or want to start over, click the **reset icon** (counterclockwise arrow) to revert to the original MIQ-generated plan without saving.
***
## Bulk Editing Transfer Plans with Excel
For WROs with many SKUs or complex allocation changes, bulk editing via Excel template saves time and reduces manual entry errors.
From the WRO details page, click **Edit** under the Inventory Distribution tile, then click the **Actions button** at the top right of the editor and select **Bulk Update** from the dropdown menu.
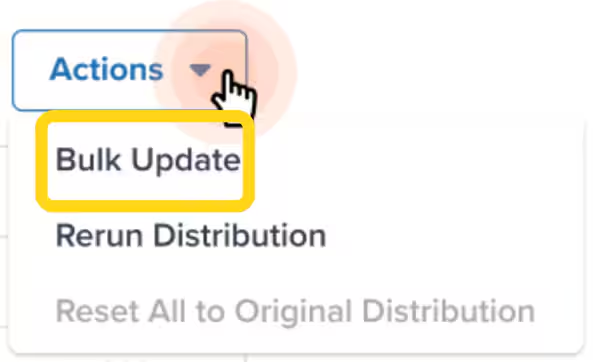 Click on **"inventory distribution"** to download the Excel template pre-populated with your WRO data, then open the template in Excel or Google Sheets.
 ### Understanding the Excel Template
The template contains these columns:
| Column | Purpose | Notes |
| ---------------- | ---------------------------------------------------------------------------- | ----------------------------------------------------------- |
| **Name** | Product name | Read-only, for reference |
| **SKU** | SKU identifier | Read-only, for reference |
| **Inventory ID** | Unique inventory identifier | Read-only, for reference |
| **Lot Date** | Expiration date for lot products | Required for lot products, leave blank for non-lot products |
| **Lot Number** | Batch number for lot products | Required for lot products, leave blank for non-lot products |
| **FC Columns** | One column per destination fulfillment center (named by local airport codes) | Enter allocation quantities here |
| **Total** | Sum of all FC allocations | Must match Expected Quantity |
Fulfillment centers are identified by their local airport codes in the template (e.g., ORD for Chicago, LAX for Los Angeles, DFW for Dallas). This standardization ensures clarity when distributing across multiple locations.
Make changes in the template:
**For non-lot products:**
* Modify quantities in the FC columns as needed
* Leave Lot Date and Lot Number columns blank
* Ensure the Total column sums correctly across all FCs
**For lot products:**
* Include Lot Date and Lot Number values for each row
* Modify FC quantities as needed
* Ensure products with the same lot information are grouped correctly
Save the file (keep the same Excel format), then return to the WRO editor in your dashboard. Drag and drop the file into the upload area, or click the upload link to browse for the file.
Click **Update Inventory Distribution** to apply the changes and review the success message confirming your updates.
If you decide not to save changes, click **Cancel** to exit without applying the bulk edits.
***
## Adding or Removing Fulfillment Centers
MIQ distributes inventory only to fulfillment centers enabled in your account. You can add or remove fulfillment centers from the distribution plan, triggering MIQ to recalculate optimal allocation.
From the Inventory Distribution tile, click **Edit** to open the transfer plan editor.
Locate the dropdown menu next to the search bar at the top of the editor. Uncheck boxes for fulfillment centers you want to remove from the plan, and check boxes for fulfillment centers you want to add to the plan.
Click **Update** to apply the FC changes.
Click the **Actions** button, then select **Rerun Distribution** from the dropdown.
Review the confirmation popup explaining that MIQ will regenerate the transfer plan based on your new FC selections. Click **Rerun Distribution** to confirm, or **Cancel** if you change your mind.
When you rerun distribution after adding or removing fulfillment centers, MIQ regenerates the entire transfer plan from scratch. Any previous manual edits will be overwritten. If you need to preserve specific allocations, note them before rerunning distribution, then re-apply those edits after the new plan generates.
### Resetting to Original Distribution
If you want to discard all edits and return to the original MIQ-generated plan:
1. **Click Actions** in the transfer plan editor
2. **Select Reset All to Original Distribution**
3. **Confirm** to revert to the initial auto-generated plan
This resets both quantity allocations and fulfillment center selections to match the original transfer plan from WRO creation.
***
## Best Practices for Editing Transfer Plans
Follow these guidelines to make effective manual adjustments while preserving MIQ's optimization benefits:
**When to Edit**:
* You have market intelligence not reflected in historical data (new product launches, promotional campaigns)
* Regional demand patterns have shifted suddenly (viral social media, influencer partnerships)
* You're testing new fulfillment centers and want to ensure strategic initial stocking
* Coordinating inventory placement with marketing campaigns targeting specific regions
**When to Trust MIQ**:
* Historical sales data accurately reflects ongoing demand patterns
* No major promotional campaigns or market shifts are planned
* You're managing steady-state replenishment without seasonal fluctuations
* Algorithm recommendations align with your intuition based on order origins
**Editing Best Practices**:
* **Review the "why"**: Hover over info icons to understand MIQ's reasoning before overriding
* **Make incremental changes**: Adjust quantities by 10-20% rather than complete reallocation unless you have strong rationale
* **Coordinate with Jetpack Care**: For major edits affecting multiple SKUs or FCs, consult your Jetpack Care team to validate your strategy
* **Document your reasoning**: Track why you made manual adjustments to evaluate accuracy over time
* **Monitor results**: Compare performance (split shipments, shipping costs, delivery times) between auto-generated and manually edited plans to refine your editing approach
For comprehensive strategic guidance, see [Jetpack MIQ Best Practices](/fulfillment/multi-hub-iq/miq-best-practices).
***
## Understanding Transfer Plan Adjustments
MIQ transfer plans can change automatically between WRO creation and shipment arrival based on real-time conditions:
**Factors That Trigger Auto-Adjustments**:
* Inventory levels at destination fulfillment centers change significantly (stockouts or unexpected surpluses)
* Order velocity shifts dramatically for specific SKUs in certain regions
* Fulfillment center capacity constraints emerge
* Other WROs arrive and alter network-wide inventory distribution
**How to Track Changes**:
The WRO details page shows an **asterisk (\*)** next to Expected Qty if the plan has been reallocated after initial generation. You can review the updated plan at any time before the editing window closes.
After your shipment arrives at the Hero Hub and receiving completes, review the Inventory Distribution tile to see the final executed transfer plan. This shows exactly how inventory was distributed across fulfillment centers, accounting for both your manual edits and any auto-adjustments MIQ made before the editing window closed.
***
## Troubleshooting Common Issues
Encountering problems while editing transfer plans? Here are solutions to common scenarios:
| Issue | Cause | Solution |
| ------------------------------ | ----------------------------------------------------------- | ------------------------------------------------------------------------------------------------------------------------------------ |
| **Can't Click Edit Button** | Shipment already arrived at Hero Hub, editing window closed | Contact Jetpack Care if you need urgent adjustments—Operations team may be able to accommodate changes during early receiving stages |
| **Totals Don't Match** | Sum of FC allocations doesn't equal Expected Quantity | Use the reset icon to revert and start over, or carefully adjust quantities so all FCs sum correctly |
| **Excel Upload Fails** | Template format modified or data corrupted | Re-download a fresh template, copy your changes carefully, and re-upload |
| **Fulfillment Center Missing** | FC not enabled in your account settings | Contact Jetpack Care to enable additional fulfillment centers before adding them to transfer plans |
| **Changes Not Saving** | Browser issue or connectivity problem | Try refreshing the page, clearing cache, or using a different browser |
***
## Let's Dive Deeper
Back to the MultiHub IQ overview and system explanation
Create WROs, review transfer plans, and use ITOs
Strategic guidance for when to edit vs accept recommendations
Track WRO status and monitor shipment progress
Decide when to replenish inventory with forecasting
Step-by-step WRO creation process for Hero Hub
### Understanding the Excel Template
The template contains these columns:
| Column | Purpose | Notes |
| ---------------- | ---------------------------------------------------------------------------- | ----------------------------------------------------------- |
| **Name** | Product name | Read-only, for reference |
| **SKU** | SKU identifier | Read-only, for reference |
| **Inventory ID** | Unique inventory identifier | Read-only, for reference |
| **Lot Date** | Expiration date for lot products | Required for lot products, leave blank for non-lot products |
| **Lot Number** | Batch number for lot products | Required for lot products, leave blank for non-lot products |
| **FC Columns** | One column per destination fulfillment center (named by local airport codes) | Enter allocation quantities here |
| **Total** | Sum of all FC allocations | Must match Expected Quantity |
Fulfillment centers are identified by their local airport codes in the template (e.g., ORD for Chicago, LAX for Los Angeles, DFW for Dallas). This standardization ensures clarity when distributing across multiple locations.
Make changes in the template:
**For non-lot products:**
* Modify quantities in the FC columns as needed
* Leave Lot Date and Lot Number columns blank
* Ensure the Total column sums correctly across all FCs
**For lot products:**
* Include Lot Date and Lot Number values for each row
* Modify FC quantities as needed
* Ensure products with the same lot information are grouped correctly
Save the file (keep the same Excel format), then return to the WRO editor in your dashboard. Drag and drop the file into the upload area, or click the upload link to browse for the file.
Click **Update Inventory Distribution** to apply the changes and review the success message confirming your updates.
If you decide not to save changes, click **Cancel** to exit without applying the bulk edits.
***
## Adding or Removing Fulfillment Centers
MIQ distributes inventory only to fulfillment centers enabled in your account. You can add or remove fulfillment centers from the distribution plan, triggering MIQ to recalculate optimal allocation.
From the Inventory Distribution tile, click **Edit** to open the transfer plan editor.
Locate the dropdown menu next to the search bar at the top of the editor. Uncheck boxes for fulfillment centers you want to remove from the plan, and check boxes for fulfillment centers you want to add to the plan.
Click **Update** to apply the FC changes.
Click the **Actions** button, then select **Rerun Distribution** from the dropdown.
Review the confirmation popup explaining that MIQ will regenerate the transfer plan based on your new FC selections. Click **Rerun Distribution** to confirm, or **Cancel** if you change your mind.
When you rerun distribution after adding or removing fulfillment centers, MIQ regenerates the entire transfer plan from scratch. Any previous manual edits will be overwritten. If you need to preserve specific allocations, note them before rerunning distribution, then re-apply those edits after the new plan generates.
### Resetting to Original Distribution
If you want to discard all edits and return to the original MIQ-generated plan:
1. **Click Actions** in the transfer plan editor
2. **Select Reset All to Original Distribution**
3. **Confirm** to revert to the initial auto-generated plan
This resets both quantity allocations and fulfillment center selections to match the original transfer plan from WRO creation.
***
## Best Practices for Editing Transfer Plans
Follow these guidelines to make effective manual adjustments while preserving MIQ's optimization benefits:
**When to Edit**:
* You have market intelligence not reflected in historical data (new product launches, promotional campaigns)
* Regional demand patterns have shifted suddenly (viral social media, influencer partnerships)
* You're testing new fulfillment centers and want to ensure strategic initial stocking
* Coordinating inventory placement with marketing campaigns targeting specific regions
**When to Trust MIQ**:
* Historical sales data accurately reflects ongoing demand patterns
* No major promotional campaigns or market shifts are planned
* You're managing steady-state replenishment without seasonal fluctuations
* Algorithm recommendations align with your intuition based on order origins
**Editing Best Practices**:
* **Review the "why"**: Hover over info icons to understand MIQ's reasoning before overriding
* **Make incremental changes**: Adjust quantities by 10-20% rather than complete reallocation unless you have strong rationale
* **Coordinate with Jetpack Care**: For major edits affecting multiple SKUs or FCs, consult your Jetpack Care team to validate your strategy
* **Document your reasoning**: Track why you made manual adjustments to evaluate accuracy over time
* **Monitor results**: Compare performance (split shipments, shipping costs, delivery times) between auto-generated and manually edited plans to refine your editing approach
For comprehensive strategic guidance, see [Jetpack MIQ Best Practices](/fulfillment/multi-hub-iq/miq-best-practices).
***
## Understanding Transfer Plan Adjustments
MIQ transfer plans can change automatically between WRO creation and shipment arrival based on real-time conditions:
**Factors That Trigger Auto-Adjustments**:
* Inventory levels at destination fulfillment centers change significantly (stockouts or unexpected surpluses)
* Order velocity shifts dramatically for specific SKUs in certain regions
* Fulfillment center capacity constraints emerge
* Other WROs arrive and alter network-wide inventory distribution
**How to Track Changes**:
The WRO details page shows an **asterisk (\*)** next to Expected Qty if the plan has been reallocated after initial generation. You can review the updated plan at any time before the editing window closes.
After your shipment arrives at the Hero Hub and receiving completes, review the Inventory Distribution tile to see the final executed transfer plan. This shows exactly how inventory was distributed across fulfillment centers, accounting for both your manual edits and any auto-adjustments MIQ made before the editing window closed.
***
## Troubleshooting Common Issues
Encountering problems while editing transfer plans? Here are solutions to common scenarios:
| Issue | Cause | Solution |
| ------------------------------ | ----------------------------------------------------------- | ------------------------------------------------------------------------------------------------------------------------------------ |
| **Can't Click Edit Button** | Shipment already arrived at Hero Hub, editing window closed | Contact Jetpack Care if you need urgent adjustments—Operations team may be able to accommodate changes during early receiving stages |
| **Totals Don't Match** | Sum of FC allocations doesn't equal Expected Quantity | Use the reset icon to revert and start over, or carefully adjust quantities so all FCs sum correctly |
| **Excel Upload Fails** | Template format modified or data corrupted | Re-download a fresh template, copy your changes carefully, and re-upload |
| **Fulfillment Center Missing** | FC not enabled in your account settings | Contact Jetpack Care to enable additional fulfillment centers before adding them to transfer plans |
| **Changes Not Saving** | Browser issue or connectivity problem | Try refreshing the page, clearing cache, or using a different browser |
***
## Let's Dive Deeper
Back to the MultiHub IQ overview and system explanation
Create WROs, review transfer plans, and use ITOs
Strategic guidance for when to edit vs accept recommendations
Track WRO status and monitor shipment progress
Decide when to replenish inventory with forecasting
Step-by-step WRO creation process for Hero Hub

Questions? Contact Jetpack Care.
If you have any questions or run into issues, you can always contact Jetpack Care for help. Our team is always here to assist via Slack, phone, or email!