> ## Documentation Index
> Fetch the complete documentation index at: https://help.jetpack3pl.com/llms.txt
> Use this file to discover all available pages before exploring further.
# Move, Merge, or Convert Products
> Manage and organize product variants by converting base products to variants, merging duplicate products, moving variants between parent products, and converting variants to standalone products.
As your catalog grows, you may need to reorganize how products and variants are structured. Jetpack lets you convert standalone products into variants, merge duplicates together, move variants between different parent products, or split variants back into standalone products—giving you flexibility to keep your catalog organized as your business evolves.
## Understanding Base Products vs. Variants
Before performing these operations, it's important to understand the distinction:
* **Base products** are physical standalone items with their own inventory, SKUs, and product details
* **Parent/primary products** are containers that group related variants together but hold no inventory themselves
* **Variants** are the actual physical products (like "Blue T-Shirt - Small") that live under a parent product
Base products (physical standalone items) cannot be converted into a parent/primary product once created or synced. This is because base products contain information like inventory and SKUs that parent/primary products cannot hold.
***
## Converting a Base Product to a Variant
If you have standalone products that should actually be variants of a parent product (for example, different colors or sizes of the same item), you can convert them.
The base product being converted cannot have on-hand inventory in the Jetpack dashboard. Make sure inventory is zero before proceeding.
Navigate to the Product Catalog page and locate the base product using the search bar or by scrolling through the catalog.
Click the **three vertical dots** under the Actions column for the product you want to convert.
From the drop-down menu, select **Convert to variant(s) and move under a product**.
A pop-up window will appear showing the selected product(s).
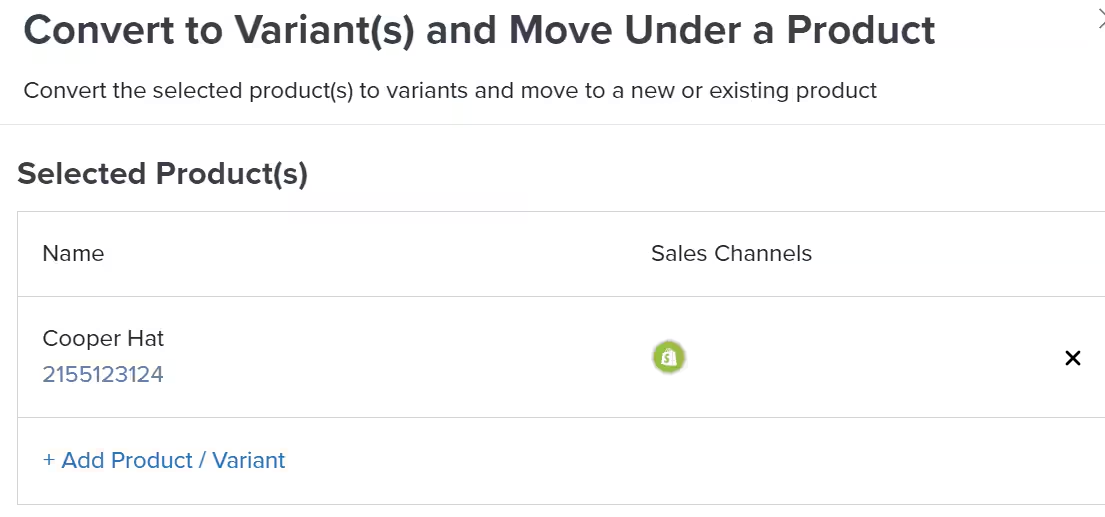 If you want to convert multiple products to variants at once, click **+ Add Product / Variant** to include more SKUs.
Decide whether to add the variant(s) to:
* **A new parent/primary product** (creates a new container)
* **An existing parent/primary product** (adds to an existing container)
Review your selection and click the button to complete the conversion.
***
## Converting a Variant Back to a Standalone Product
If a variant needs to become its own standalone product, you can split it out from its parent.
Navigate to the Product Catalog and find the variant listed under its parent/primary product.
Click the **three vertical dots** next to the variant to see more options.
If you want to convert multiple products to variants at once, click **+ Add Product / Variant** to include more SKUs.
Decide whether to add the variant(s) to:
* **A new parent/primary product** (creates a new container)
* **An existing parent/primary product** (adds to an existing container)
Review your selection and click the button to complete the conversion.
***
## Converting a Variant Back to a Standalone Product
If a variant needs to become its own standalone product, you can split it out from its parent.
Navigate to the Product Catalog and find the variant listed under its parent/primary product.
Click the **three vertical dots** next to the variant to see more options.
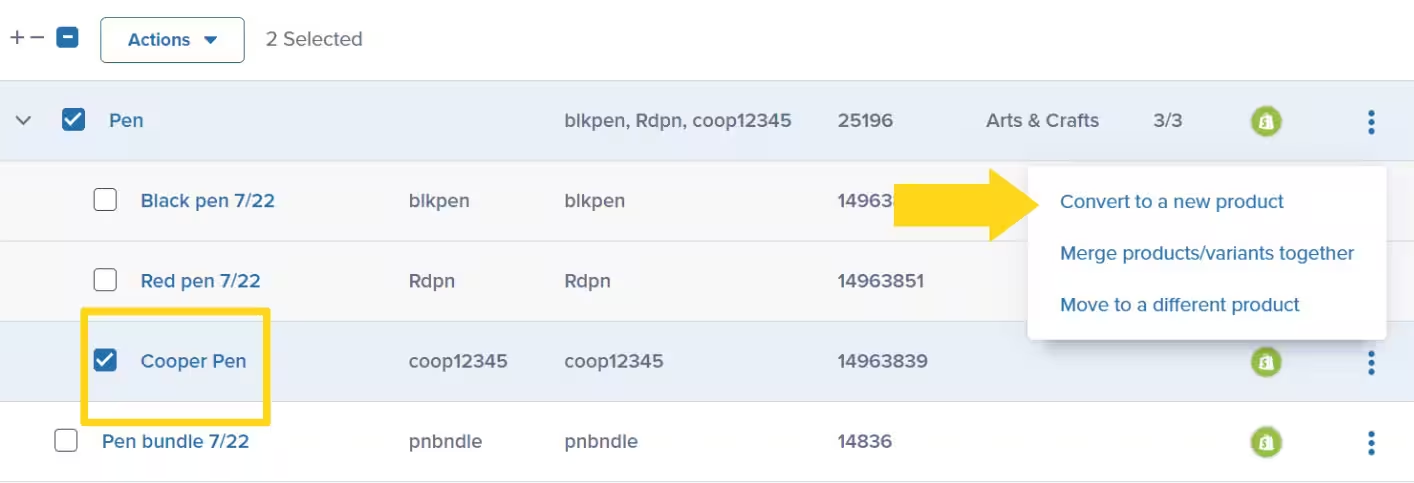 From the drop-down menu, select **Convert to a new product**.
A pop-up window will appear with the conversion form.
In the conversion dialog:
* (Optional) Change the product's name by typing a new name in the provided textbox
* Use the drop-down menu to change the product's category/subcategory if needed
From the drop-down menu, select **Convert to a new product**.
A pop-up window will appear with the conversion form.
In the conversion dialog:
* (Optional) Change the product's name by typing a new name in the provided textbox
* Use the drop-down menu to change the product's category/subcategory if needed
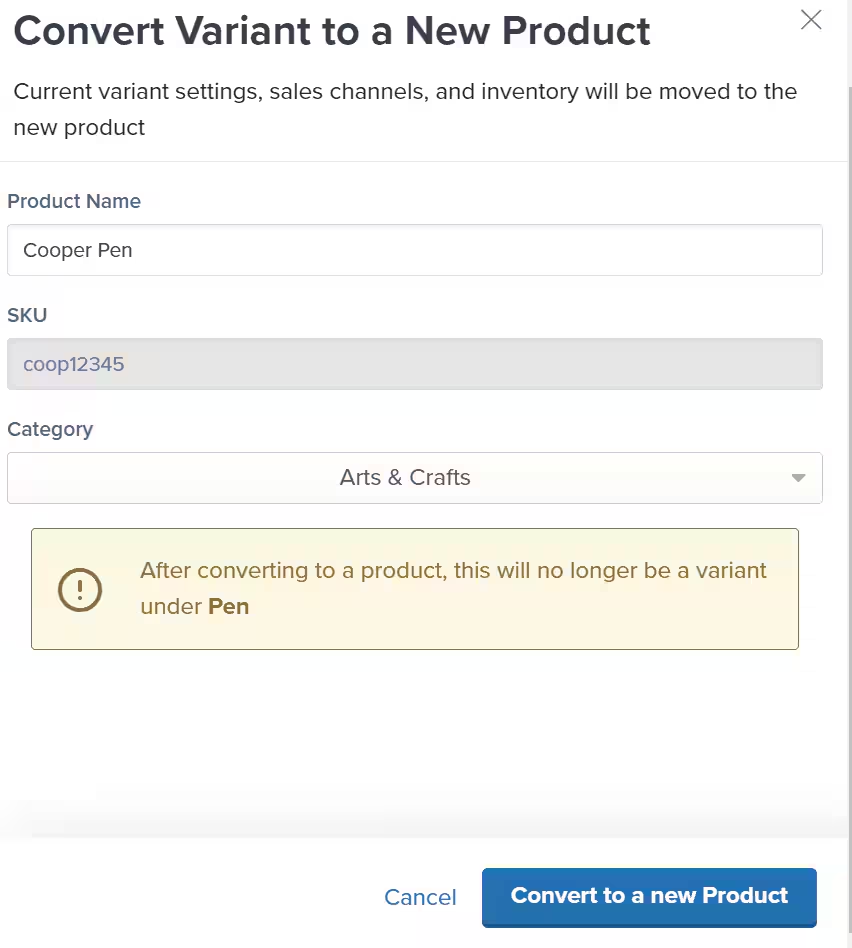 Review the details and click **Convert to a new Product**.
A success message will confirm the conversion is complete.
***
## Merging Duplicate Products
If you have duplicate products in your catalog—often caused by importing the same SKU from multiple stores or integrations—you can merge them into a single product.
Once merged, products cannot be unmerged. The merge is permanent.
### When to Use This
* The same physical SKU was imported multiple times from different stores
* You have duplicate listings for the same product
* You want to consolidate inventory and order history under one product
In the Product Catalog, locate the products/variants you want to merge and check the box next to each product's name.
If you select a parent/primary product, all its variants will be automatically selected. Deselect any variants you don't want to merge.
Review the details and click **Convert to a new Product**.
A success message will confirm the conversion is complete.
***
## Merging Duplicate Products
If you have duplicate products in your catalog—often caused by importing the same SKU from multiple stores or integrations—you can merge them into a single product.
Once merged, products cannot be unmerged. The merge is permanent.
### When to Use This
* The same physical SKU was imported multiple times from different stores
* You have duplicate listings for the same product
* You want to consolidate inventory and order history under one product
In the Product Catalog, locate the products/variants you want to merge and check the box next to each product's name.
If you select a parent/primary product, all its variants will be automatically selected. Deselect any variants you don't want to merge.
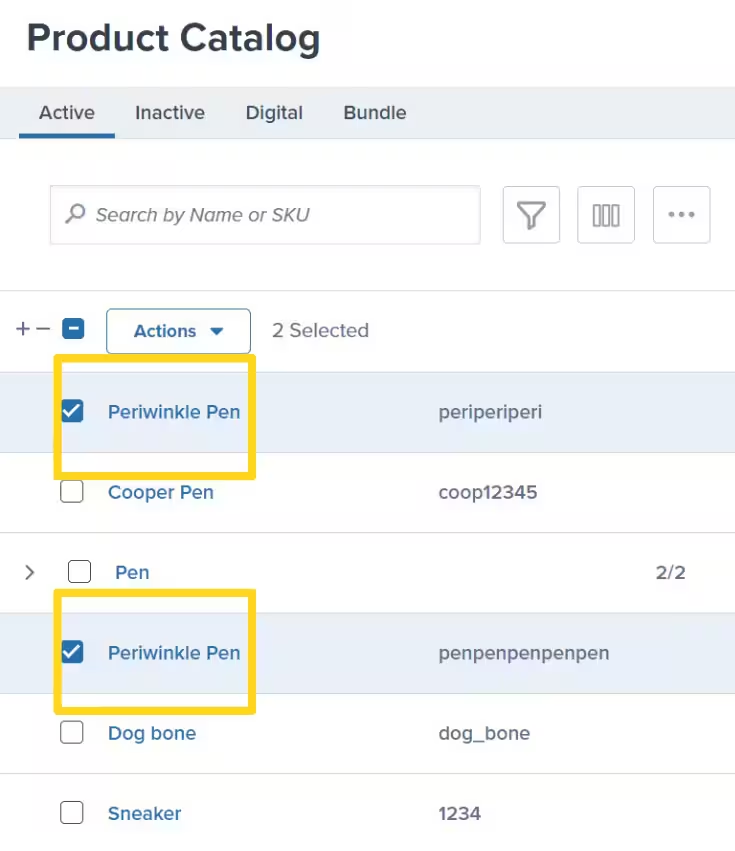 With your products selected, click the **Actions** button at the top of the catalog.
From the Actions menu, select **Merge products/variants together**.
A pop-up window will appear showing your selected items.
With your products selected, click the **Actions** button at the top of the catalog.
From the Actions menu, select **Merge products/variants together**.
A pop-up window will appear showing your selected items.
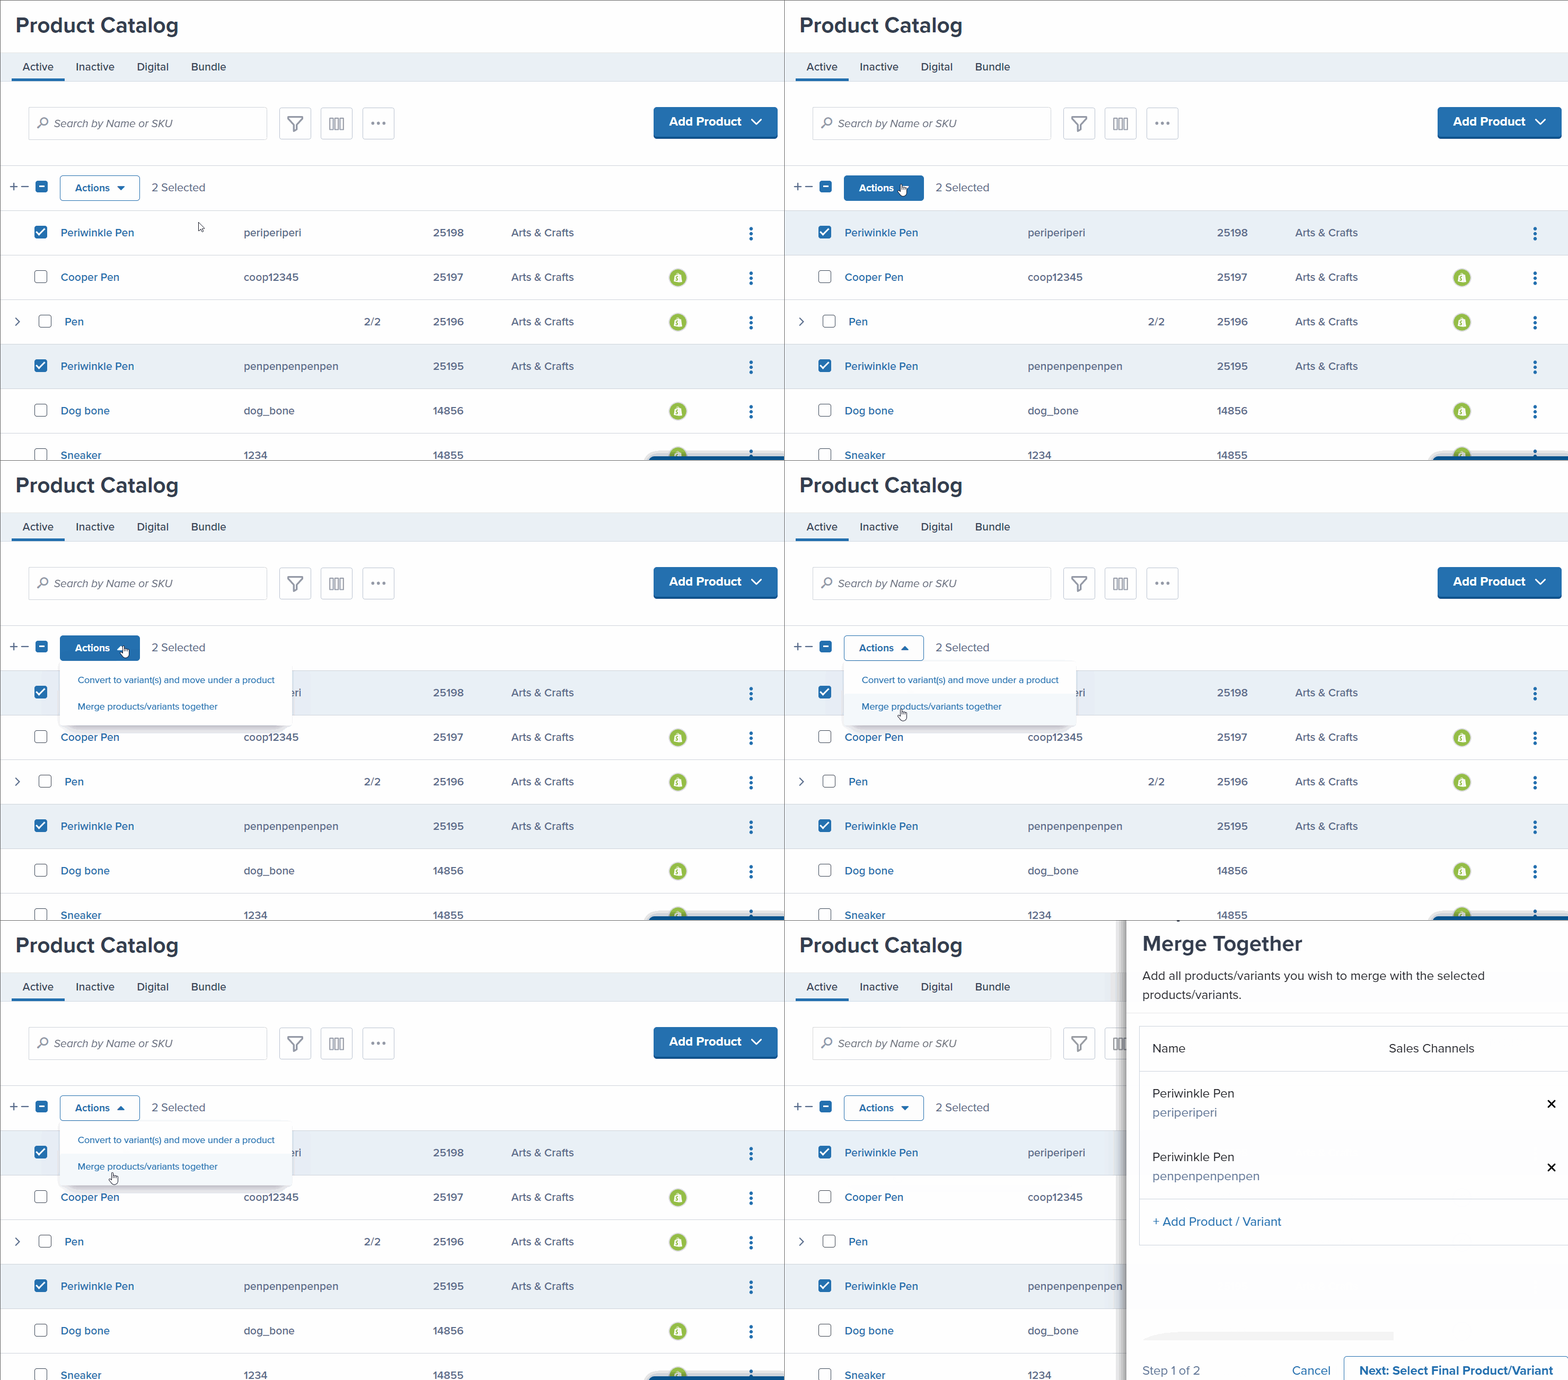 Review the selected products in the dialog. If needed, click **+ Add Product / Variant** to include additional SKUs in the merge.
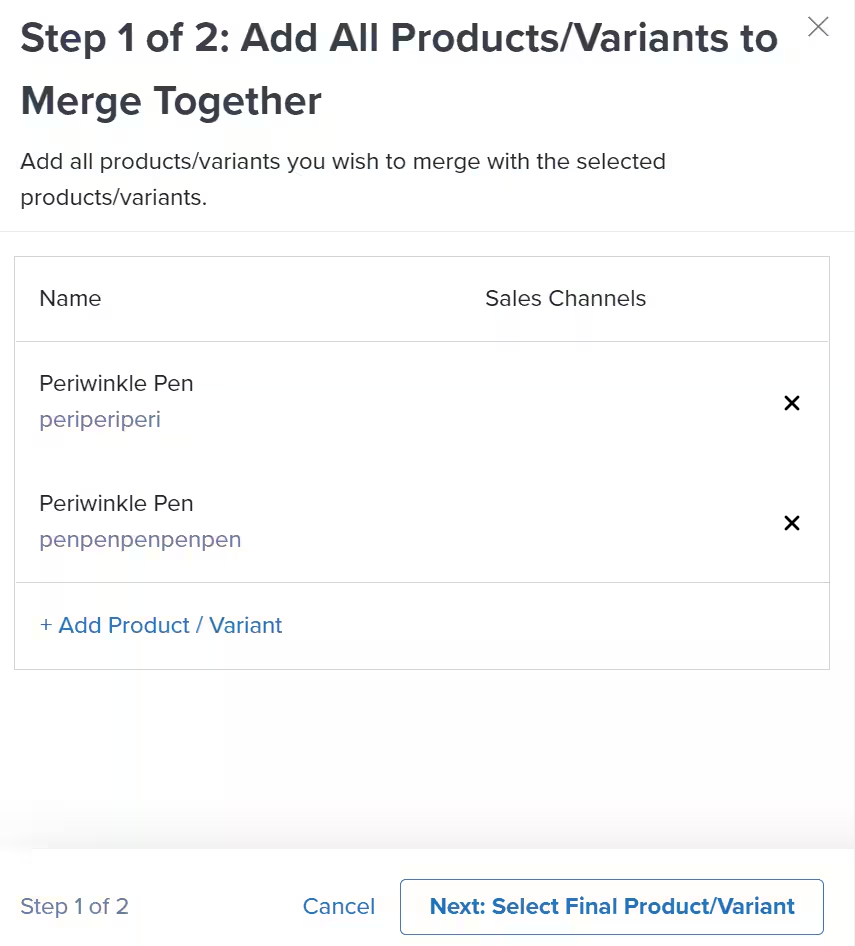 Click **Next: Select Final Product/Variant** to continue to the next step.
Select which product/variant should be the main product (this one will remain after the merge).
The selected final product will retain all combined inventory, sales channels, and settings.
Click **Next: Select Final Product/Variant** to continue to the next step.
Select which product/variant should be the main product (this one will remain after the merge).
The selected final product will retain all combined inventory, sales channels, and settings.
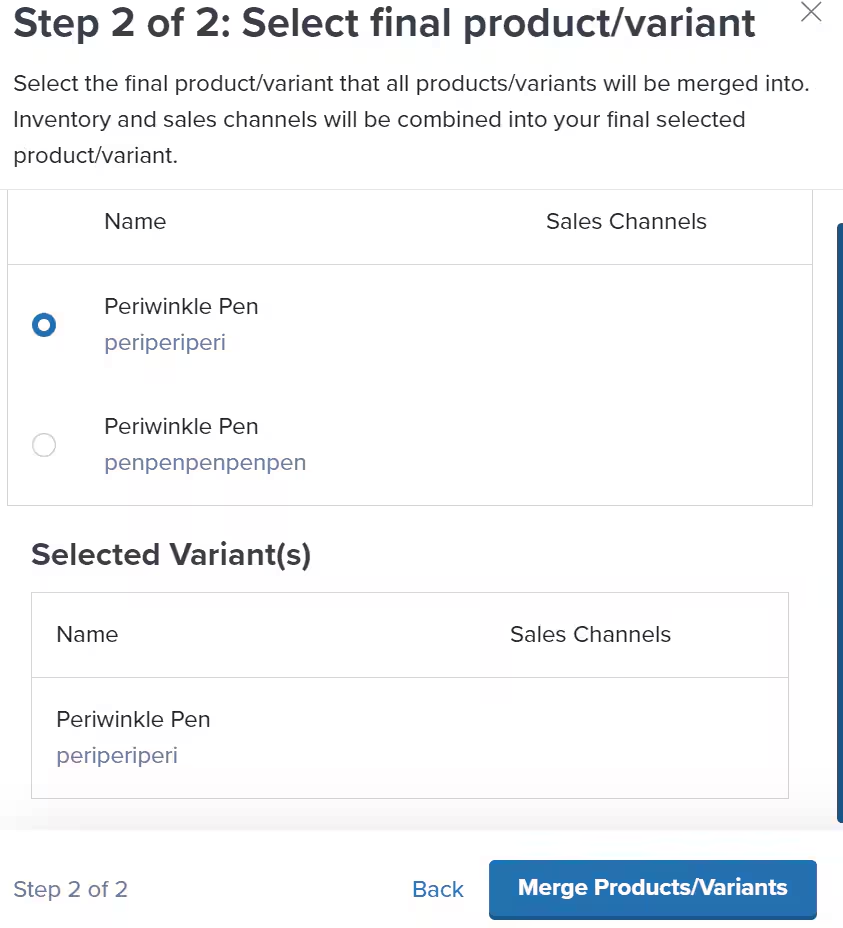 Click **Merge Products/Variants** to finalize the merge.
A success message will confirm the merge is complete.
### What Happens After Merging
* The selected main product remains active with all combined inventory
* Other products are removed from the catalog
* If automation rules existed for the merged products, they update to use the main product's SKU
* Order history is preserved for all merged products
### Reversing a Merge
While you can't fully unmerge products, you can unmerge Seller SKUs from the primary SKU's Sales Channels page. This can trigger product syncs or new order imports that recreate a product, provided the SKU doesn't already exist in your catalog.
***
## Moving Variants Between Parent Products
Sometimes you need to reorganize variants by moving them from one parent product to another. This helps you keep related products grouped together logically.
### Moving to a New Parent Product
If you want to create a new parent product container:
Navigate to the Product Catalog and find the variant listed under its current parent/primary product.
Click the **three vertical dots** next to the variant to expand options.
Click **Merge Products/Variants** to finalize the merge.
A success message will confirm the merge is complete.
### What Happens After Merging
* The selected main product remains active with all combined inventory
* Other products are removed from the catalog
* If automation rules existed for the merged products, they update to use the main product's SKU
* Order history is preserved for all merged products
### Reversing a Merge
While you can't fully unmerge products, you can unmerge Seller SKUs from the primary SKU's Sales Channels page. This can trigger product syncs or new order imports that recreate a product, provided the SKU doesn't already exist in your catalog.
***
## Moving Variants Between Parent Products
Sometimes you need to reorganize variants by moving them from one parent product to another. This helps you keep related products grouped together logically.
### Moving to a New Parent Product
If you want to create a new parent product container:
Navigate to the Product Catalog and find the variant listed under its current parent/primary product.
Click the **three vertical dots** next to the variant to expand options.
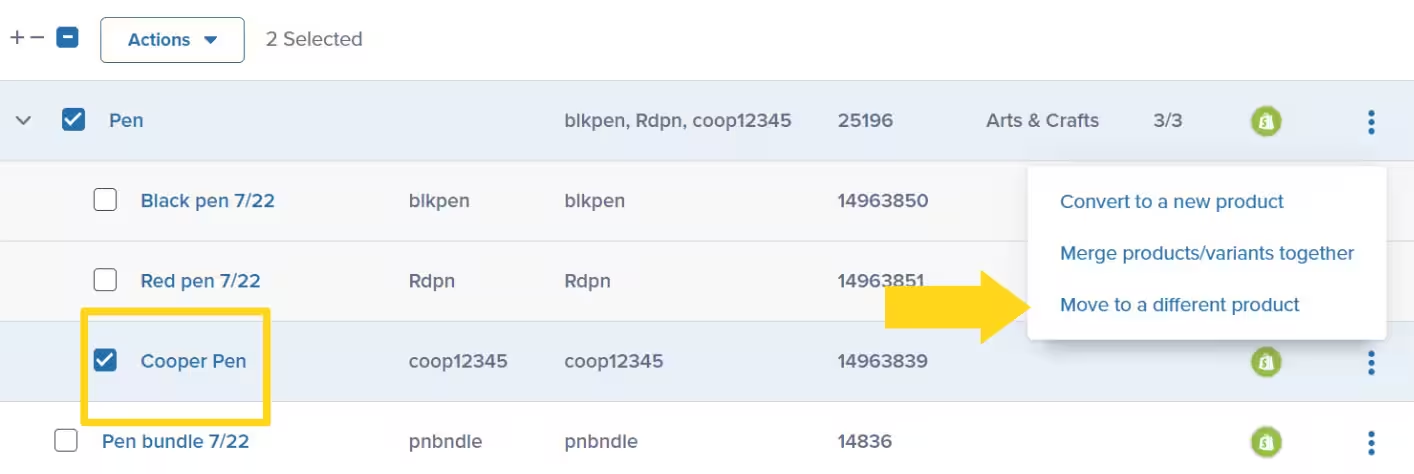 From the drop-down menu, select **Move to a different product**.
A pop-up window will appear with the selected product(s).
From the drop-down menu, select **Move to a different product**.
A pop-up window will appear with the selected product(s).
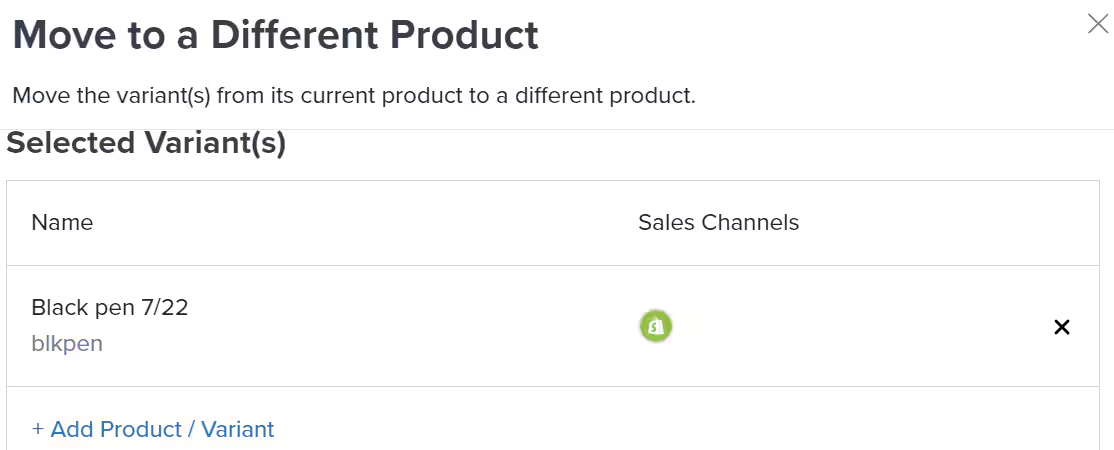 If you want to move multiple variants together, click **+ Add Product / Variant** to include more SKUs.
In the dialog, click **New Product** to create a new parent product container.
If you want to move multiple variants together, click **+ Add Product / Variant** to include more SKUs.
In the dialog, click **New Product** to create a new parent product container.
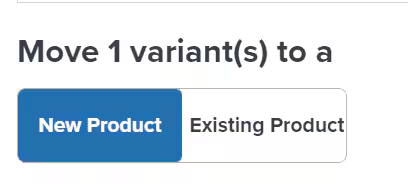 Enter a name in the **New Product Name** textbox and select a category (and subcategory, if applicable) from the drop-down menu.
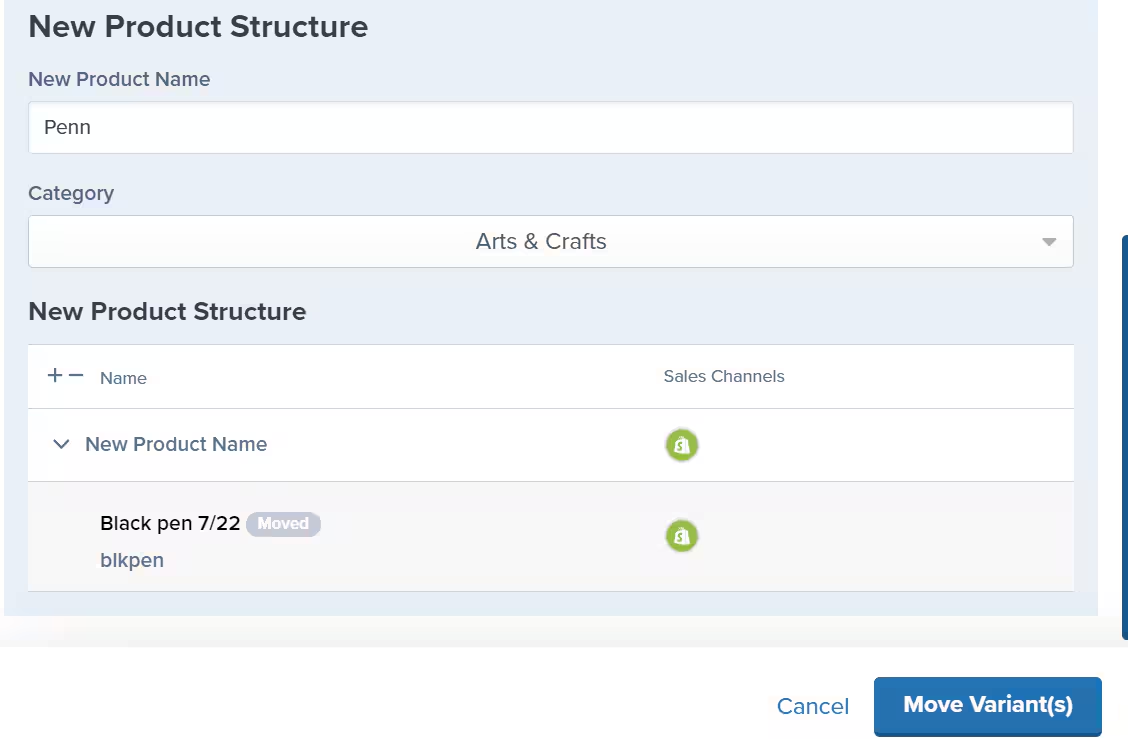 Review the new product structure and click **Move Variant(s)** to finalize the move.
### Moving to an Existing Parent Product
If you want to add variants to a parent product that already exists:
Follow Steps 1-4 from the "Moving to a New Parent Product" section above to open the move dialog.
In the dialog, select **Existing Product** instead of New Product.
Type the parent/primary product name into the search bar and select the appropriate product from the drop-down menu.
You can only move variants to an existing parent product that already has variants. You cannot add variants to a base product.
Review the new product structure and click **Move Variant(s)** to finalize the move.
***
## Let's Dive Deeper
Create and manage product variations
Navigate and organize your product catalog
Configure product settings and options
Update multiple products at once
Configure individual product settings
Save custom views for easier navigation
Review the new product structure and click **Move Variant(s)** to finalize the move.
### Moving to an Existing Parent Product
If you want to add variants to a parent product that already exists:
Follow Steps 1-4 from the "Moving to a New Parent Product" section above to open the move dialog.
In the dialog, select **Existing Product** instead of New Product.
Type the parent/primary product name into the search bar and select the appropriate product from the drop-down menu.
You can only move variants to an existing parent product that already has variants. You cannot add variants to a base product.
Review the new product structure and click **Move Variant(s)** to finalize the move.
***
## Let's Dive Deeper
Create and manage product variations
Navigate and organize your product catalog
Configure product settings and options
Update multiple products at once
Configure individual product settings
Save custom views for easier navigation

Questions? Contact Jetpack Care.
If you have any questions or run into issues, you can always contact Jetpack Care for help. Our team is always here to assist via Slack, phone, or email!