> ## Documentation Index
> Fetch the complete documentation index at: https://help.jetpack3pl.com/llms.txt
> Use this file to discover all available pages before exploring further.
# Creating Product Bundles
> Group multiple individual products into a single orderable bundle SKU that automatically displays and fulfills component products during order processing.
Bundles let you sell multiple products together as a single unit, making it easy to offer gift sets, starter kits, or multipacks without any physical assembly required. When someone orders a bundle, Jetpack automatically picks and ships all the individual items included—no special packaging or kitting work orders needed.
## What Makes Bundles Different
Think of a bundle as a virtual container rather than a physical product. The bundle SKU itself doesn't exist as inventory in the fulfillment center—instead, it's simply a convenient way to group multiple SKUs together for selling purposes. All the individual items remain stored separately and are picked together when the bundle is ordered.
This is different from kitting work orders, which involve actual physical assembly or preparation work:
**When you need a kitting work order instead:**
* Items arrive separately and must be physically combined into a set
* Custom boxes require folding inserts or dividers
* Packaging involves more than 8 folds
* Stickers, barcodes, or inspections need to be applied
* Inventory needs to be moved between SKUs or storage types
**When bundles work perfectly:**
* Products can ship together without assembly
* You want to group items for selling convenience
* Individual components are already properly packaged
Since bundles are virtual containers, all items within them are stored individually at Jetpack fulfillment centers. The bundle simply tells the system which products to pick together.
***
## Converting an Existing Product to a Bundle
If you already have a product in your catalog that you'd like to turn into a bundle:
Click **Products** in the left-hand navigation, then select the product you want to convert by clicking its name.
Scroll down to the **Bundles tile** under the Product Details tab and click **Convert to Bundle**.
The system will open a pop-up with the product's name and SKU already filled in.
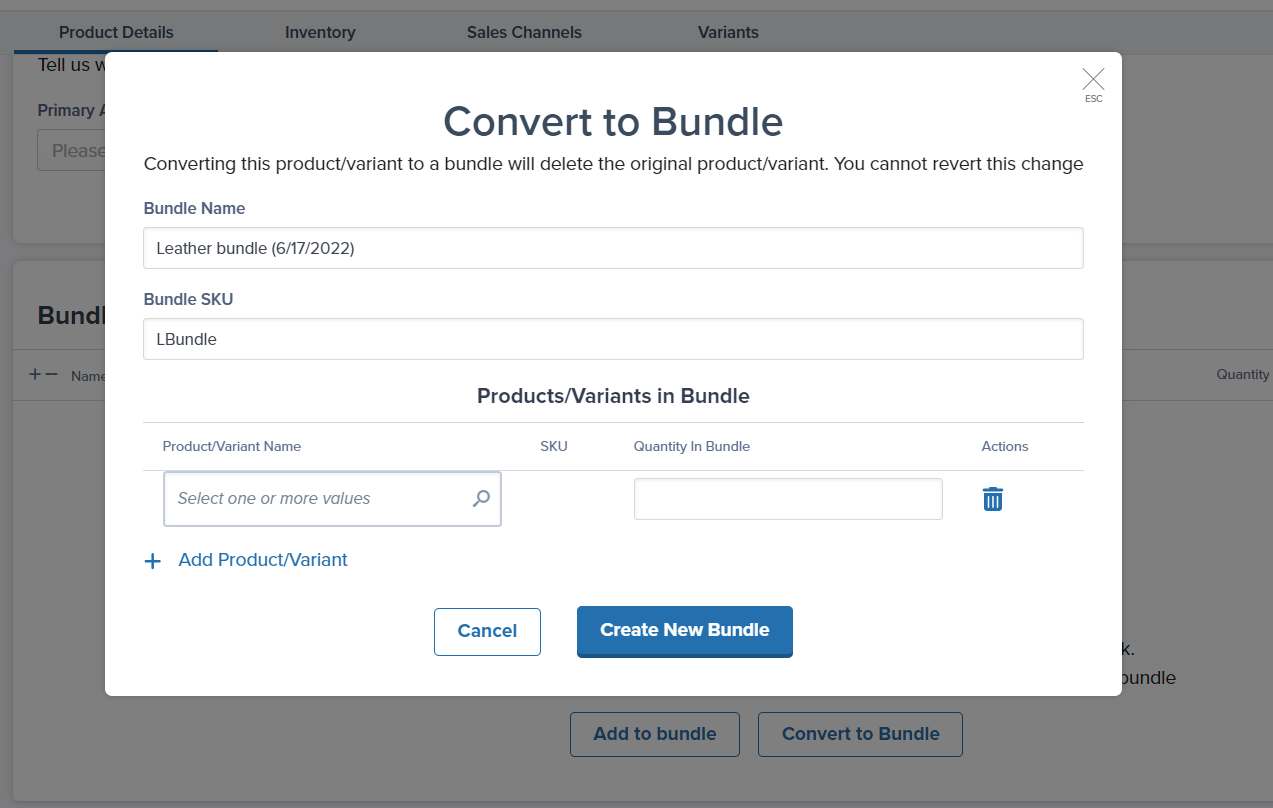 Use the **Product/Variant Name** search field to find products you want to include, select each product from the dropdown, and enter how many of each product should be in the bundle.
If you're bundling just one type of product (like a 3-pack of the same item), the quantity must be greater than 1.
Click **Add Product/Variant** if you want to include additional products.
Click **Create New Bundle** when you're done.
Your product now functions as a bundle, and orders will automatically pull the individual items.
***
## Creating a Brand New Bundle
To build a bundle from scratch:
Click **Products** in the left-hand navigation, then click **Add Product** and select **Add Bundle** from the dropdown.
Use the **Product/Variant Name** search field to find products you want to include, select each product from the dropdown, and enter how many of each product should be in the bundle.
If you're bundling just one type of product (like a 3-pack of the same item), the quantity must be greater than 1.
Click **Add Product/Variant** if you want to include additional products.
Click **Create New Bundle** when you're done.
Your product now functions as a bundle, and orders will automatically pull the individual items.
***
## Creating a Brand New Bundle
To build a bundle from scratch:
Click **Products** in the left-hand navigation, then click **Add Product** and select **Add Bundle** from the dropdown.
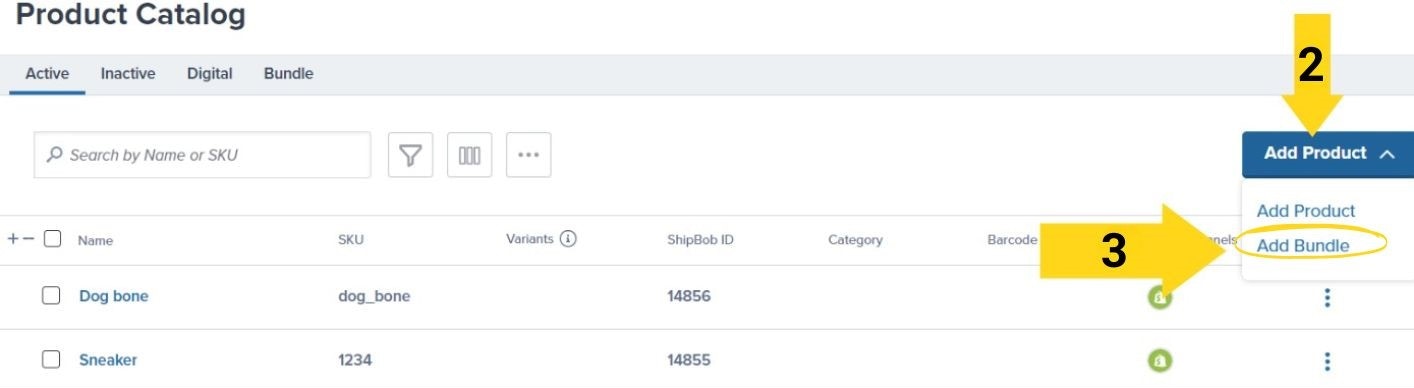 This opens the bundle creation window.
Enter a **Bundle Name** (what customers will see) and create a unique **Bundle SKU** (your internal identifier).
This opens the bundle creation window.
Enter a **Bundle Name** (what customers will see) and create a unique **Bundle SKU** (your internal identifier).
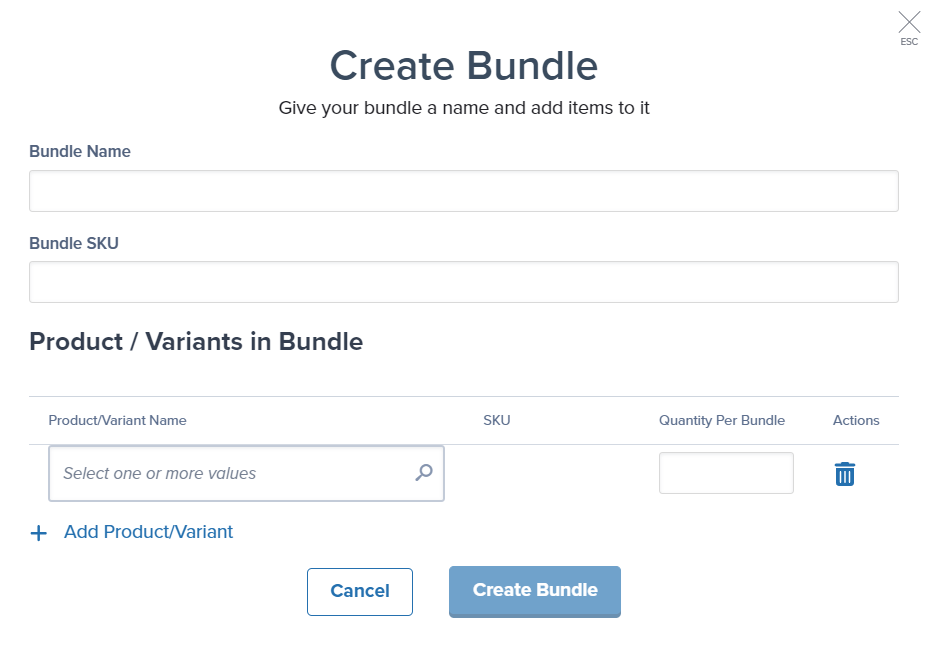 Search for and select the products you want to include, then set the quantity of each product in the bundle.
If adding only one SKU, the quantity must be greater than 1. For example, a 3-pack requires a quantity of 3.
Use **Add Product/Variant** to include more items if needed.
Click **Create New Bundle** to finalize.
***
## Managing Your Bundles
Once created, you can update bundle details from the Bundle Details tab:
**What you can change:**
* Bundle name (edit the Bundle Name field)
* Bundle SKU (update the SKU field)
* Component products and their quantities
* Add new products using the Add Product button
* Remove products using the trash icon in the Actions column
**What you can view:**
* Jetpack ID (a unique system identifier that can't be edited)
* Current bundle composition
* Inventory availability for each component
Search for and select the products you want to include, then set the quantity of each product in the bundle.
If adding only one SKU, the quantity must be greater than 1. For example, a 3-pack requires a quantity of 3.
Use **Add Product/Variant** to include more items if needed.
Click **Create New Bundle** to finalize.
***
## Managing Your Bundles
Once created, you can update bundle details from the Bundle Details tab:
**What you can change:**
* Bundle name (edit the Bundle Name field)
* Bundle SKU (update the SKU field)
* Component products and their quantities
* Add new products using the Add Product button
* Remove products using the trash icon in the Actions column
**What you can view:**
* Jetpack ID (a unique system identifier that can't be edited)
* Current bundle composition
* Inventory availability for each component
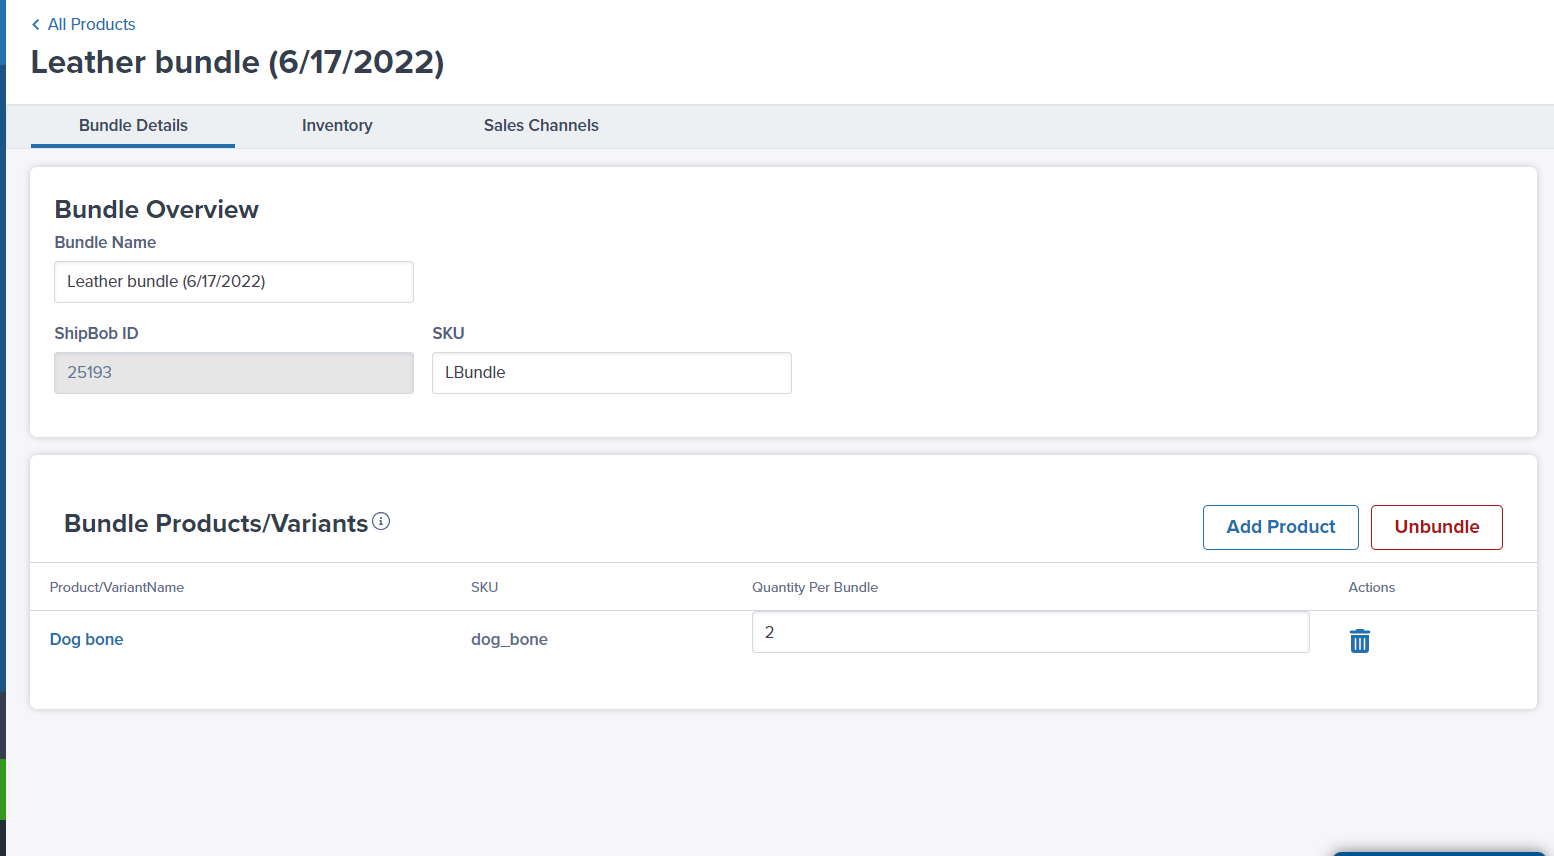 This makes it easy to adjust bundles as your product offerings change—no need to recreate them from scratch.
***
## Let's Dive Deeper
Create products in your catalog
Reorganize your product catalog
Configure product settings and options
Navigate your product catalog
Physical assembly and preparation work
Configure bundle components and settings
This makes it easy to adjust bundles as your product offerings change—no need to recreate them from scratch.
***
## Let's Dive Deeper
Create products in your catalog
Reorganize your product catalog
Configure product settings and options
Navigate your product catalog
Physical assembly and preparation work
Configure bundle components and settings

Questions? Contact Jetpack Care.
If you have any questions or run into issues, you can always contact Jetpack Care for help. Our team is always here to assist via Slack, phone, or email!