> ## Documentation Index
> Fetch the complete documentation index at: https://help.jetpack3pl.com/llms.txt
> Use this file to discover all available pages before exploring further.
# Syncing, Importing, and Creating Orders
> Learn the different methods to get orders into Jetpack—automatic sync from store integrations, manual sync, bulk Excel imports, and creating individual orders in the dashboard.
Getting orders into Jetpack is the first step in fulfilling your customer shipments. Whether you're automatically syncing thousands of orders from your ecommerce store, bulk importing B2B orders via Excel, or manually creating individual shipments, Jetpack provides flexible methods to fit your workflow. This guide covers all four methods for populating orders in your dashboard, along with guidelines to ensure smooth order processing and fulfillment.
## Four Ways to Get Orders into Jetpack
| Method | Best For | Key Features |
| ----------------------- | ------------------------------------------------------------------------------------------------------------------------------------------------------------ | ---------------------------------------------------------------------------------------------------------------------------------------------------- |
| **Automatic Syncing** | - D2C orders from integrated stores
- High-volume ecommerce businesses
- Hands-off order management
| - Orders sync automatically at regular intervals
- No manual intervention required
- Set once in Connection Settings
|
| **Manual Syncing** | - Importing orders outside automatic sync schedule
- One-time order imports
- Testing integrations
| - Trigger sync on-demand from Orders page
- Select specific orders to import
- See which orders already imported
|
| **Bulk Excel Import** | - B2B and wholesale orders
- Large batches of orders (up to 1,000 D2C or 25 B2B per file)
- Orders from non-integrated platforms
| - Upload using Jetpack's Excel template
- Supports both D2C and B2B orders
- Maximum 1,000 D2C or 25 B2B orders per file
|
| **Individual Creation** | - Single B2C, B2B, or FBA orders
- Custom or one-off shipments
- Testing fulfillment workflows
| - Create orders one at a time in dashboard
- Full control over recipient details
- Supports Amazon FBA prep orders
|
To automatically sync orders from your ecommerce platform, you must first integrate your store with Jetpack. Learn more about [setting up store integrations](/fulfillment/account-setup/integrations-overview).
***
## Method 1: Automatically Syncing Orders from Store Integrations
Automatic syncing is the most common method for importing D2C orders into Jetpack. Once configured, orders from your integrated ecommerce platform automatically sync to your Jetpack dashboard at regular intervals—no manual intervention required.
### How Automatic Order Sync Works
Each ecommerce integration syncs orders at varying time intervals depending on the platform. For example, some platforms sync every 15 minutes, while others sync hourly or at custom intervals you configure. To view the specific sync schedule for your integration, refer to the integration's Help Center article.
When automatic syncing is enabled:
1. New orders are created in your ecommerce store (Shopify, BigCommerce, WooCommerce, etc.)
2. The integration automatically detects new orders based on the sync schedule
3. Orders are imported to your Jetpack dashboard
4. Jetpack begins processing orders for fulfillment
### Enabling Automatic Order Sync
To enable automatic order syncing from your ecommerce store integration:
From the Jetpack dashboard:
Click **Integrations** on the left-hand navigation bar
Select **My Apps**
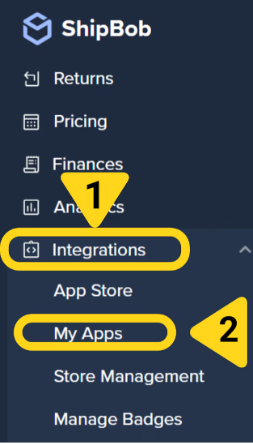 Locate the integration you want to update
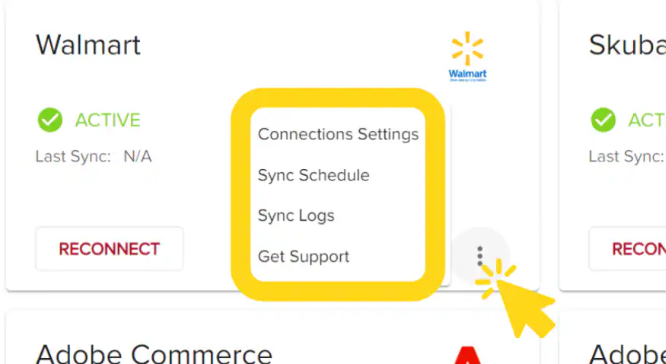
Click the **3 vertical dots** icon and choose **Connection Settings**
Locate the integration you want to update
Click the **3 vertical dots** icon and choose **Connection Settings**
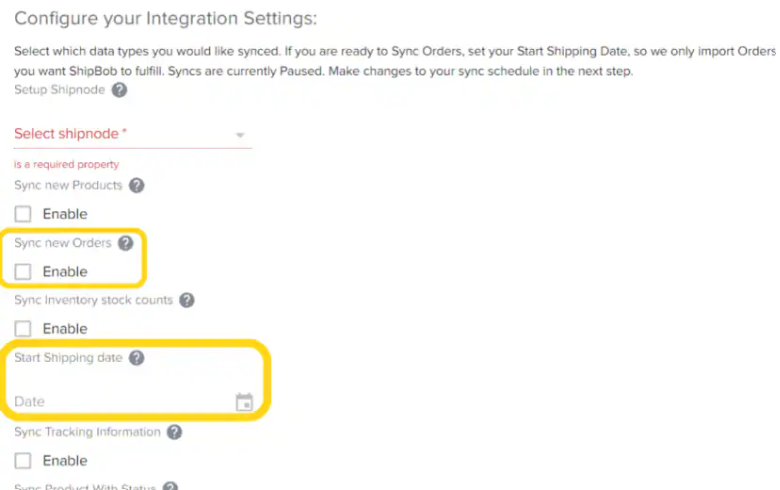
 Check the box next to **Sync new Orders**
Select a **Start Shipping date** (this can be a date in the past up to 120 days, or a future date)
* Orders created on or after this date will be imported from your store
Check the box next to **Sync new Orders**
Select a **Start Shipping date** (this can be a date in the past up to 120 days, or a future date)
* Orders created on or after this date will be imported from your store
 Click **SAVE**
The Start Shipping date determines which orders Jetpack will import. Only orders created on or after this date will sync from your ecommerce platform. You can set a past date (up to 120 days back) to import historical orders or a future date if you're not ready to start fulfillment yet.
### What If There's No Direct Integration?
If Jetpack doesn't have a direct integration with your ecommerce platform, you have several options:
* **Middleware providers** - Use tools like NetSuite, Order Desk, or ShipStation to connect your platform to Jetpack
* **ShipBob Developer API** - Build a custom integration using Jetpack's API infrastructure
* **OAuth Apps** - Connect via third-party OAuth applications
* **Manual import methods** - Use bulk Excel imports or manual order creation (covered below)
Learn more about [available integrations](/fulfillment/account-setup/integrations-overview) and [other integration options](/fulfillment/account-setup/other-integrations).
***
## Method 2: Manually Syncing Orders from Store Integrations
Manual syncing allows you to trigger order imports on-demand, outside of the automatic sync schedule. This is useful when you need to import orders immediately for testing, troubleshooting, or handling time-sensitive shipments.
### When to Use Manual Sync
* You need to import orders outside the automatic sync schedule
* Testing a new integration
* Importing a specific subset of orders
* Troubleshooting missing orders
### How to Manually Sync Orders
From the Jetpack dashboard:
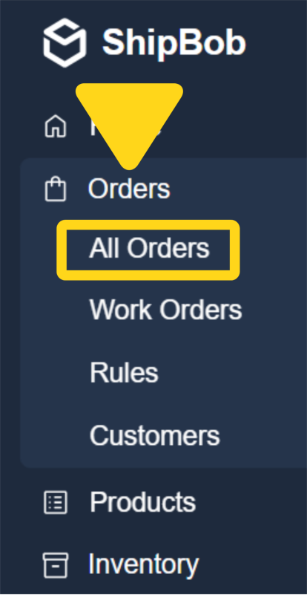
Click **Orders** on the left-hand navigation bar
Additional menu options will appear
Select **All Orders**
You will be redirected to the orders page
Click **SAVE**
The Start Shipping date determines which orders Jetpack will import. Only orders created on or after this date will sync from your ecommerce platform. You can set a past date (up to 120 days back) to import historical orders or a future date if you're not ready to start fulfillment yet.
### What If There's No Direct Integration?
If Jetpack doesn't have a direct integration with your ecommerce platform, you have several options:
* **Middleware providers** - Use tools like NetSuite, Order Desk, or ShipStation to connect your platform to Jetpack
* **ShipBob Developer API** - Build a custom integration using Jetpack's API infrastructure
* **OAuth Apps** - Connect via third-party OAuth applications
* **Manual import methods** - Use bulk Excel imports or manual order creation (covered below)
Learn more about [available integrations](/fulfillment/account-setup/integrations-overview) and [other integration options](/fulfillment/account-setup/other-integrations).
***
## Method 2: Manually Syncing Orders from Store Integrations
Manual syncing allows you to trigger order imports on-demand, outside of the automatic sync schedule. This is useful when you need to import orders immediately for testing, troubleshooting, or handling time-sensitive shipments.
### When to Use Manual Sync
* You need to import orders outside the automatic sync schedule
* Testing a new integration
* Importing a specific subset of orders
* Troubleshooting missing orders
### How to Manually Sync Orders
From the Jetpack dashboard:
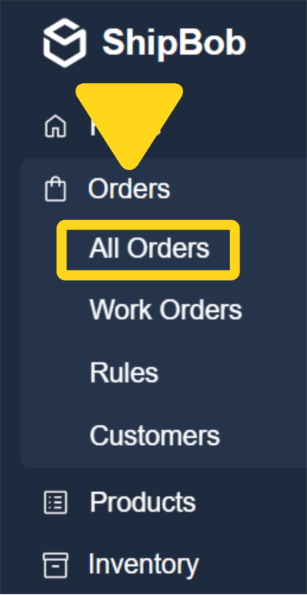
Click **Orders** on the left-hand navigation bar
Additional menu options will appear
Select **All Orders**
You will be redirected to the orders page
 Click the **Sync Orders** button
 Select the ecommerce platform tab and the store from the drop-down
Orders that have already been imported are marked with a **gray checkbox**
Select the ecommerce platform tab and the store from the drop-down
Orders that have already been imported are marked with a **gray checkbox**
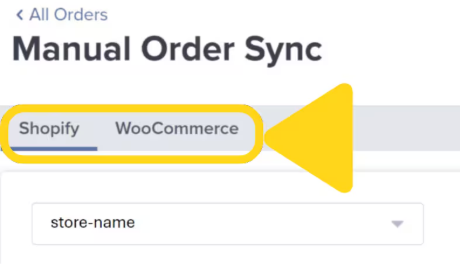 Click the **Sync** button next to each order you want to import—or select multiple orders and click **Sync Orders** at once
 Imported orders should appear within a few minutes. If they don't appear after 10–15 minutes, please use Slack or email.
***
## Method 3: Bulk Importing Orders Using Excel Template
Bulk importing via Excel is ideal for B2B orders, wholesale shipments, and high-volume order imports from platforms without direct integrations. You can import up to 1,000 D2C orders or 25 B2B orders per file using Jetpack's order import template.
### When to Use Bulk Excel Import
* Importing B2B or wholesale orders in large batches
* Creating orders from non-integrated ecommerce platforms
* Migrating order history from another 3PL or system
* Handling one-time bulk order scenarios
### Guidelines for Using the Bulk Order Import Template
Before uploading your Excel file, follow these important guidelines to ensure successful order imports:
| Guideline | Details |
| -------------------------------- | -------------------------------------------------------------------------------------------------------------------------------------------------------------------------------------------------------------------------------- |
| **Download the Template** | Use only Jetpack's official bulk order import Excel template. Do not create your own format. |
| **Follow Template Instructions** |
Imported orders should appear within a few minutes. If they don't appear after 10–15 minutes, please use Slack or email.
***
## Method 3: Bulk Importing Orders Using Excel Template
Bulk importing via Excel is ideal for B2B orders, wholesale shipments, and high-volume order imports from platforms without direct integrations. You can import up to 1,000 D2C orders or 25 B2B orders per file using Jetpack's order import template.
### When to Use Bulk Excel Import
* Importing B2B or wholesale orders in large batches
* Creating orders from non-integrated ecommerce platforms
* Migrating order history from another 3PL or system
* Handling one-time bulk order scenarios
### Guidelines for Using the Bulk Order Import Template
Before uploading your Excel file, follow these important guidelines to ensure successful order imports:
| Guideline | Details |
| -------------------------------- | -------------------------------------------------------------------------------------------------------------------------------------------------------------------------------------------------------------------------------- |
| **Download the Template** | Use only Jetpack's official bulk order import Excel template. Do not create your own format. |
| **Follow Template Instructions** | - Review the **Definitions & Instructions** tab carefully
- Do not alter cell formatting, including dropdown fields
- Enter B2C and B2B orders on their respective tabs
|
| **Order Limits** | - **B2C:** Maximum 1,000 orders (10 SKUs per order) per file
- **B2B:** Maximum 25 orders (50 SKUs per order) per file
|
| **B2B Large Orders** | If submitting a B2B order containing more than 10,000 units, fill out Jetpack's advance notice form 10 business days ahead of time in addition to uploading the Excel file. |
| **High-Volume D2C Notice** | If uploading more than 100 D2C orders, a +1 business day will be added to the orders' SLA. Provide the Operations team with 72-hour advance notice by submitting Jetpack's high-volume order form in addition to the Excel file. |
| **Zip Code Requirements** | If a country does not have a zip code, you must input the country abbreviation in the **Zipcode** column (as it appears on the **Country Codes & Names** tab of the Excel file). |
| **Product Name Matching** | - Product names must match exactly as they appear in the Jetpack Product Catalog
- This column cannot be blank
- Case-sensitive and spacing-sensitive
|
The most common cause of bulk import failures is product name mismatches. Ensure that product names in your Excel file match exactly—character for character—with the names in your [Product Catalog](/fulfillment/managing-products). Any discrepancies will cause the upload to fail.
### How to Upload the Excel Template
From the Jetpack dashboard:
Click **Orders** on the left-hand navigation bar
Additional menu options will appear
Select **All Orders**
You will be redirected to the Orders page
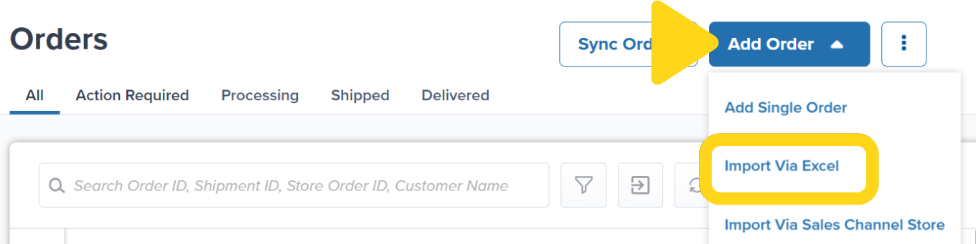
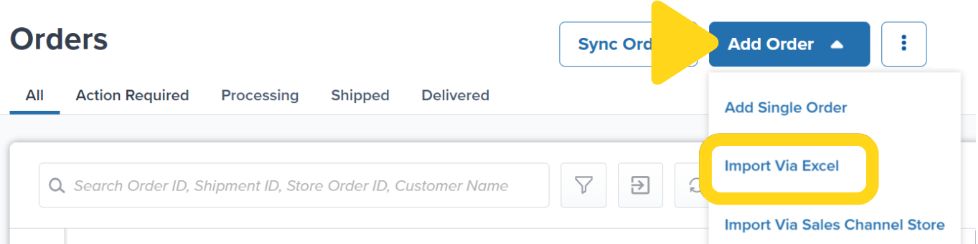
 Click **Add Order**
Additional menu options will appear
Select **Import Via Excel**
Click **Add Order**
Additional menu options will appear
Select **Import Via Excel**
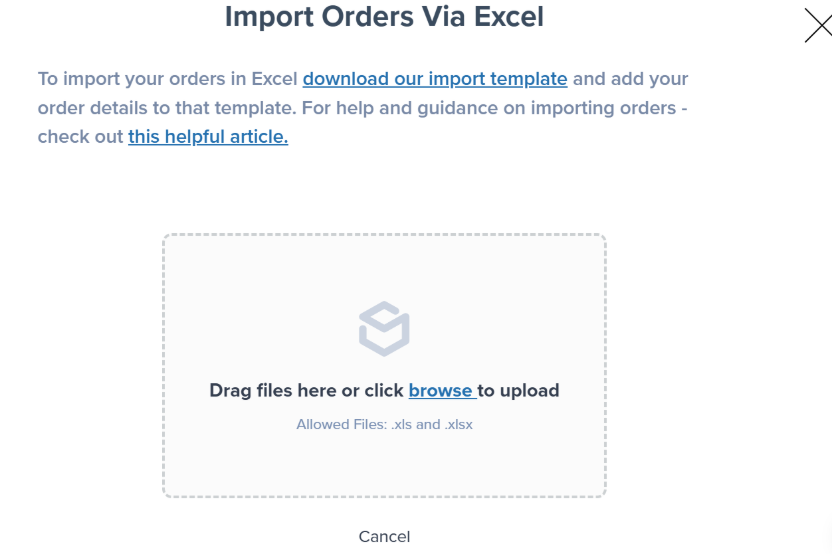
 Drag and drop or browse for your saved Excel file
 Click **Yes** to confirm that the total number of orders matches the count on the screen
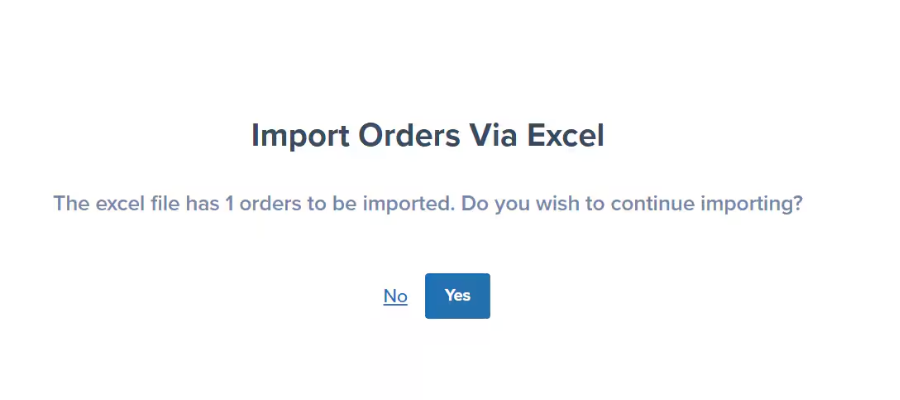 Imported orders should appear within a few minutes. If they don't appear after 10–15 minutes, please use Slack or email.
### Troubleshooting Bulk Import Errors
If errors occur during the upload process, you'll receive an error message indicating the issue. Common errors include:
| Error Type | Cause | Solution |
| --------------------------- | -------------------------------------------------- | --------------------------------------------------------------------------------------------------------------------- |
| **Duplicate Order IDs** | Order ID already exists in Jetpack | Remove duplicate orders or use unique order IDs |
| **Formatting Issues** | Cell formatting altered or incorrect data types | Re-download template and re-enter data without changing formatting |
| **Product Name Mismatch** | Product name doesn't match Product Catalog exactly | Verify product names in your [Product Catalog](/fulfillment/managing-products) and update Excel file to match exactly |
| **Missing Required Fields** | Required columns left blank | Review template instructions and fill in all required fields |
After reviewing the template instructions and making corrections, upload the corrected Excel file again.
***
## Method 4: Creating Individual Orders Manually
Creating individual orders manually in the Jetpack dashboard gives you full control over recipient details, products, and order types. This method is ideal for one-off shipments, custom orders, or testing fulfillment workflows.
### When to Create Orders Individually
* Single B2C, B2B, or FBA orders
* Custom or one-off shipments not from your store
* Testing fulfillment workflows or new products
* Sending samples or promotional shipments
* Creating Amazon FBA prep orders
### How to Create an Individual Order
From the Jetpack dashboard:
Click **Orders** on the left-hand navigation bar
Additional menu options will appear
Select **All Orders**
You will be redirected to the Orders page
Click **Add Order**
Additional menu options will appear
Select **Add Single Order**
Imported orders should appear within a few minutes. If they don't appear after 10–15 minutes, please use Slack or email.
### Troubleshooting Bulk Import Errors
If errors occur during the upload process, you'll receive an error message indicating the issue. Common errors include:
| Error Type | Cause | Solution |
| --------------------------- | -------------------------------------------------- | --------------------------------------------------------------------------------------------------------------------- |
| **Duplicate Order IDs** | Order ID already exists in Jetpack | Remove duplicate orders or use unique order IDs |
| **Formatting Issues** | Cell formatting altered or incorrect data types | Re-download template and re-enter data without changing formatting |
| **Product Name Mismatch** | Product name doesn't match Product Catalog exactly | Verify product names in your [Product Catalog](/fulfillment/managing-products) and update Excel file to match exactly |
| **Missing Required Fields** | Required columns left blank | Review template instructions and fill in all required fields |
After reviewing the template instructions and making corrections, upload the corrected Excel file again.
***
## Method 4: Creating Individual Orders Manually
Creating individual orders manually in the Jetpack dashboard gives you full control over recipient details, products, and order types. This method is ideal for one-off shipments, custom orders, or testing fulfillment workflows.
### When to Create Orders Individually
* Single B2C, B2B, or FBA orders
* Custom or one-off shipments not from your store
* Testing fulfillment workflows or new products
* Sending samples or promotional shipments
* Creating Amazon FBA prep orders
### How to Create an Individual Order
From the Jetpack dashboard:
Click **Orders** on the left-hand navigation bar
Additional menu options will appear
Select **All Orders**
You will be redirected to the Orders page
Click **Add Order**
Additional menu options will appear
Select **Add Single Order**
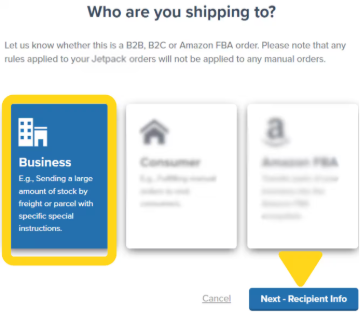
 Select one of the following order types:
* **Business** - For B2B/wholesale orders (note: orders with 25+ units are automatically considered B2B)
* **Consumer** - For B2C orders
* **Amazon FBA** - For inventory transfers to an Amazon warehouse
Click **Next - Create Order**
Select one of the following order types:
* **Business** - For B2B/wholesale orders (note: orders with 25+ units are automatically considered B2B)
* **Consumer** - For B2C orders
* **Amazon FBA** - For inventory transfers to an Amazon warehouse
Click **Next - Create Order**
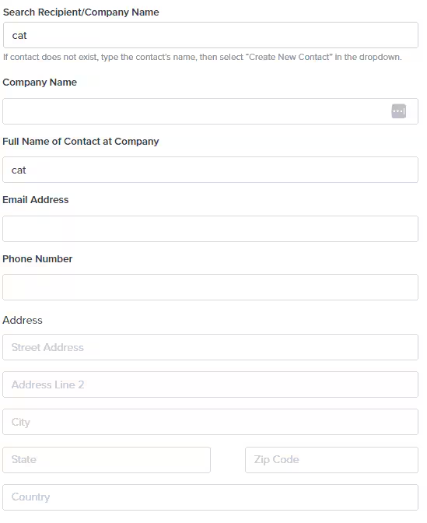
 Search for an existing contact or create a new one
Review and edit recipient information if needed
Click **Next**
* Jetpack validates the address; you'll be notified if the address is invalid
Search for an existing contact or create a new one
Review and edit recipient information if needed
Click **Next**
* Jetpack validates the address; you'll be notified if the address is invalid
 On the **New Order Draft** page, add products by typing their names or selecting from the dropdown list
Input the quantity for each product
Click **Save Items** to create the order
On the **New Order Draft** page, add products by typing their names or selecting from the dropdown list
Input the quantity for each product
Click **Save Items** to create the order
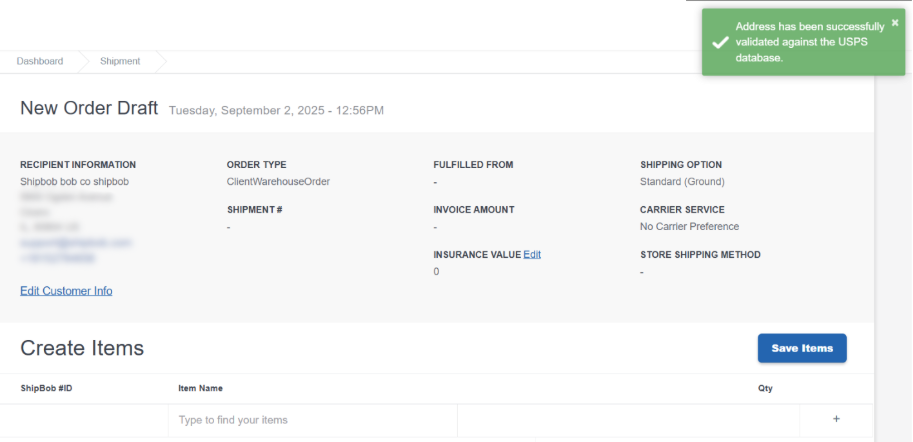 You will be redirected to the order details page of the newly created order. From here, you can [edit the order](/fulfillment/order-management/editing-orders) if needed, view order status, and track fulfillment progress.
For B2B orders created manually in Jetpack, standard GS1 labels are used for tracking and packing slips. These labels are printed on 4 x 6-inch (10.16 x 15.24 cm) labels and include a unique serial shipping container code (SSCC) for each box or pallet. Learn more about [creating manual B2B orders](/fulfillment/b2b/creating-manual-b2b-orders).
***
## Choosing the Right Method for Your Business
| If You Need To... | Use This Method |
| -------------------------------------------------------------------------------- | -------------------------------------------------------------------------------------------------------------- |
| Automatically import all D2C orders from Shopify, BigCommerce, WooCommerce, etc. | **Method 1: Automatic Syncing** |
| Import a specific subset of orders from your store on-demand | **Method 2: Manual Syncing** |
| Import 25 B2B wholesale orders at once | **Method 3: Bulk Excel Import** |
| Create a single custom shipment or sample order | **Method 4: Individual Creation** |
| Import orders from a platform without a direct integration | **Method 3: Bulk Excel Import** or explore [middleware options](/fulfillment/account-setup/other-integrations) |
| Test a new integration or fulfillment workflow | **Method 2: Manual Syncing** or **Method 4: Individual Creation** |
***
## Let's Dive Deeper
Back to the main D2C fulfillment guide
Understand order status progression
Resolve orders with issues
How orders are assigned to fulfillment centers
Make changes to order details
Connect your ecommerce platforms and apps
You will be redirected to the order details page of the newly created order. From here, you can [edit the order](/fulfillment/order-management/editing-orders) if needed, view order status, and track fulfillment progress.
For B2B orders created manually in Jetpack, standard GS1 labels are used for tracking and packing slips. These labels are printed on 4 x 6-inch (10.16 x 15.24 cm) labels and include a unique serial shipping container code (SSCC) for each box or pallet. Learn more about [creating manual B2B orders](/fulfillment/b2b/creating-manual-b2b-orders).
***
## Choosing the Right Method for Your Business
| If You Need To... | Use This Method |
| -------------------------------------------------------------------------------- | -------------------------------------------------------------------------------------------------------------- |
| Automatically import all D2C orders from Shopify, BigCommerce, WooCommerce, etc. | **Method 1: Automatic Syncing** |
| Import a specific subset of orders from your store on-demand | **Method 2: Manual Syncing** |
| Import 25 B2B wholesale orders at once | **Method 3: Bulk Excel Import** |
| Create a single custom shipment or sample order | **Method 4: Individual Creation** |
| Import orders from a platform without a direct integration | **Method 3: Bulk Excel Import** or explore [middleware options](/fulfillment/account-setup/other-integrations) |
| Test a new integration or fulfillment workflow | **Method 2: Manual Syncing** or **Method 4: Individual Creation** |
***
## Let's Dive Deeper
Back to the main D2C fulfillment guide
Understand order status progression
Resolve orders with issues
How orders are assigned to fulfillment centers
Make changes to order details
Connect your ecommerce platforms and apps

Questions? Contact Jetpack Care.
If you have any questions or run into issues, you can always contact Jetpack Care for help. Our team is always here to assist via Slack, phone, or email!