> ## Documentation Index
> Fetch the complete documentation index at: https://help.jetpack3pl.com/llms.txt
> Use this file to discover all available pages before exploring further.
# Inventory Transfers
> Learn how to transfer inventory between Jetpack fulfillment centers or to external facilities using WROs and B2B orders.
Inventory transfers enable you to strategically move inventory between Jetpack fulfillment centers, hubs, or to external facilities like Amazon. This guide walks you through the complete process of creating both the Warehouse Receiving Order (WRO) and corresponding B2B order needed to complete your transfer.
## Inventory Transfers Overview
Inventory transfers help you optimize your fulfillment strategy by moving stock between two Jetpack warehouses or from Jetpack to an external facility. These transfers enable faster shipping options, reduce costs, and maintain optimal inventory distribution across your fulfillment network.
All transfers are subject to standard shipping fees, receiving fees, and service level agreements.
Under no circumstances should cash on delivery (COD) be requested when scheduling a transfer.
### International Transfer Requirements
For inventory transfers to fulfillment centers outside of the United States, you will need to provide:
* A prepaid label with DDP service
* Pre-arranged freight with a customs broker
* A commercial invoice indicating that you are the Importer of Record ([template available here](https://support.shipbob.com/s/article/kb-1709835774759))
**Important:** If Jetpack is listed as the Importer on Record/Sold, a 15% accessorial fee will be billed back to you.
***
## Step 1: Create a Warehouse Receiving Order (WRO)
Creating a WRO is the first step because you'll need to upload the box labels to your B2B order later.
Click **Receiving** on the left-hand side, then select **Receiving Orders**, and click the blue **Send Inventory** button to start the WRO creation process.
Choose the Jetpack warehouse or hub you are sending inventory to. Optionally, insert a Purchase Order number (PO#), then click **Save & Continue**.
Begin typing the name of each product and select it from the search results. Enter the quantity to send for each product. Optionally, mark any product as a lot/dangerous good and check the confirmation box if applicable. Click **Save & Continue** when done.
Select your shipping method based on how you're sending the inventory:
**Parcel Shipments:**
* Configure the B2B order as Parcel
* When prompted, select "One SKU per Box"
* Choose your label option:
* Discounted printable labels from Jetpack
* Purchase your own labels
* Use your own carrier
**Palletized Container or Less than Truckload (LTL):**
* Configure the B2B order as Freight
* Select "One SKU per Pallet"
* Note: The team will consolidate inventory when possible
**Floor Loaded Container:**
* Also configure as Freight
* Provide a breakdown of total units per box/pallet and the number of boxes/pallets being shipped
Review the shipping address to ensure it matches the receiving fulfillment center. Enter the estimated date of arrival (calculate 10 business days from the current date/local time of the receiving center). Optionally, upload your Bill of Lading (BOL) if applicable (this appears only for freight configurations).
Review all details and click **Submit Receiving Order**. Confirm the submission when prompted.
**Download the box labels** for later upload to your B2B order, then click **Done** to complete the process. You'll be redirected to the completed WRO page.
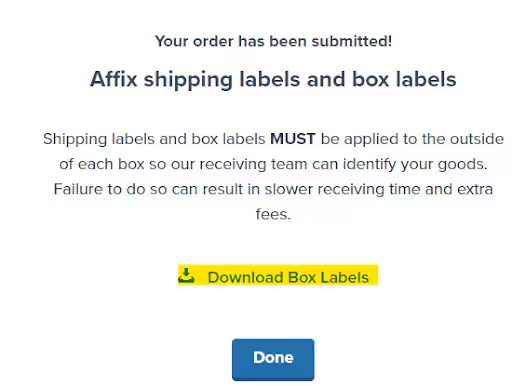 Save the downloaded box labels immediately—you'll need to upload them to your B2B order in the next step.
For more detailed guidance on creating WROs, see our [Creating a Warehouse Receiving Order (WRO)](/fulfillment/sending-inventory/creating-wro) guide.
***
## Step 2: Submit a B2B Order
Once your WRO is complete, create a B2B order to prep the inventory for shipment.
Click **Orders** on the left-hand side, then **All Orders**. Click **New Order** at the top right.
Save the downloaded box labels immediately—you'll need to upload them to your B2B order in the next step.
For more detailed guidance on creating WROs, see our [Creating a Warehouse Receiving Order (WRO)](/fulfillment/sending-inventory/creating-wro) guide.
***
## Step 2: Submit a B2B Order
Once your WRO is complete, create a B2B order to prep the inventory for shipment.
Click **Orders** on the left-hand side, then **All Orders**. Click **New Order** at the top right.
 Select **Business**, then click **Next – Recipient Info**.
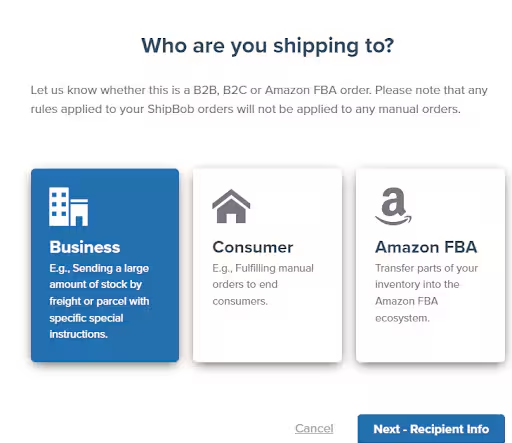 Ensure that details reflect the same information as your WRO:
* **For transfers within the United States**: Provide Jetpack's email address ([support@shipbob.com](mailto:support@shipbob.com)) and phone number (312-313-1104)
* **For transfers outside the United States**: Insert information of the individual handling the customs brokerage for this shipment
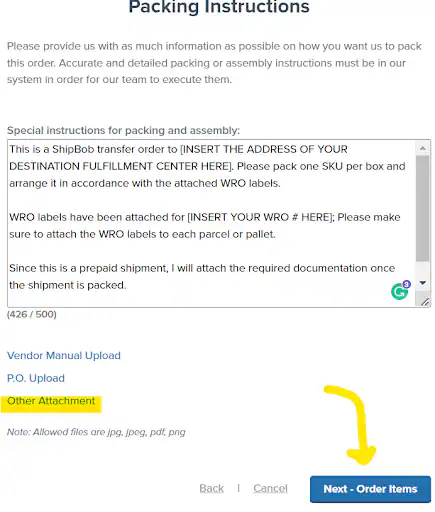
In the "Special Instructions for packing and assembly" field, copy and paste the following text (customize the bracketed sections):
*"This is a Jetpack transfer order to \[INSERT THE ADDRESS OF YOUR DESTINATION FULFILLMENT CENTER HERE]. Please pack one SKU per box and arrange it in accordance with the attached WRO labels. WRO labels have been attached for \[INSERT YOUR WRO # HERE]; Please make sure to attach the WRO labels to each parcel or pallet. Since this is a prepaid shipment, I will attach the required documentation once the shipment is packed."*
Upload the box labels downloaded during the WRO process by clicking **Other Attachment**.
Ensure that details reflect the same information as your WRO:
* **For transfers within the United States**: Provide Jetpack's email address ([support@shipbob.com](mailto:support@shipbob.com)) and phone number (312-313-1104)
* **For transfers outside the United States**: Insert information of the individual handling the customs brokerage for this shipment
In the "Special Instructions for packing and assembly" field, copy and paste the following text (customize the bracketed sections):
*"This is a Jetpack transfer order to \[INSERT THE ADDRESS OF YOUR DESTINATION FULFILLMENT CENTER HERE]. Please pack one SKU per box and arrange it in accordance with the attached WRO labels. WRO labels have been attached for \[INSERT YOUR WRO # HERE]; Please make sure to attach the WRO labels to each parcel or pallet. Since this is a prepaid shipment, I will attach the required documentation once the shipment is packed."*
Upload the box labels downloaded during the WRO process by clicking **Other Attachment**.
 Select the fulfillment center from which you are transferring inventory.
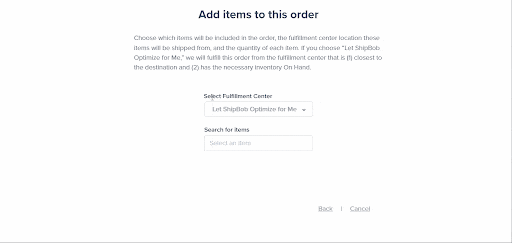 Do not select "Let Jetpack Optimize for Me" for inventory transfers. You must manually select the originating fulfillment center.
In the "Insert any special instructions for these SKUs" field, copy and paste the following text (customize the bracketed section):
*"This is a Jetpack transfer order to \[INSERT YOUR DESTINATION FULFILLMENT CENTER HERE]. Please pack one SKU per box and arrange it in accordance with the attached WRO labels."*
***
## B2B Order Information and Requirements
### Monitoring Your Transfer Order
Ensure that your shipment is in **Processing** status and address any **On-Hold** or **Action Required** issues promptly.
**Documentation Requirements:**
* **If using Jetpack labels or arranged freight**: No additional attachments or appointments are needed
* **If using prepaid labels or freight**: Your company must:
1. Upload the dimensions and weights once the service level agreement (SLA) has been met
2. Upload the prepaid labels or bill of lading (BOL) when ready
### Scheduling Appointments
For those arranging their own freight pickup or drop-off, please schedule appointments with Jetpack's inbound team.
Once a shipment has been picked, you cannot edit the products or units within it. Any changes to the shipping method should be communicated using Slack or email.
***
## Let's Dive Deeper
Learn how to create B2B orders for other scenarios
Detailed guide on attaching documents to orders
Understand service level agreements for B2B orders
Complete WRO creation guide
Track and manage your Warehouse Receiving Orders
Optimize inventory distribution across fulfillment centers
Do not select "Let Jetpack Optimize for Me" for inventory transfers. You must manually select the originating fulfillment center.
In the "Insert any special instructions for these SKUs" field, copy and paste the following text (customize the bracketed section):
*"This is a Jetpack transfer order to \[INSERT YOUR DESTINATION FULFILLMENT CENTER HERE]. Please pack one SKU per box and arrange it in accordance with the attached WRO labels."*
***
## B2B Order Information and Requirements
### Monitoring Your Transfer Order
Ensure that your shipment is in **Processing** status and address any **On-Hold** or **Action Required** issues promptly.
**Documentation Requirements:**
* **If using Jetpack labels or arranged freight**: No additional attachments or appointments are needed
* **If using prepaid labels or freight**: Your company must:
1. Upload the dimensions and weights once the service level agreement (SLA) has been met
2. Upload the prepaid labels or bill of lading (BOL) when ready
### Scheduling Appointments
For those arranging their own freight pickup or drop-off, please schedule appointments with Jetpack's inbound team.
Once a shipment has been picked, you cannot edit the products or units within it. Any changes to the shipping method should be communicated using Slack or email.
***
## Let's Dive Deeper
Learn how to create B2B orders for other scenarios
Detailed guide on attaching documents to orders
Understand service level agreements for B2B orders
Complete WRO creation guide
Track and manage your Warehouse Receiving Orders
Optimize inventory distribution across fulfillment centers

Questions? Contact Jetpack Care.
If you have any questions or run into issues with inventory transfers, you can always contact Jetpack Care for help. Our team is always here to assist via Slack, phone, or email!