> ## Documentation Index
> Fetch the complete documentation index at: https://help.jetpack3pl.com/llms.txt
> Use this file to discover all available pages before exploring further.
# Creating B2B/Wholesale Orders
> Learn how to create B2B and wholesale orders in the Jetpack dashboard, including guidelines, SLAs, and step-by-step instructions for parcel and freight shipments.
B2B order creation gives you full control over wholesale shipments, personal pickups, and donation orders directly from your Jetpack dashboard. This comprehensive guide covers everything you need to know about creating B2B orders—from understanding guidelines and service level agreements to step-by-step instructions for parcel and freight shipments. Whether you're shipping to retailers, wholesalers, or other commercial businesses, this guide will help you navigate the B2B order creation process effectively.
## What Are B2B Orders?
B2B (Business-to-Business) orders are larger requests typically shipped to retailers, wholesalers, or other commercial places of business. In Jetpack, B2B orders include:
* **Retail Distribution** - Orders processed via EDI to your retailers (for more information on EDI integration and retail distribution fulfillment, see [Retail Distribution + Dropshipping](/fulfillment/b2b/retail-distribution))
* **Manual B2B orders** - Non-EDI wholesale orders created in the dashboard (this article focuses on manual B2B order creation)
* **Personal pick-up orders** - Orders picked up directly from a fulfillment center
* **Donation orders** - Products donated to organizations or causes
* **High-volume B2C orders** - B2C orders with 25+ units (treated as B2B for pricing and SLA purposes)
Jetpack will treat B2C orders with more than 25 units as B2B orders, though they will remain in the dashboard as B2C orders. B2B pricing and SLA apply as outlined on this page.
***
## B2B Order Guidelines
Before creating manual B2B orders, review these important guidelines to ensure smooth order processing and fulfillment:
Requesting adjustment of the inventory within the B2B order in any way (adding, removing, or canceling the order) will incur a fee priced as a paid request.
If a B2B order requires a single lot ID per product, refer to the [B2B pick-by-lot process](/fulfillment/b2b/pick-by-lot) for details.
You can only have one order draft at a time (either B2C, manual B2B, or automated FBA). Click the **X** icon to exit the B2B creation process; all steps will be saved as a draft.
Jetpack will follow the fragile pack process for any items marked as fragile in the dashboard. Learn more about [handling fragile items](/fulfillment/tools-techniques/fragile-items).
For FBA orders requiring ASIN application, use Jetpack's [FBA flow](/fulfillment/b2b/amazon-fba/creating-automated-fba-shipments).
All orders with an insurance value of USD \$300 or greater will automatically require a signature. You will be charged per the pricing outlined in your agreement.
Attach a commercial invoice for all international B2B orders. Learn more about [customs and commercial invoices](/fulfillment/account-setup/shipping-preferences/customs-commercial-invoices).
Jetpack cannot ship orders on plastic pallets, modify shipping labels, or support custom labels unless a PDF attachment is provided.
Upload required shipping labels within 5 business days of order readiness for prepaid parcel orders.
Attach required shipping labels and schedule pickup within 5 business days for self-arranged freight orders.
For B2B parcel orders with a Jetpack label, the carrier will be chosen based on the order's Ship Option. The default is standard shipping, but you can select a specific carrier or expedited shipping on the order details page. Learn more about [choosing default carriers](/fulfillment/account-setup/shipping-preferences/choosing-default-carriers).
For B2B freight shipments in AU, EU (Netherlands), UK, or US, Jetpack will handle freight coordination and scheduling. Outside these regions, use the Upload Your Own (Prepaid) option for freight shipments.
For special B2B shipping needs (e.g., reefer truck), add details to the Special SKU Instructions. Learn more about [Jetpack's freight services](/fulfillment/tools-techniques/using-our-freight-services).
Any value-added services (e.g., bagging, labeling) must be done through a [kitting order](/fulfillment/kitting-and-work-orders/creating-kitting-orders) before submitting a B2B order.
If submitting a B2B order containing more than 10,000 units, contact Jetpack Care 10 business days ahead of time to ensure proper capacity planning at the fulfillment center.
***
## B2B Wholesale SLA
Jetpack's B2B Service Level Agreement (SLA) outlines turnaround times and expectations for wholesale order fulfillment. The SLA starts once the reserve date is met and the order enters Processing status.
For detailed information about B2B turnaround times and service level agreements, see [B2B Turnaround Times](/fulfillment/b2b/b2b-turnaround-times).
***
## Creating Manual B2B Wholesale Orders in the Dashboard
Follow these step-by-step instructions to create a manual B2B order in your Jetpack dashboard:
From the Jetpack dashboard:
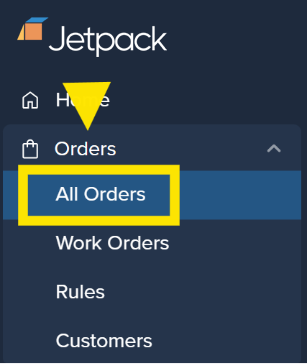
1. Click **Orders** on the left-hand navigation bar
2. Select **All Orders** to be redirected to the Orders page
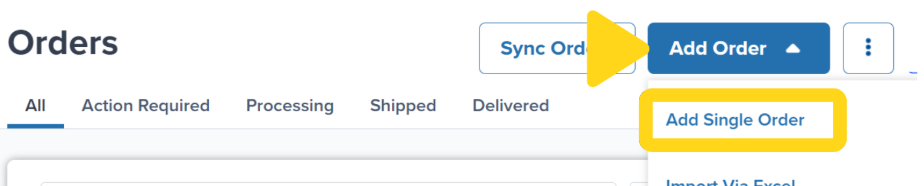
 1. Click **Add Order**
2. Additional menu options will appear
3. Select **Add Single Order**
4. You will be redirected to begin the order creation process
1. Click **Add Order**
2. Additional menu options will appear
3. Select **Add Single Order**
4. You will be redirected to begin the order creation process
 1. Select **Business** under "Who are you shipping to?"
2. Click **Next - Recipient Info**
1. Select **Business** under "Who are you shipping to?"
2. Click **Next - Recipient Info**
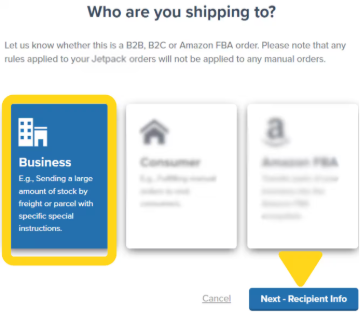 Choose **Business** for B2B/wholesale orders. Choose **Consumer** for standard D2C orders. Remember that B2C orders with 25+ units are automatically treated as B2B orders for pricing and SLA purposes.
1. In the textbox under "Search Recipient/Company Name", search for the recipient by name
2. Select an existing contact or click **Create New Contact** to add a new recipient
* If selecting an existing contact, the recipient's address and contact details will auto-populate
* If creating a new contact, complete the required fields
3. Click **Next - Shipping Info**
Choose **Business** for B2B/wholesale orders. Choose **Consumer** for standard D2C orders. Remember that B2C orders with 25+ units are automatically treated as B2B orders for pricing and SLA purposes.
1. In the textbox under "Search Recipient/Company Name", search for the recipient by name
2. Select an existing contact or click **Create New Contact** to add a new recipient
* If selecting an existing contact, the recipient's address and contact details will auto-populate
* If creating a new contact, complete the required fields
3. Click **Next - Shipping Info**
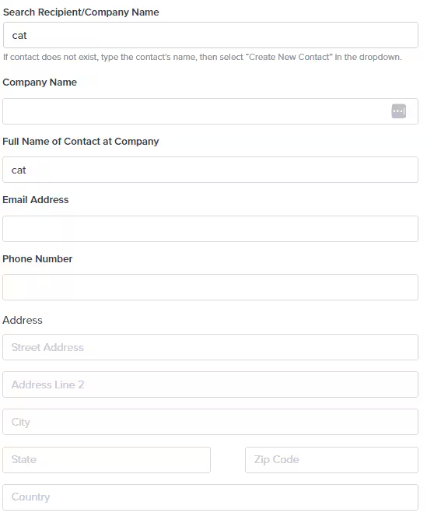 Always verify the recipient's address for accuracy. Address validation will occur when you proceed to the next step.
Choose **Parcel** or **Freight** based on the shipment's size:
* **Parcel** - For individual boxes
* **Freight** - For palletized shipments
Click **Next - Shipping Details**
Select **Jetpack buys** or **Upload your own**:
**Option A: Jetpack Buys**
* Jetpack will ship the order using our carriers
* **Important:** By choosing Jetpack buys, you consent to the selected carrier and their associated fees
**For a shipping quote before shipment:**
* Select **Upload your own** and contact Jetpack Care after the order is fully packed
* Once Jetpack has provided a quote, you will have the opportunity to accept the quote for Jetpack-provided shipping or provide your own shipping label for the order
**Option B: Upload Your Own**
* You will arrange shipping, and Jetpack will upload the order's dimensions/weight once packed
Click **Next - Packing Instructions**
1. In the textbox under "Special instructions for packing and assembly", add any specific instructions for packing
2. Upload a PO or any other attachments
* Accepted file types: .jpg, .jpeg, .pdf, .png
* Maximum file size: 5 MB
Note: The "Vendor Manual Upload" hyperlink does not have functionality (meaning Jetpack will not be able to follow or read vendor manuals). For specific product handling instructions, add them directly in the packing instructions field.
Click **Next - Order Items**
1. Choose the fulfillment center for the order from the dropdown menu, or select **Let Jetpack optimize for me** to have Jetpack select the optimal fulfillment center
2. Add the inventory ID(s) and total units to be picked
3. **(Optional):** Add special instructions for specific SKUs
Click **Next - Shipping Information**
1. Under "What day should we reserve your inventory?", select the date for inventory reservation
* If the order needs to be processed immediately, select today's date
* The SLA starts once the reserve date is met
Click **Next - Review**
1. Review all order details
2. To make changes, click **Back**
3. Click **Create Order** to complete the process
You will be redirected to the order details page where you can view the order and perform additional actions.
***
## Accessing Order Details
After creating the order, you will be redirected to the order details page, where you can view details and perform certain actions:
| Order Detail | Description | Can Be Edited? |
| -------------------------- | ------------------------------------ | ----------------------------------- |
| **Recipient Information** | Shipping address and contact details | Yes, until the order is picked |
| **Unique Shipment Number** | Order reference number | No, cannot be edited |
| **Fulfillment Center** | The FC that will fulfill the order | No, set during creation |
| **Reserve Inventory Date** | The date when inventory was reserved | View only |
| **Dimensions and Weight** | Package measurements | Available after the order is packed |
| **Shipping Options** | Carrier and service level | Only relevant for parcel shipments |
Learn more about viewing and managing order information on the [Shipment Details Page](/fulfillment/order-management/shipment-details-page).
### Insurance Value
From the Order Details page, you can also specify if you want to add insurance to an order. Orders with an insurance value of USD \$300 or greater will automatically require a signature.
***
## Monitoring Order Status
Understanding order status helps you track fulfillment progress and resolve issues quickly:
* If the reserve date is met and no Action Required reason exists, the order will automatically move to **Processing**
* If the reserve date is not met, the order will move to **Action Required**
* The SLA starts when the order enters **Processing**
Resolve any Action Required statuses promptly to prevent delays. Common Action Required reasons include:
* Insufficient inventory
* Missing or invalid shipping information
* Required shipping labels not uploaded (for prepaid orders)
Learn more about [resolving orders with Action Required status](/fulfillment/d2c/orders-action-required).
Once packed, access the order's dimensions and weight under Additional Information on the order details page (for prepaid parcel and all freight orders). This information is critical for:
* Prepaid parcel orders - To create shipping labels
* All freight orders - To coordinate pickup and delivery
Learn more about [retrieving shipment dimensions and weight](/fulfillment/tools-techniques/package-size-weight-policies).
***
## Let's Dive Deeper
Back to the main B2B fulfillment guide
Review SLAs for wholesale orders
Automate B2B order imports from Shopify
Single lot ID per product requirements
Add POs and documents to orders
Learn about freight coordination
Always verify the recipient's address for accuracy. Address validation will occur when you proceed to the next step.
Choose **Parcel** or **Freight** based on the shipment's size:
* **Parcel** - For individual boxes
* **Freight** - For palletized shipments
Click **Next - Shipping Details**
Select **Jetpack buys** or **Upload your own**:
**Option A: Jetpack Buys**
* Jetpack will ship the order using our carriers
* **Important:** By choosing Jetpack buys, you consent to the selected carrier and their associated fees
**For a shipping quote before shipment:**
* Select **Upload your own** and contact Jetpack Care after the order is fully packed
* Once Jetpack has provided a quote, you will have the opportunity to accept the quote for Jetpack-provided shipping or provide your own shipping label for the order
**Option B: Upload Your Own**
* You will arrange shipping, and Jetpack will upload the order's dimensions/weight once packed
Click **Next - Packing Instructions**
1. In the textbox under "Special instructions for packing and assembly", add any specific instructions for packing
2. Upload a PO or any other attachments
* Accepted file types: .jpg, .jpeg, .pdf, .png
* Maximum file size: 5 MB
Note: The "Vendor Manual Upload" hyperlink does not have functionality (meaning Jetpack will not be able to follow or read vendor manuals). For specific product handling instructions, add them directly in the packing instructions field.
Click **Next - Order Items**
1. Choose the fulfillment center for the order from the dropdown menu, or select **Let Jetpack optimize for me** to have Jetpack select the optimal fulfillment center
2. Add the inventory ID(s) and total units to be picked
3. **(Optional):** Add special instructions for specific SKUs
Click **Next - Shipping Information**
1. Under "What day should we reserve your inventory?", select the date for inventory reservation
* If the order needs to be processed immediately, select today's date
* The SLA starts once the reserve date is met
Click **Next - Review**
1. Review all order details
2. To make changes, click **Back**
3. Click **Create Order** to complete the process
You will be redirected to the order details page where you can view the order and perform additional actions.
***
## Accessing Order Details
After creating the order, you will be redirected to the order details page, where you can view details and perform certain actions:
| Order Detail | Description | Can Be Edited? |
| -------------------------- | ------------------------------------ | ----------------------------------- |
| **Recipient Information** | Shipping address and contact details | Yes, until the order is picked |
| **Unique Shipment Number** | Order reference number | No, cannot be edited |
| **Fulfillment Center** | The FC that will fulfill the order | No, set during creation |
| **Reserve Inventory Date** | The date when inventory was reserved | View only |
| **Dimensions and Weight** | Package measurements | Available after the order is packed |
| **Shipping Options** | Carrier and service level | Only relevant for parcel shipments |
Learn more about viewing and managing order information on the [Shipment Details Page](/fulfillment/order-management/shipment-details-page).
### Insurance Value
From the Order Details page, you can also specify if you want to add insurance to an order. Orders with an insurance value of USD \$300 or greater will automatically require a signature.
***
## Monitoring Order Status
Understanding order status helps you track fulfillment progress and resolve issues quickly:
* If the reserve date is met and no Action Required reason exists, the order will automatically move to **Processing**
* If the reserve date is not met, the order will move to **Action Required**
* The SLA starts when the order enters **Processing**
Resolve any Action Required statuses promptly to prevent delays. Common Action Required reasons include:
* Insufficient inventory
* Missing or invalid shipping information
* Required shipping labels not uploaded (for prepaid orders)
Learn more about [resolving orders with Action Required status](/fulfillment/d2c/orders-action-required).
Once packed, access the order's dimensions and weight under Additional Information on the order details page (for prepaid parcel and all freight orders). This information is critical for:
* Prepaid parcel orders - To create shipping labels
* All freight orders - To coordinate pickup and delivery
Learn more about [retrieving shipment dimensions and weight](/fulfillment/tools-techniques/package-size-weight-policies).
***
## Let's Dive Deeper
Back to the main B2B fulfillment guide
Review SLAs for wholesale orders
Automate B2B order imports from Shopify
Single lot ID per product requirements
Add POs and documents to orders
Learn about freight coordination

Questions? Contact Jetpack Care.
If you have any questions or run into issues creating B2B orders, you can always contact Jetpack Care for help. Our team is always here to assist via Slack, phone, or email!