> ## Documentation Index
> Fetch the complete documentation index at: https://help.jetpack3pl.com/llms.txt
> Use this file to discover all available pages before exploring further.

# Syncing Your Products

> Learn how to sync products from your integrated online stores into the Jetpack Product Catalog.

<div className="page-intro">
  Syncing products from your integrated online stores is the most common and efficient way to get your products into the Jetpack platform. Once you've connected your store integration, you can sync your product catalog with just a few clicks.
</div>

## Syncing Products from Your Online Stores

**From the Jetpack dashboard:**

<Steps>
  <Step title="Open Quick Actions">
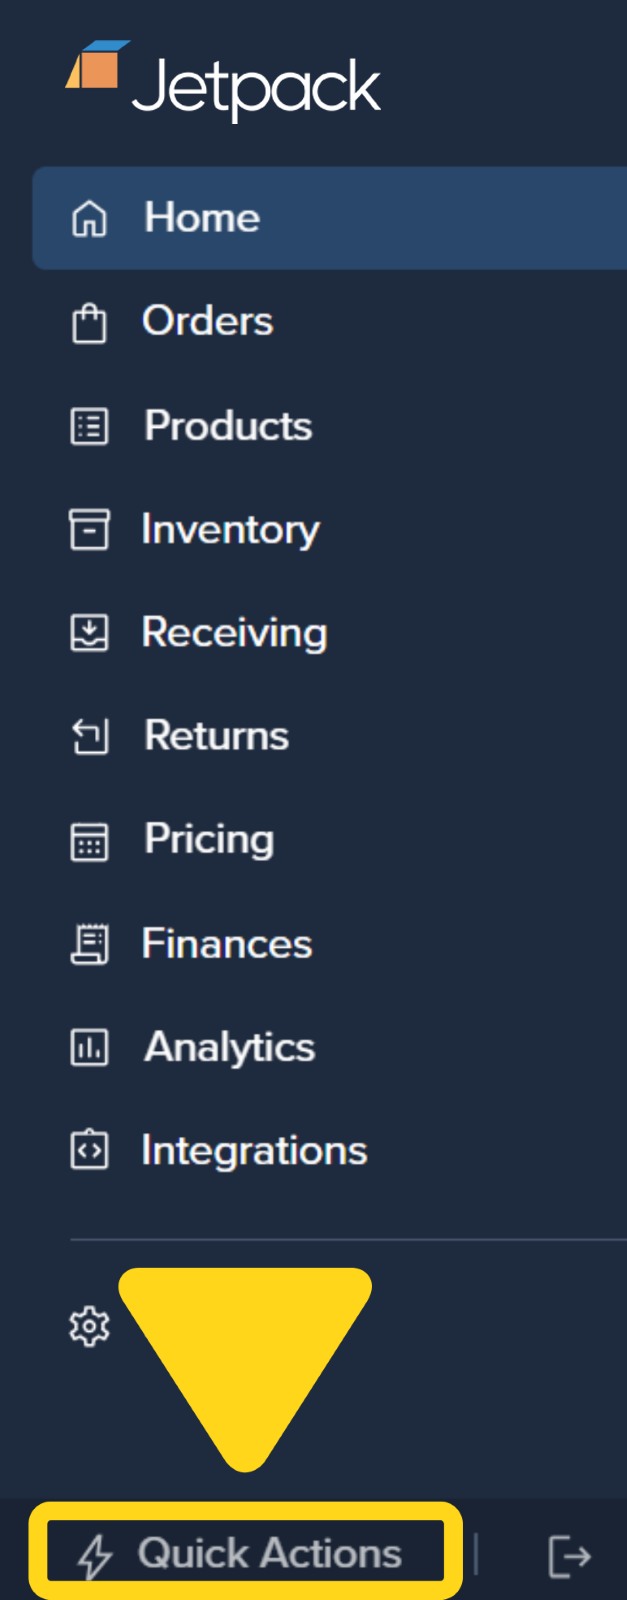
    Click on **Quick Actions** in your dashboard. A pop-up window will appear.

    <img src="https://mintcdn.com/jetpack/tNeg3buzYemYIRBU/fulfillment/account-setup/images/onboarding-quick-actions-button.png?fit=max&auto=format&n=tNeg3buzYemYIRBU&q=85&s=2224fb6a5ab58bfa6bdcb6e5d87b890c" alt="Jetpack dashboard with Quick Actions button highlighted" className="screenshot" width="627" height="1600" data-path="fulfillment/account-setup/images/onboarding-quick-actions-button.png" />
  </Step>

  <Step title="Choose Sync Your Products">
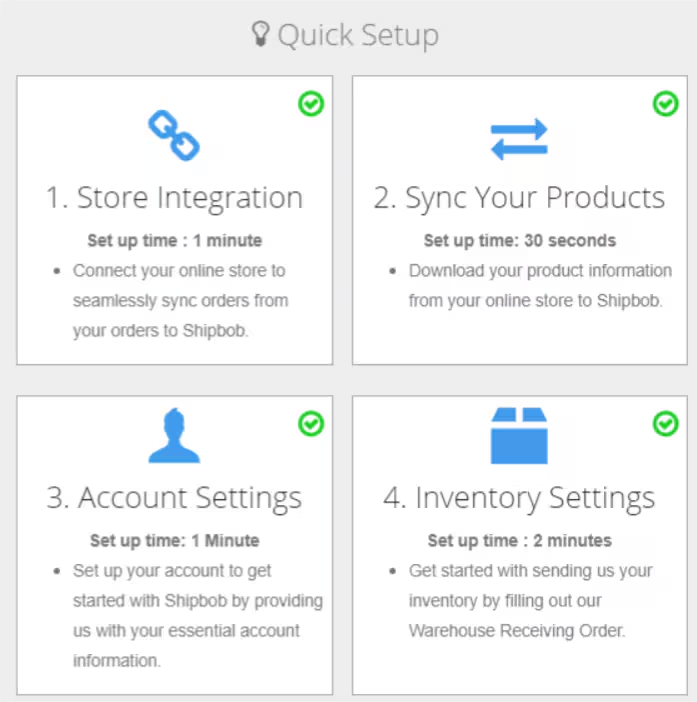
    Select the **Sync Your Products** option from the menu.

    <img src="https://mintcdn.com/jetpack/tNeg3buzYemYIRBU/fulfillment/account-setup/images/onboarding-quick-actions-menu.png?fit=max&auto=format&n=tNeg3buzYemYIRBU&q=85&s=c69868bca65f996681c620507fc5d6bd" alt="Quick Setup menu showing setup options including Sync Your Products" className="screenshot" width="697" height="702" data-path="fulfillment/account-setup/images/onboarding-quick-actions-menu.png" />
  </Step>

  <Step title="Select stores to sync">
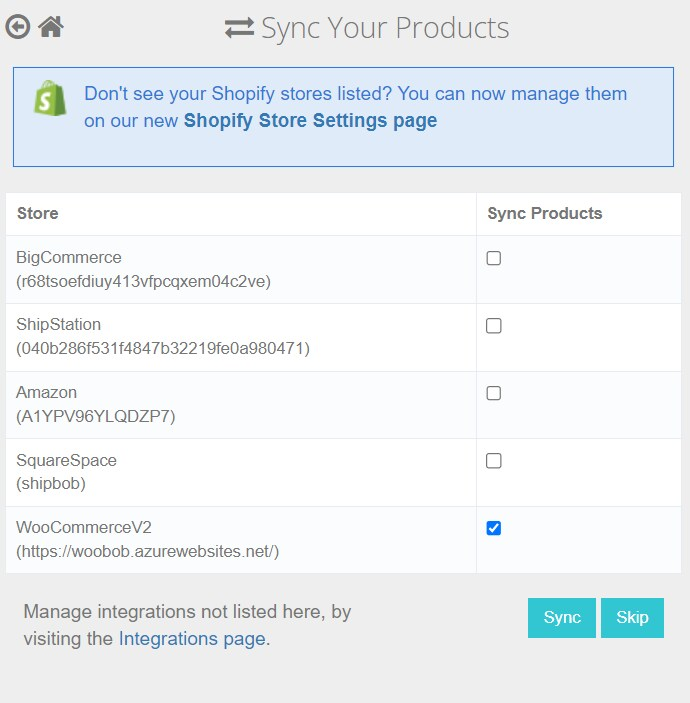
    Check the box next to each store from which you want to sync SKUs.

    <img src="https://mintcdn.com/jetpack/tNeg3buzYemYIRBU/fulfillment/account-setup/images/onboarding-sync-stores-selection.png?fit=max&auto=format&n=tNeg3buzYemYIRBU&q=85&s=76ea4b5ea0f7ed7550b3ed1cdda25b6b" alt="Product sync dialog showing store list with checkboxes to select which stores to sync from" className="screenshot" width="690" height="703" data-path="fulfillment/account-setup/images/onboarding-sync-stores-selection.png" />
  </Step>

  <Step title="Start the sync">
    Click the **Sync** button to begin syncing your products.
  </Step>
</Steps>

Once the sync is complete, your products will appear in the [Product Catalog](/fulfillment/managing-products).

<Info title="Platform-Specific Instructions">
  Specific instructions and options for initially syncing products from your store will depend on which ecommerce platform you're syncing from. For detailed guidance on setting up your specific integration, see the [Store Integration Overview](/fulfillment/account-setup/integrating-store).
</Info>

***

## What Happens After You Sync?

After your initial product sync completes, your products appear in the Product Catalog—but there are important next steps to ensure smooth fulfillment operations.

### Reviewing Your Product Data

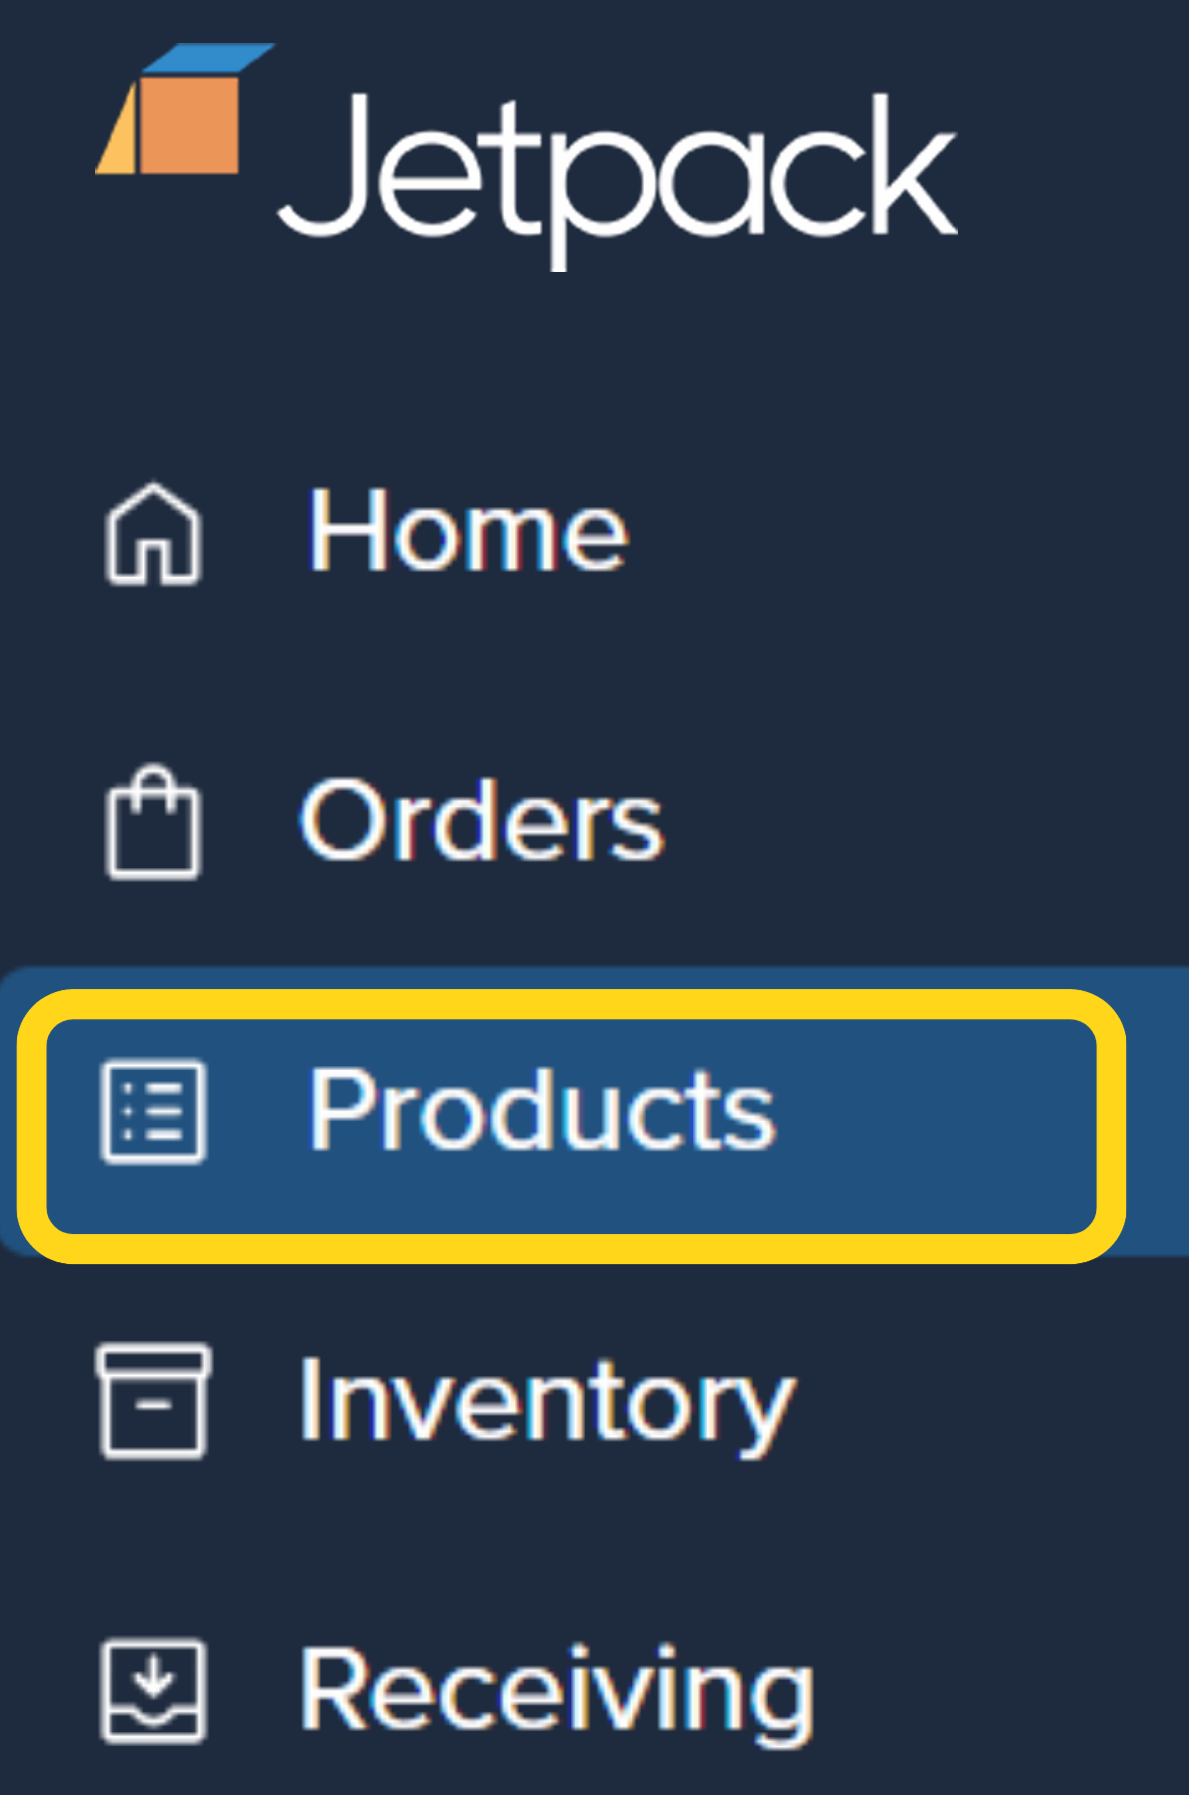
Navigate to **Products** in your dashboard to access the Product Catalog and verify your synced products:

<img src="https://mintcdn.com/jetpack/tNeg3buzYemYIRBU/fulfillment/account-setup/images/onboarding-product-catalog-overview.png?fit=max&auto=format&n=tNeg3buzYemYIRBU&q=85&s=cf80ae818d2095535196c7477b97b86e" alt="Product Catalog page showing synced products with SKUs, categories, and barcodes" className="screenshot" width="1189" height="1795" data-path="fulfillment/account-setup/images/onboarding-product-catalog-overview.png" />

| What to Check              | Why It Matters                                                        |
| -------------------------- | --------------------------------------------------------------------- |
| **Product Names and SKUs** | Ensure all products synced correctly with accurate identifiers        |
| **Product Details**        | Verify dimensions, weights, and other attributes transferred properly |
| **Active/Inactive Status** | Confirm only products you want to fulfill are marked as active        |
| **Inventory Levels**       | Check that inventory quantities match your records (if applicable)    |

If you notice missing products or incorrect data, you may need to adjust your [integration settings](/fulfillment/account-setup/integrating-store) or [manually add products](/fulfillment/managing-products/adding-products).

### Configuring Product Preferences

Before sending inventory or fulfilling orders, configure critical product settings. Each product in your catalog needs proper configuration to ensure accurate fulfillment:

| Setting Category             | What to Configure                                                                                                                                                              | Where to Learn More                                                                                          |
| ---------------------------- | ------------------------------------------------------------------------------------------------------------------------------------------------------------------------------ | ------------------------------------------------------------------------------------------------------------ |
| **Barcodes**                 | <ul><li>Add or verify barcode identifiers (UPC, EAN, etc.)</li><li>Ensure barcodes match physical product labels</li><li>Required for accurate receiving and picking</li></ul> | [About Barcodes](/fulfillment/managing-products/more-tools/barcodes)                                         |

| **Customs Information**      | <ul><li>Set country of origin</li><li>Define harmonized tariff codes</li><li>Required for international shipments</li></ul>                                                    | [Customs + Commercial Invoices](/fulfillment/account-setup/shipping-preferences/customs-commercial-invoices) |
| **Reorder Points**           | <ul><li>Configure inventory thresholds</li><li>Receive automated replenishment alerts</li><li>Prevent stockouts on critical SKUs</li></ul>                                     | [Setting Reorder Points](/fulfillment/account-setup/shipping-preferences/setting-reorder-points)             |
| **Packaging Preferences**    | <ul><li>Choose standard vs. custom packaging</li><li>Define box selection rules</li><li>Set special handling requirements</li></ul>                                            | [Setting Product Preferences](/fulfillment/managing-products/setting-product-preferences)                    |
| **Dangerous Goods (HAZMAT)** | <ul><li>Mark products containing restricted materials</li><li>Configure shipping carrier limitations</li><li>Ensure compliance with regulations</li></ul>                      | [Dangerous Goods + HAZMAT](/fulfillment/goods-policies/dangerous-goods)                                      |

<Warning title="Configure Before Sending Inventory">
  Complete product configuration before creating your first Warehouse Receiving Order (WRO). Missing barcodes, incorrect dimensions, or unmarked HAZMAT products can cause receiving delays and create Unidentified Receiving Orders (UROs).
</Warning>

### Sales Channels and Product Bundles

If you sell products through multiple channels or offer bundled products, configure these settings in your Product Catalog:

* **Sales Channels**: Associate products with specific sales platforms to manage inventory distribution
* **Product Bundles**: Create virtual bundles that combine multiple SKUs into a single sellable unit

Learn more about [managing your Product Catalog](/fulfillment/managing-products) to configure these advanced features.

***

## Next Steps in Your Onboarding Journey

After syncing and configuring your products, you're ready to move forward with these key onboarding steps:

| Next Step                                 | What Happens                                                                              | Where to Start                                                                   |
| ----------------------------------------- | ----------------------------------------------------------------------------------------- | -------------------------------------------------------------------------------- |
| **1. Send Your First Inventory Shipment** | Create a Warehouse Receiving Order (WRO) to send inventory to Jetpack fulfillment centers | [Sending Us Your Inventory](/fulfillment/account-setup/sending-inventory)        |
| **2. Import Your Orders**                 | Configure automatic order syncing or manually import orders to begin fulfillment          | [Importing Your Orders](/fulfillment/account-setup/importing-orders)             |
| **3. Configure Shipping Preferences**     | Set up automation rules, carrier preferences, and fulfillment settings                    | [Shipping Preferences Overview](/fulfillment/account-setup/shipping-preferences) |

<Tip title="Complete Setup Before Going Live">
  For the smoothest onboarding experience, complete all product configuration and send at least one test WRO before enabling automatic order syncing. This ensures your products are properly received and ready to fulfill when live orders begin flowing.
</Tip>

***

## Let's Dive Deeper

<CardGroup cols={3}>
  <Card title="Store Integration Overview" icon="plug" href="/fulfillment/account-setup/integrating-store">
    Connect and configure your ecommerce platform
  </Card>

  <Card title="Product Catalog Page" icon="grid-2" href="/fulfillment/managing-products/index">
    Navigate and organize your product catalog
  </Card>

  <Card title="Manually Adding Products" icon="square-plus" href="/fulfillment/managing-products/adding-products">
    Add products without a store integration
  </Card>

  <Card title="Setting Product Preferences" icon="sliders" href="/fulfillment/managing-products/setting-product-preferences">
    Configure product settings for fulfillment
  </Card>

  <Card title="Sending Inventory" icon="warehouse" href="/fulfillment/account-setup/sending-inventory">
    Create WROs to send your first inventory shipment
  </Card>

  <Card title="Importing Orders" icon="file-import" href="/fulfillment/account-setup/importing-orders">
    Begin fulfilling orders after product sync
  </Card>
</CardGroup>

<div className="jetpack-callout">
  <img src="https://mintcdn.com/jetpack/2iejPNBTYKEx6ntF/images/jetpack-logomark-256.png?fit=max&auto=format&n=2iejPNBTYKEx6ntF&q=85&s=340604ced4add3864f2641341826e1c9" alt="Jetpack" className="jetpack-callout-icon" width="256" height="256" data-path="images/jetpack-logomark-256.png" />

  <div className="jetpack-callout-content">
    <h4 className="jetpack-callout-title">Questions? Contact Jetpack Care.</h4>
    <p className="jetpack-callout-text">If you have any questions or run into issues, you can always contact Jetpack Care for help. Our team is always here to assist via Slack, phone, or email!</p>
  </div>
</div>
