> ## Documentation Index
> Fetch the complete documentation index at: https://help.jetpack3pl.com/llms.txt
> Use this file to discover all available pages before exploring further.
# Start Shipping Date
> Configure your Start Shipping Date to control which orders are imported from your store and when Jetpack begins fulfillment operations.
The Start Shipping Date is the configured date from which Jetpack begins importing your order data and shipping your orders. This setting prevents old orders (those placed before the selected date) from being imported and ensures that only new orders, from the start shipping date onward, are processed.
## What is the Start Shipping Date?
The Start Shipping Date determines which orders Jetpack will import from your ecommerce platform. The system uses this date as a cutoff to ensure:
* **Old orders are not imported** - Orders placed before your Start Shipping Date are excluded from import
* **Only new orders are processed** - Orders placed on or after the Start Shipping Date are imported and fulfilled
* **Clean transition between providers** - When switching from another fulfillment provider, you avoid duplicate shipments
This feature is particularly useful when transitioning from another fulfillment provider or when setting up a new store to avoid processing orders that have already been shipped or are outdated.
Jetpack can only import orders that your customers placed within the last 120 days. If you set a Start Shipping Date more than 120 days in the past, orders older than 120 days will not be imported.
***
## How the Start Shipping Date Works
When integrating your ecommerce store with Jetpack, setting the Start Shipping Date is part of the store configuration settings. The system calculates the difference between today's date and your selected Start Shipping Date to determine which orders to import.
**Import Logic:**
* Orders are imported **only if** they are placed **on or after** the Start Shipping Date
* If today's date is **before** the Start Shipping Date, no orders will be imported until that date arrives
* If today's date is **on or after** the Start Shipping Date, orders placed from the Start Shipping Date onward will be imported immediately
***
## Start Shipping Date Examples
Understanding how the Start Shipping Date affects order import behavior:
### Example 1: Future Start Shipping Date
**Scenario:**
* Today's date: December 14th
* Selected Start Shipping Date: December 16th
**Result:**
* **No orders will be imported until December 16th**
* On December 16th, orders placed on December 16th and later will begin importing
* Orders placed before December 16th will not be imported
**Use Case:** You're setting up your Jetpack integration but don't want to start fulfillment until after a specific date (e.g., after you've completed sending initial inventory to Jetpack).
***
### Example 2: Current Day Start Shipping Date
**Scenario:**
* Today's date: December 14th
* Selected Start Shipping Date: December 14th
**Result:**
* **Orders placed today and onward will be imported and shipped**
* Orders placed before December 14th will not be imported
**Use Case:** You're switching from another fulfillment provider and want Jetpack to handle all orders placed starting today, while your previous provider ships all prior orders.
***
### Example 3: Past Start Shipping Date
**Scenario:**
* Today's date: December 14th
* Selected Start Shipping Date: December 1st
**Result:**
* **Orders placed from December 1st through December 14th (today) will be imported immediately**
* Future orders will continue to import as they're placed
**Use Case:** You want to backfill orders from the past two weeks that your previous fulfillment provider hasn't shipped yet.
***
## Setting Your Start Shipping Date
The Start Shipping Date is configured when you integrate your ecommerce store with Jetpack. This setting is part of the initial store configuration process.
**When to configure:**
* During initial store integration (Shopify, WooCommerce, BigCommerce, etc.)
* When connecting a new sales channel
* When switching fulfillment providers
**To set your Start Shipping Date:**
Or click **Add New Store** if setting up for the first time.
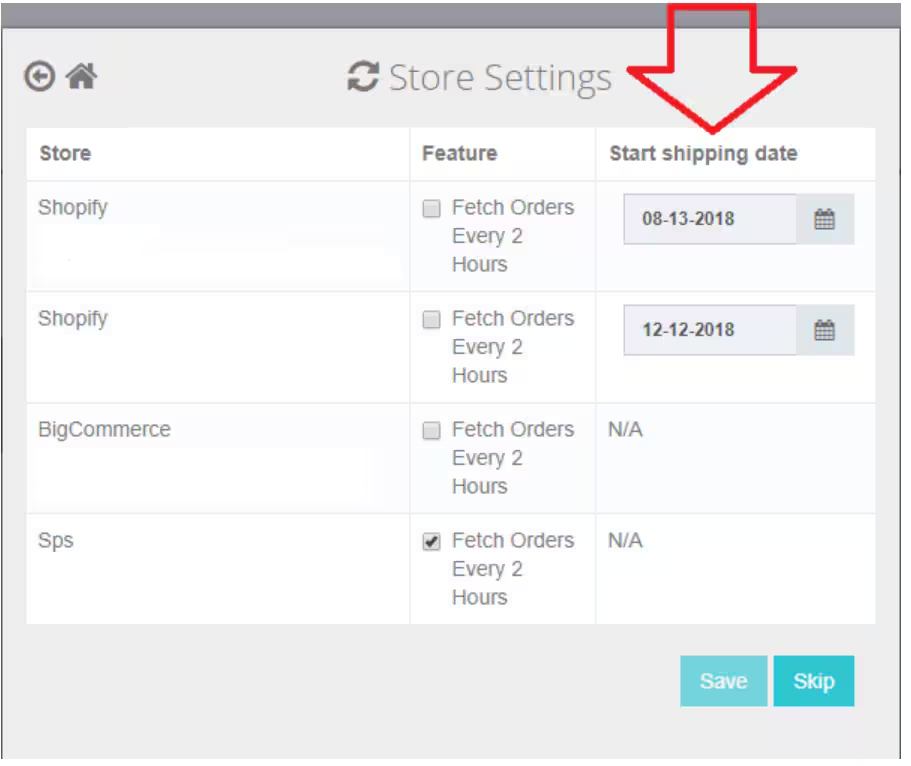 This sets when Jetpack begins importing orders.
***
## What Happens to Orders Before the Start Shipping Date?
Orders placed **before** your configured Start Shipping Date are **not imported** into Jetpack. This means:
* **Previous fulfillment provider** should handle these orders (if switching providers)
* **You are responsible** for fulfilling these orders through other means
* **Jetpack will not see** these orders in the dashboard and cannot fulfill them
If you discover you need to fulfill orders placed before your Start Shipping Date, you have three options:
1. **Manual order creation** - Manually create these orders in the Jetpack dashboard one at a time
2. **Batch upload via Excel** - Upload multiple historical orders at once using the Excel order import template
3. **Contact Jetpack Care** - Request assistance importing specific historical orders
After setting your Start Shipping Date and going live with Jetpack, check your previous fulfillment system to ensure all pre-cutover orders were fulfilled. Don't leave customers waiting!
## Start Shipping Date vs. Automatic Processing Pause
Understanding the difference between these two features:
| Feature | Start Shipping Date | Automatic Processing Pause |
| -------------------- | ------------------------------------------------------ | ----------------------------------------------------------- |
| **Purpose** | Controls **which orders are imported** from your store | Controls **when imported orders begin fulfillment** |
| **Configuration** | Set during store integration setup | Enable/disable in Shipment Settings |
| **Effect on Orders** | Orders before the date are not imported at all | Orders are imported but held On-Hold until you release them |
| **Use Case** | Preventing import of old/historical orders | Reviewing orders before fulfillment begins |
You can use **both** features together:
* **Start Shipping Date** ensures only orders from a specific date forward are imported
* **Automatic Processing Pause** holds those imported orders for review before fulfillment
For more information, see [Automatic Processing Pause](/fulfillment/account-setup/shipping-preferences/automatic-processing-pause).
***
## Let's Dive Deeper
Back to the main shipping preferences guide
Hold imported orders for review
Connect your ecommerce store to Jetpack
Send inventory to Jetpack before your Start Shipping Date
Configure order import settings
Switch to Jetpack seamlessly
This sets when Jetpack begins importing orders.
***
## What Happens to Orders Before the Start Shipping Date?
Orders placed **before** your configured Start Shipping Date are **not imported** into Jetpack. This means:
* **Previous fulfillment provider** should handle these orders (if switching providers)
* **You are responsible** for fulfilling these orders through other means
* **Jetpack will not see** these orders in the dashboard and cannot fulfill them
If you discover you need to fulfill orders placed before your Start Shipping Date, you have three options:
1. **Manual order creation** - Manually create these orders in the Jetpack dashboard one at a time
2. **Batch upload via Excel** - Upload multiple historical orders at once using the Excel order import template
3. **Contact Jetpack Care** - Request assistance importing specific historical orders
After setting your Start Shipping Date and going live with Jetpack, check your previous fulfillment system to ensure all pre-cutover orders were fulfilled. Don't leave customers waiting!
## Start Shipping Date vs. Automatic Processing Pause
Understanding the difference between these two features:
| Feature | Start Shipping Date | Automatic Processing Pause |
| -------------------- | ------------------------------------------------------ | ----------------------------------------------------------- |
| **Purpose** | Controls **which orders are imported** from your store | Controls **when imported orders begin fulfillment** |
| **Configuration** | Set during store integration setup | Enable/disable in Shipment Settings |
| **Effect on Orders** | Orders before the date are not imported at all | Orders are imported but held On-Hold until you release them |
| **Use Case** | Preventing import of old/historical orders | Reviewing orders before fulfillment begins |
You can use **both** features together:
* **Start Shipping Date** ensures only orders from a specific date forward are imported
* **Automatic Processing Pause** holds those imported orders for review before fulfillment
For more information, see [Automatic Processing Pause](/fulfillment/account-setup/shipping-preferences/automatic-processing-pause).
***
## Let's Dive Deeper
Back to the main shipping preferences guide
Hold imported orders for review
Connect your ecommerce store to Jetpack
Send inventory to Jetpack before your Start Shipping Date
Configure order import settings
Switch to Jetpack seamlessly

Questions? Contact Jetpack Care.
If you have any questions or run into issues, you can always contact Jetpack Care for help. Our team is always here to assist via Slack, phone, or email!