> ## Documentation Index
> Fetch the complete documentation index at: https://help.jetpack3pl.com/llms.txt
> Use this file to discover all available pages before exploring further.
# Automation Rules
> Create conditional logic that automatically applies specific fulfillment behaviors based on order attributes with Jetpack Automation Rules.
Automation Rules let you create conditional logic that automatically applies specific fulfillment behaviors to orders imported from your e-commerce integrations. Instead of manually configuring each order, set up rules that trigger actions based on conditions you define—like adding products to orders, requiring signatures, or routing to specific fulfillment centers.
## How Automation Rules Work
Automation Rules use trigger-action-condition logic to automatically configure order fulfillment. When an order meets your specified conditions, Jetpack automatically applies the corresponding action without requiring manual intervention.
**Every rule has three components:**
* **Trigger** - Specifies when the rule applies. In Jetpack, the trigger is always the order import from your e-commerce integration.
* **Action** - Specifies what happens when the rule conditions are met (e.g., add a gift card to the order, require signature at delivery).
* **Conditions** (Optional) - Specifies restrictions or limitations that must be met for the action to execute (e.g., order total > \$100, order tagged "VIP").
**Example:** Add a gift card to every order with more than 5 items.
* **Trigger:** Order imported from integration
* **Condition:** Total item quantity > 5
* **Action:** Add gift card product to order
***
## Supported Actions
Jetpack Automation Rules support five actions:
| Action | What It Does |
| ----------------------------------------- | ----------------------------------------------------------------------------------------------------------------------------------------------------------------- |
| **Add X product to orders** | Automatically adds a specified product to orders meeting your conditions. Useful for including free gifts, samples, marketing materials, or required accessories. |
| **Ignore orders** | Prevents orders from being processed by Jetpack. Orders are imported but not fulfilled, allowing you to handle them manually or through alternative workflows. |
| **Request signature at delivery** | Requires the carrier to obtain a signature upon delivery. Helps prevent theft and provides delivery confirmation for high-value orders. |
| **Exclude gift messages from orders** | Removes gift messages from packing slips and other order documents. Useful for wholesale or B2B orders where gift messaging isn't appropriate. |
| **Set the fulfillment center assignment** | Routes orders to a specific Jetpack fulfillment center based on your conditions. Enables regional routing, specialized handling, or inventory balancing. |
Automation rules are created and configured by your **Jetpack Care Manager**. Contact your Jetpack Care Manager via Slack, phone, or email to request new rules or modifications to existing rules.
***
## Supported Conditions
Conditions determine when rules apply to orders. You can combine up to 25 conditions using **AND** logic (all conditions must be true). **OR** logic is not supported.
The available conditions vary depending on your e-commerce platform:
### Order Total in Dollars
Total amount paid, including tax and additional charges.
**Supported platforms:** BigCommerce, Developer API, eBay, ShipStation, Shopify, Squarespace, WooCommerce, NetSuite
**Example uses:**
* Require signature for orders over \$500
* Add free gift to orders over \$100
* Ignore orders under \$5 (potential test orders)
### Tags
Matches a specific tag on the order.
**Supported platforms:** Developer API, eBay, ShipStation, Shopify, WooCommerce, NetSuite, Squarespace (must match verbatim)
**Example uses:**
* Add signature requirement for orders tagged "High-Value"
* Route orders tagged "Wholesale" to specific fulfillment center
* Add promotional item to orders tagged "Holiday2024"
### Notes
Matches specific order note text.
**Supported platform:** ShipStation only
**Example uses:**
* Add special handling for orders with "Fragile" in notes
* Route orders with "Rush" in notes to priority fulfillment center
### MarketPlace Source
Specific to ShipStation rules for eBay orders.
**Supported platform:** eBay (via ShipStation)
**Example uses:**
* Apply different rules for orders from different marketplaces
* Route eBay orders differently than other channels
### Total Item Quantity
Total items or bundles per order.
**Supported platforms:** BigCommerce, eBay, ShipStation, Shopify, Squarespace, WooCommerce, NetSuite
**Note:** For NetSuite, this applies to bundles as count of bundles, not individual items.
**Example uses:**
* Add free shipping insert to orders with 3+ items
* Route large orders (10+ items) to specific fulfillment center
* Add bulk packaging to orders with 20+ items
### Shipping Method
Shipping method text as shown in the store.
**Supported platforms:** Developer API, eBay, Shopify, Squarespace
**Example uses:**
* Add signature to orders with "Express" shipping method
* Route "Same-Day" shipping method orders to nearest fulfillment center
* Exclude gift messages from "Wholesale Shipping" method
### Customer Order Count
Total number of orders per customer per store.
**Supported platform:** ShipStation only
**Example uses:**
* Add thank you gift to first-time customer orders (order count = 1)
* Add loyalty rewards to orders from repeat customers (order count > 5)
* Apply special handling to VIP customer orders (order count > 20)
### Shipping Country Code
Two-letter country code (e.g., US, CA, GB).
**Supported platforms:** Amazon, BigCommerce, Developer API, eBay, ShipStation, Shopify, Squarespace, WooCommerce, NetSuite
**Example uses:**
* Route Canadian orders to Canadian fulfillment center
* Add customs documentation requirements for international orders
* Exclude gift messages from international orders
***
## Important Guidelines for Creating Rules
When requesting automation rules from your Jetpack Care Manager, keep these guidelines in mind:
### Avoid Double Negatives
Don't use double negative conditions like "if the order doesn't contain tag X." This creates confusion and can lead to unexpected behavior. Instead, use positive conditions that clearly state what should trigger the rule.
**Example:**
* **Avoid:** "If order doesn't have tag 'Wholesale', add gift message"
* **Better:** "If order has tag 'Retail', add gift message"
### Rules Apply Only to Integration Orders
Automation rules only apply to orders imported via e-commerce integrations. Rules do **not** apply to:
* Orders created manually in Jetpack dashboard
* Orders uploaded via bulk Excel import
* Orders created via direct API calls (unless using Developer API conditions)
If you need rules to apply to manually created orders, discuss alternative workflows with your Jetpack Care Manager.
### Platform Scope
If you have multiple stores connected to Jetpack on the same e-commerce platform (e.g., three Shopify stores), the same automation rules apply across **all stores** on that platform.
You cannot create platform-specific rules that apply to only one of your Shopify stores—the rule will apply to all Shopify integrations. Use conditions like Tags or Shipping Method to differentiate between stores if needed.
### Specificity Limitations
Rules cannot be created for specific items in the cart. For example, you cannot create a rule that says "add product X if the order contains product Y."
If you need item-specific logic, use the **Tags** condition instead. Configure your e-commerce platform to automatically tag orders containing specific products, then create automation rules based on those tags.
**Example workaround:**
* Goal: Add batteries when order contains electronic toy
* Solution: Configure Shopify to tag orders containing electronic toy with "NeedsBatteries"
* Create rule: If order has tag "NeedsBatteries", add batteries product
### Testing New Rules
After your Jetpack Care Manager creates a rule, test it before processing live orders:
Navigate to **Settings** > **Shipping Preferences** and enable [Automatic Processing Pause](/fulfillment/account-setup/shipping-preferences/automatic-processing-pause). This prevents orders from being automatically processed while you test.
Place a test order in your e-commerce platform that meets the rule's conditions. Ensure the order is imported into Jetpack.
Check the order in your Jetpack dashboard to confirm the action was applied correctly (e.g., product was added, signature was required, etc.).
If the rule isn't working as expected, disable it and contact your Jetpack Care Manager to adjust the conditions or actions. Once verified, disable Automatic Processing Pause to resume normal processing.
### Rule Hierarchy
There is **no hierarchy** between multiple automation rules. If multiple rules apply to the same order and their conditions are met, **all corresponding actions will be executed**.
This is different from priority-based systems where higher-priority rules override lower-priority rules. In Jetpack, all applicable rules run independently.
**Example:** If you have two rules:
1. "If order total > \$100, add free gift A"
2. "If order has tag 'VIP', add free gift B"
An order with total \$150 and tag "VIP" will receive **both** free gift A and free gift B.
***
## Accessing Automation Rules
From your Jetpack dashboard, click **Orders** in the left-hand navigation bar, then select **Rules**.
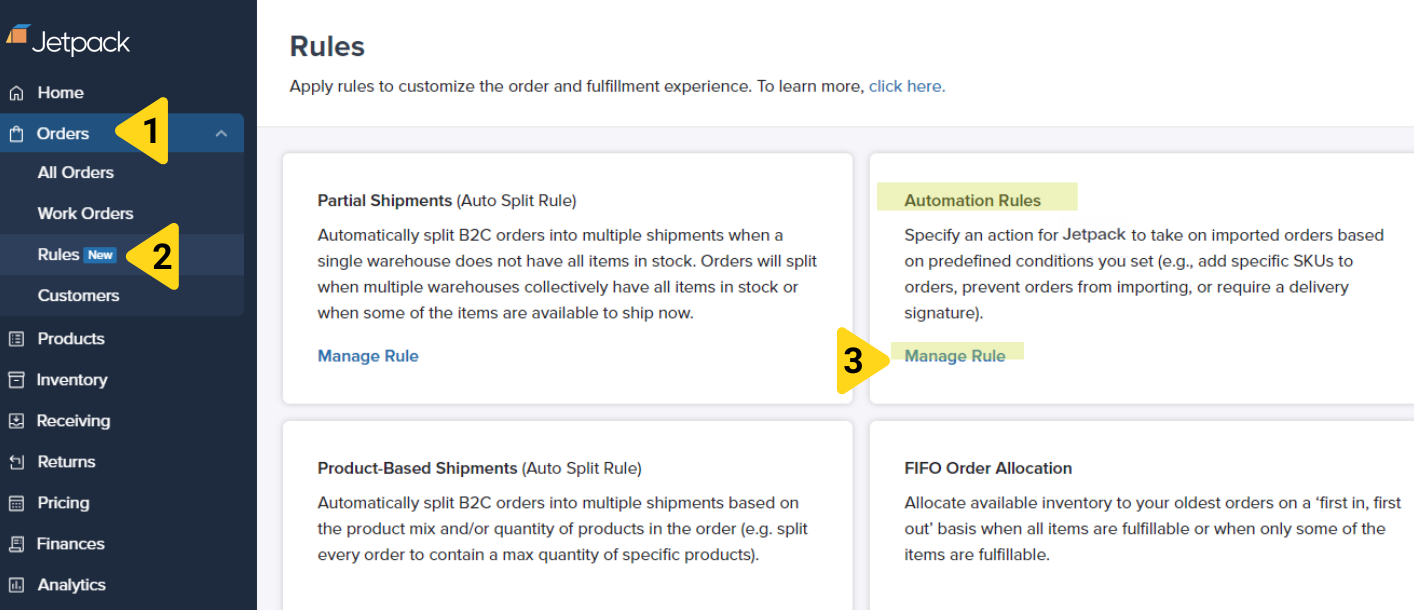 Click **Manage Rule** under the **Automation Rules** tile to view all your configured rules.
***
## Managing Automation Rules
Once your Jetpack Care Manager creates automation rules, you can enable, disable, and view rule details in your dashboard.
Click **Manage Rule** under the **Automation Rules** tile to view all your configured rules.
***
## Managing Automation Rules
Once your Jetpack Care Manager creates automation rules, you can enable, disable, and view rule details in your dashboard.
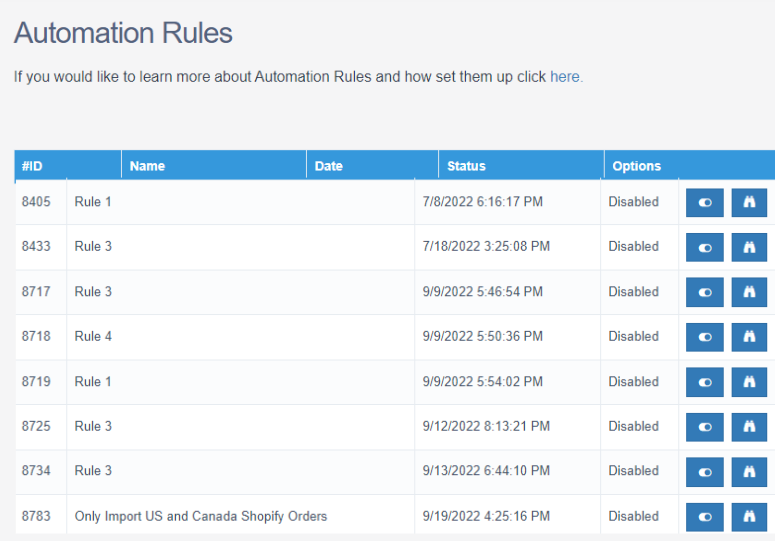 ### Viewing All Rules
On the Automation Rules page, you can see:
* **Rule ID** - Unique identifier for each rule
* **Name** - Descriptive name assigned when rule was created
* **Date** - When the rule was created or last modified
* **Status** - Whether the rule is currently enabled (active) or disabled (inactive)
* **Options** - Toggle to enable/disable, and view icon to see rule details
### Enabling and Disabling Rules
You can enable or disable automation rules yourself without contacting Jetpack Care:
Find the rule you want to enable or disable in the Automation Rules list.
Click the toggle icon (switch) to activate or deactivate the rule. When disabled, the rule remains configured but won't apply to new orders.
**When to disable rules:**
* **Seasonal promotions** - Disable holiday gift rules during off-season
* **Testing impact** - Temporarily disable to see effect on order processing
* **Troubleshooting** - Turn off rules while diagnosing fulfillment issues
* **Inventory constraints** - Disable "add product" rules when promotional items are out of stock
Always disable rules instead of requesting deletion. Disabled rules can be re-enabled instantly with a single click, while deleted rules must be recreated by Jetpack Care with a new request.
### Viewing Rule Details
To see a rule's complete configuration:
1. Click the **binocular icon** (view details) next to any rule
2. Review the rule's conditions and actions
3. Use this information to understand what the rule does before enabling it
New rules created by Jetpack Care appear **disabled by default**. Always review the rule details and test with Automatic Processing Pause enabled before activating new rules.
***
## Creating and Modifying Rules
### Requesting a New Rule
To create a new automation rule, contact your **Jetpack Care Manager** via Slack, phone, or email with the following information:
**Required Information:**
1. **Rule Name** - A descriptive name (e.g., "Add Free Sample to Orders Over \$100")
2. **Action** - Which of the 5 supported actions should the rule perform?
3. **Conditions** - What order attributes should trigger this rule? (Be specific: order total > \$100, tag = "VIP", etc.)
4. **E-commerce Platform** - Which integration will this rule apply to? (Check platform support for your desired conditions)
**Example request:**
```
Rule Name: High-Value Signature Requirement
Action: Request signature at delivery
Conditions: Order total > $500
Platform: Shopify
```
Your Jetpack Care Manager will review your request, confirm the rule is supported, create it, and notify you when it's ready to test.
### Modifying an Existing Rule
To modify a rule's conditions, actions, or name, contact your **Jetpack Care Manager** with:
* **Rule ID or Name** - Which rule needs modification (found in Automation Rules list)
* **Requested Changes** - What should change? (e.g., "Change order total threshold from $500 to $750")
* **Reason** - Why the modification is needed (helps ensure the change achieves your goal)
### Deleting a Rule
To permanently delete a rule, contact your **Jetpack Care Manager** with the rule ID or name. Remember that disabled rules don't affect orders, so consider disabling instead of deleting unless you're certain you'll never need the rule again.
***
## Alternative Automation Options
If Jetpack Automation Rules don't support your desired logic, consider using e-commerce platform automation apps:
* **Shopify Flow** - Create complex automation workflows in Shopify
* **Auto Tags Order + Customer** - Automatically tag orders and customers based on conditions
* **Shopify Circle Order Tagger - Auto Tags** - Advanced order tagging automation
These apps can add tags, modify order attributes, or trigger actions before orders are imported into Jetpack, allowing you to then use Jetpack Automation Rules based on those tags.
***
## Let's Dive Deeper
Back to the main shipping preferences guide
Pause order processing to test rules safely
Configure carrier selection and mapping
Automate inventory alerts
Advanced geographic routing rules
Automatically split orders across fulfillment centers
### Viewing All Rules
On the Automation Rules page, you can see:
* **Rule ID** - Unique identifier for each rule
* **Name** - Descriptive name assigned when rule was created
* **Date** - When the rule was created or last modified
* **Status** - Whether the rule is currently enabled (active) or disabled (inactive)
* **Options** - Toggle to enable/disable, and view icon to see rule details
### Enabling and Disabling Rules
You can enable or disable automation rules yourself without contacting Jetpack Care:
Find the rule you want to enable or disable in the Automation Rules list.
Click the toggle icon (switch) to activate or deactivate the rule. When disabled, the rule remains configured but won't apply to new orders.
**When to disable rules:**
* **Seasonal promotions** - Disable holiday gift rules during off-season
* **Testing impact** - Temporarily disable to see effect on order processing
* **Troubleshooting** - Turn off rules while diagnosing fulfillment issues
* **Inventory constraints** - Disable "add product" rules when promotional items are out of stock
Always disable rules instead of requesting deletion. Disabled rules can be re-enabled instantly with a single click, while deleted rules must be recreated by Jetpack Care with a new request.
### Viewing Rule Details
To see a rule's complete configuration:
1. Click the **binocular icon** (view details) next to any rule
2. Review the rule's conditions and actions
3. Use this information to understand what the rule does before enabling it
New rules created by Jetpack Care appear **disabled by default**. Always review the rule details and test with Automatic Processing Pause enabled before activating new rules.
***
## Creating and Modifying Rules
### Requesting a New Rule
To create a new automation rule, contact your **Jetpack Care Manager** via Slack, phone, or email with the following information:
**Required Information:**
1. **Rule Name** - A descriptive name (e.g., "Add Free Sample to Orders Over \$100")
2. **Action** - Which of the 5 supported actions should the rule perform?
3. **Conditions** - What order attributes should trigger this rule? (Be specific: order total > \$100, tag = "VIP", etc.)
4. **E-commerce Platform** - Which integration will this rule apply to? (Check platform support for your desired conditions)
**Example request:**
```
Rule Name: High-Value Signature Requirement
Action: Request signature at delivery
Conditions: Order total > $500
Platform: Shopify
```
Your Jetpack Care Manager will review your request, confirm the rule is supported, create it, and notify you when it's ready to test.
### Modifying an Existing Rule
To modify a rule's conditions, actions, or name, contact your **Jetpack Care Manager** with:
* **Rule ID or Name** - Which rule needs modification (found in Automation Rules list)
* **Requested Changes** - What should change? (e.g., "Change order total threshold from $500 to $750")
* **Reason** - Why the modification is needed (helps ensure the change achieves your goal)
### Deleting a Rule
To permanently delete a rule, contact your **Jetpack Care Manager** with the rule ID or name. Remember that disabled rules don't affect orders, so consider disabling instead of deleting unless you're certain you'll never need the rule again.
***
## Alternative Automation Options
If Jetpack Automation Rules don't support your desired logic, consider using e-commerce platform automation apps:
* **Shopify Flow** - Create complex automation workflows in Shopify
* **Auto Tags Order + Customer** - Automatically tag orders and customers based on conditions
* **Shopify Circle Order Tagger - Auto Tags** - Advanced order tagging automation
These apps can add tags, modify order attributes, or trigger actions before orders are imported into Jetpack, allowing you to then use Jetpack Automation Rules based on those tags.
***
## Let's Dive Deeper
Back to the main shipping preferences guide
Pause order processing to test rules safely
Configure carrier selection and mapping
Automate inventory alerts
Advanced geographic routing rules
Automatically split orders across fulfillment centers

Questions? Contact Jetpack Care.
If you have any questions or run into issues, you can always contact Jetpack Care for help. Our team is always here to assist via Slack, phone, or email!