> ## Documentation Index
> Fetch the complete documentation index at: https://help.jetpack3pl.com/llms.txt
> Use this file to discover all available pages before exploring further.
# Automatic Processing Pause
> Configure automatic order holds to review and modify orders before fulfillment begins, giving you time to make changes to shipping preferences or order details.
Automatic Processing Pause moves all newly created orders (manual, store import, or Excel uploads) to the On-Hold status indefinitely, without reserving inventory, until you decide to move them to Processing. This feature is ideal when you need time to review orders before fulfillment begins or when you want to make batch modifications to shipping preferences.
## How Automatic Processing Pause Works
When Automatic Processing Pause is **enabled**, all new orders created in your Jetpack dashboard are automatically placed in On-Hold status:
1. **Orders arrive** from your store, manual entry, or Excel import
2. **System places order On-Hold** without reserving inventory
3. **You review the order** and make any necessary changes (shipping method, address, special instructions)
4. **You manually release orders** to Processing when ready for fulfillment
This gives you control over the fulfillment timeline and ensures orders meet your requirements before Jetpack's Operations team begins picking and packing.
Automatic Processing Pause is particularly useful during promotional periods, when testing new products, or when you need to verify shipping addresses before fulfillment. It's also valuable for merchants who batch-process orders at specific times of day.
***
## What Happens When You Enable Automatic Processing Pause
After enabling Automatic Processing Pause, you can expect the following:
| Behavior | What Happens |
| ---------------------------------- | ------------------------------------------------------------------------------------------------------------------------------------------------------------------------------------------------------------------------------------------------------------------------ |
| **Only affects new orders** | - Automatic Processing Pause will only affect orders created in your Jetpack dashboard **after** the setting is enabled
- To place preexisting orders in the On-Hold status, select them on the Orders page and use the **Move to On Hold** action
|
| **On-Hold reason tracking** | - Automatic Processing Pause will be listed as the **On-Hold reason** in the Jetpack dashboard
- This allows you to filter by this On-Hold reason to track affected orders
|
| **Multiple On-Hold reasons** | - Orders can accumulate other On-Hold reasons (e.g., address validation issues, inventory exceptions)
- You'll need to resolve all On-Hold reasons before the order can proceed to Processing
|
| **Disabling doesn't auto-release** | - **Disabling Automatic Processing Pause will not move orders to the Processing status**
- Orders already On-Hold must be manually released to Processing
|
***
## Enabling or Disabling Automatic Processing Pause
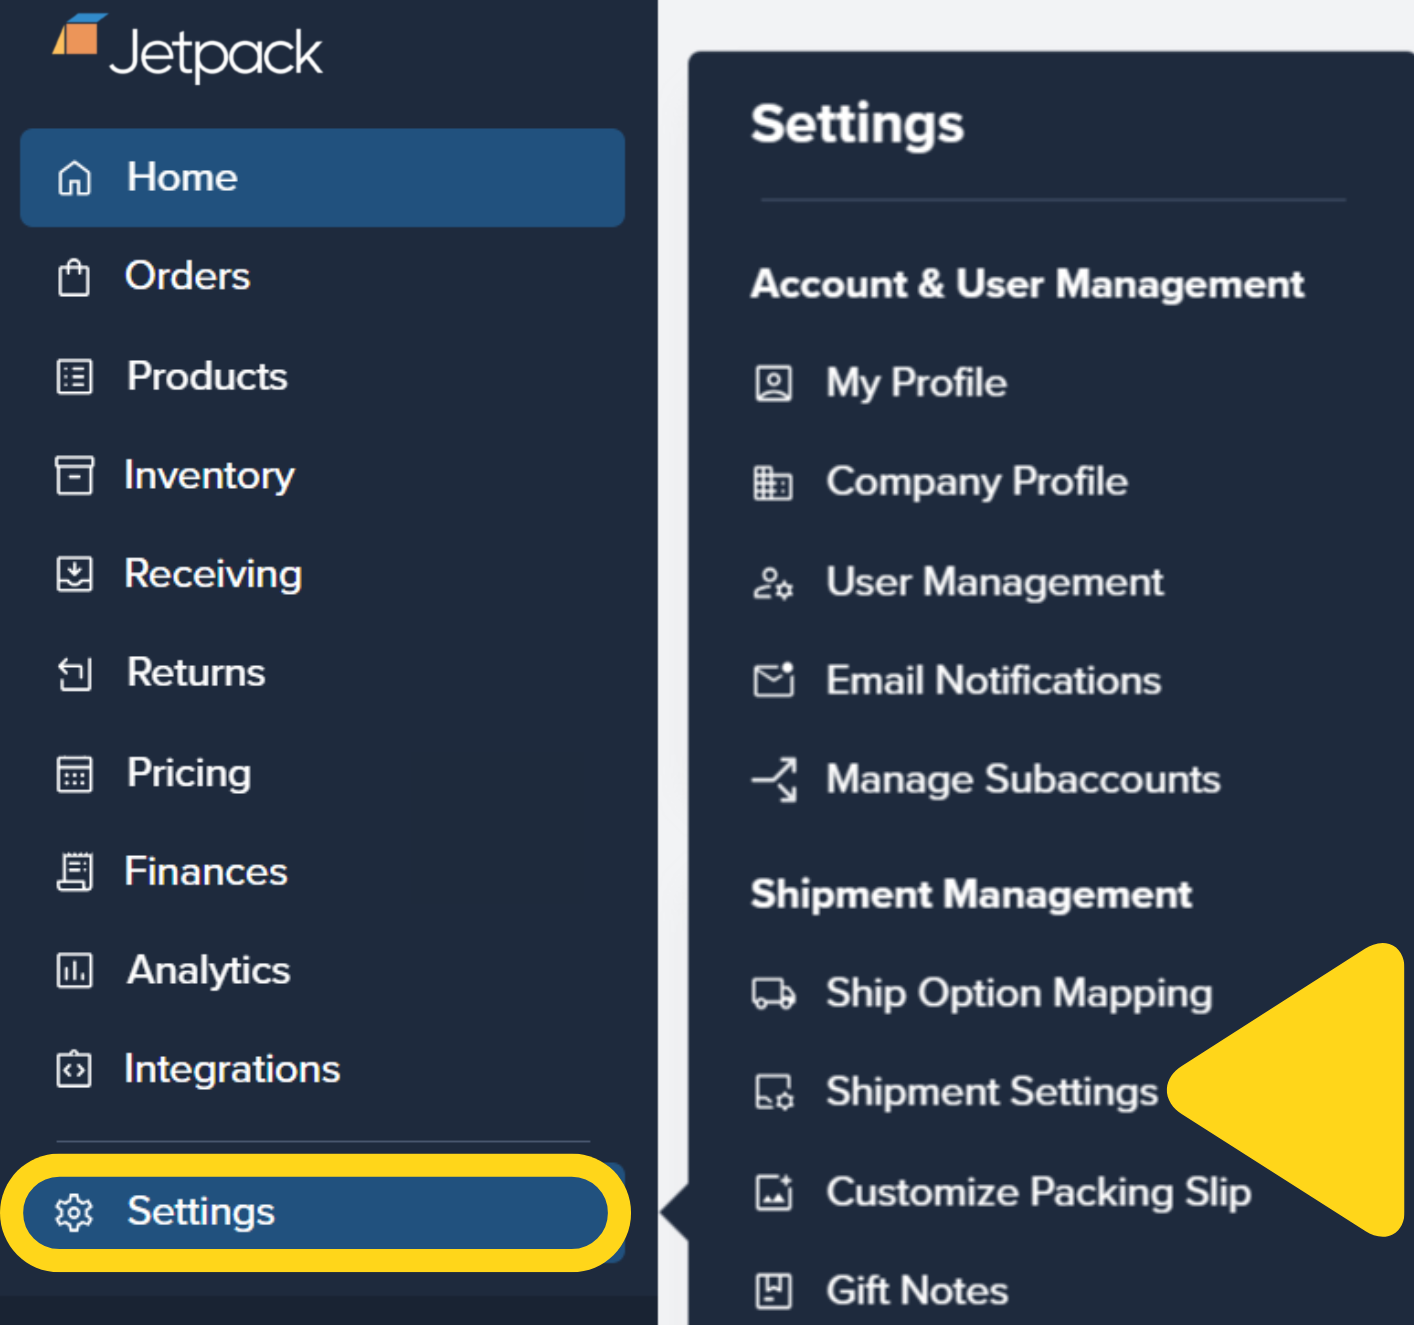
Automatic Processing Pause is **disabled by default**, so orders syncing to the dashboard are fulfilled immediately (as long as the order doesn't have additional On-Hold or Exception statuses). The steps below walk through how to enable and disable Automatic Processing Pause.
### Accessing Shipment Settings
From the Jetpack dashboard:
Additional menu options will appear.
You will be redirected to the Shipment Settings page.
 ***
### Enabling Automatic Processing Pause
To enable the feature:
See steps above.
Located under the **Enabled** column.
***
### Enabling Automatic Processing Pause
To enable the feature:
See steps above.
Located under the **Enabled** column.
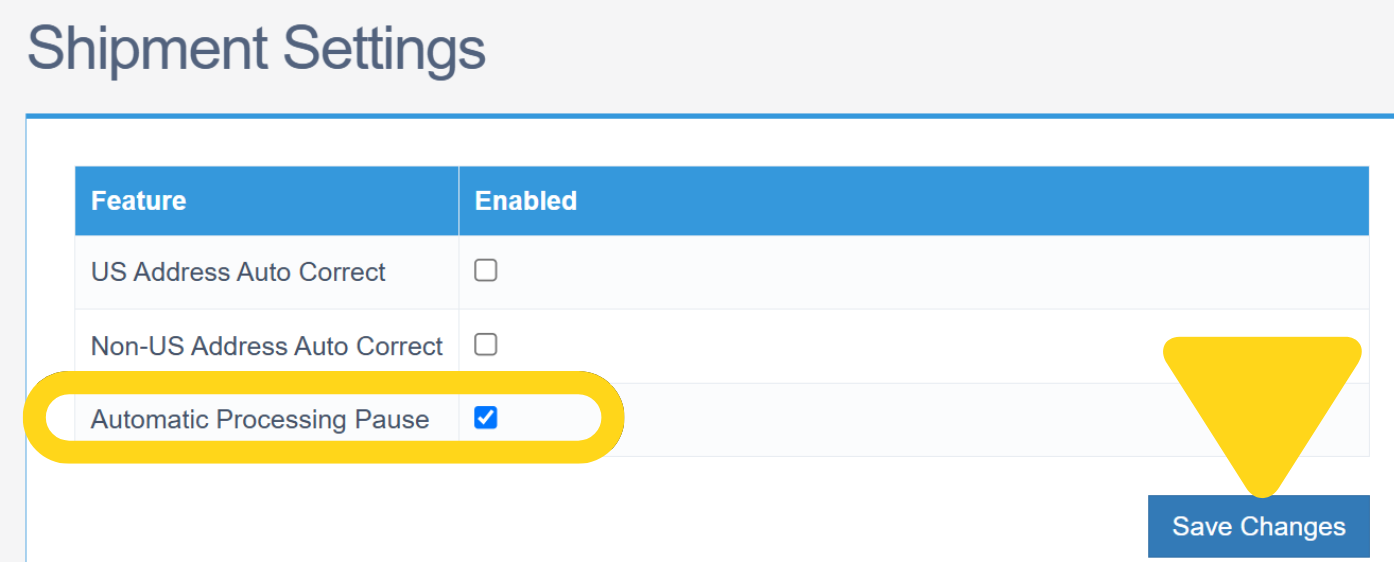 All new orders will now be placed On-Hold until you manually release them to Processing.
***
### Disabling Automatic Processing Pause
To disable the feature:
Located under the **Enabled** column.
All new orders will now be placed On-Hold until you manually release them to Processing.
***
### Disabling Automatic Processing Pause
To disable the feature:
Located under the **Enabled** column.
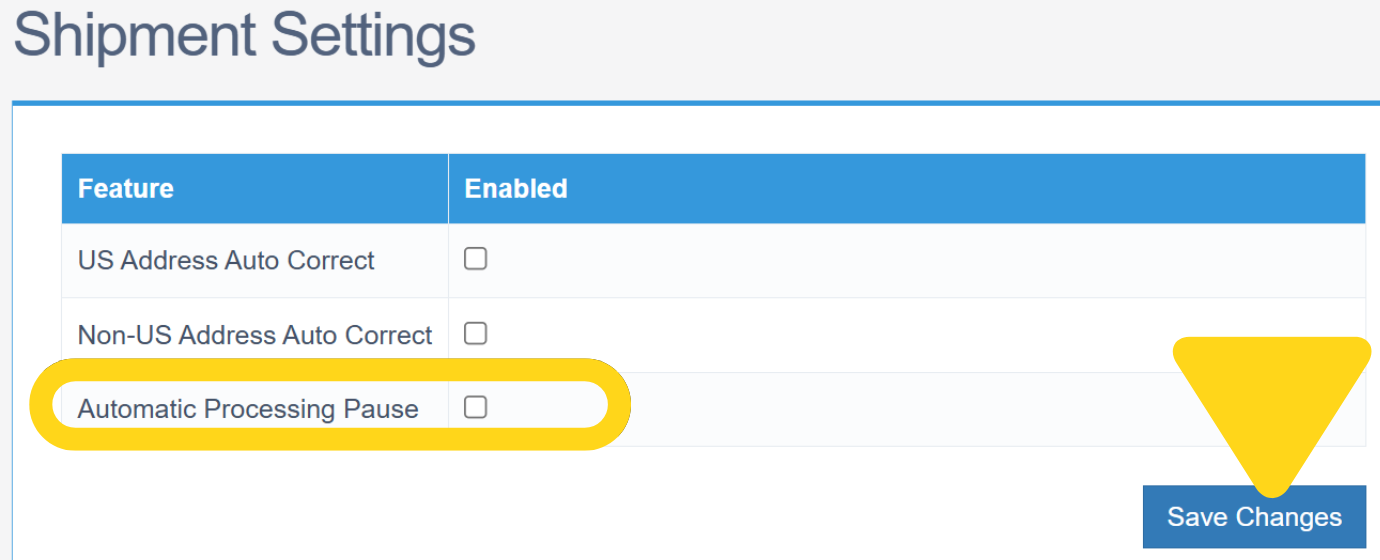 New orders will now proceed directly to Processing (assuming no other On-Hold or Exception conditions exist).
Disabling Automatic Processing Pause does not automatically release orders already On-Hold. You must manually move these orders to Processing using the steps in the next section.
***
## Releasing Orders from On-Hold Status
Once you've reviewed orders and are ready for fulfillment, you need to manually release them to Processing.
From the Jetpack dashboard:
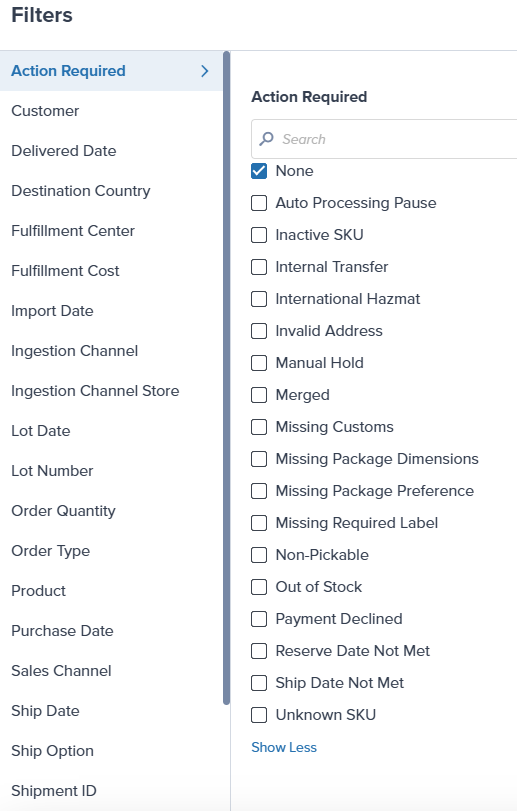
Show only orders with On-Hold reason: **Automatic Processing Pause**.
New orders will now proceed directly to Processing (assuming no other On-Hold or Exception conditions exist).
Disabling Automatic Processing Pause does not automatically release orders already On-Hold. You must manually move these orders to Processing using the steps in the next section.
***
## Releasing Orders from On-Hold Status
Once you've reviewed orders and are ready for fulfillment, you need to manually release them to Processing.
From the Jetpack dashboard:
Show only orders with On-Hold reason: **Automatic Processing Pause**.
 Located at the top right (green button).
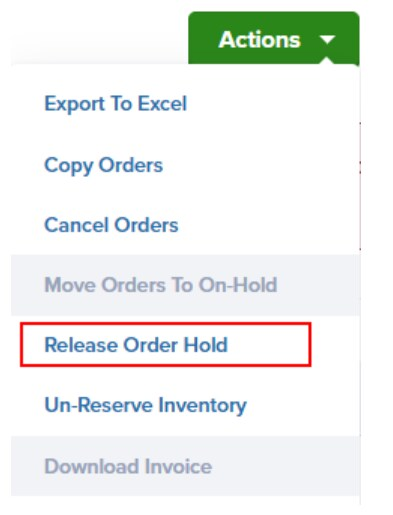 The selected orders will move to Processing and begin fulfillment.
You can select multiple orders at once and release them in bulk. This is particularly useful if you're reviewing orders once or twice per day and want to release them all at the same time.
***
## Filtering Orders by On-Hold Reason
When Automatic Processing Pause is enabled, you can easily find affected orders using the On-Hold reason filter:
From the filter categories on the left side.
This displays all orders currently held due to Automatic Processing Pause.
***
## Automatic Processing Pause vs. Manual On-Hold
Understanding the difference between these two hold methods:
| Feature | Automatic Processing Pause | Manual On-Hold |
| ------------------------- | ----------------------------------- | ------------------------------------------- |
| **Activation** | Enabled in Shipment Settings | Applied per order via Actions button |
| **Applies To** | All new orders automatically | Only selected orders |
| **Inventory Reservation** | No inventory reserved | Can choose to maintain or release inventory |
| **Use Case** | Batch processing, systematic review | Individual order issues, special handling |
| **Release Method** | Manual release to Processing | Manual release to Processing |
For more information on manually placing orders On-Hold, see [Managing Order Status](/fulfillment/order-management/managing-order-status).
***
## Let's Dive Deeper
Back to the main shipping preferences guide
Require signatures for high-value deliveries
Understand order statuses and workflows
Configure shipping methods while orders are On-Hold
Create conditional fulfillment logic
Control when orders begin shipping
The selected orders will move to Processing and begin fulfillment.
You can select multiple orders at once and release them in bulk. This is particularly useful if you're reviewing orders once or twice per day and want to release them all at the same time.
***
## Filtering Orders by On-Hold Reason
When Automatic Processing Pause is enabled, you can easily find affected orders using the On-Hold reason filter:
From the filter categories on the left side.
This displays all orders currently held due to Automatic Processing Pause.
***
## Automatic Processing Pause vs. Manual On-Hold
Understanding the difference between these two hold methods:
| Feature | Automatic Processing Pause | Manual On-Hold |
| ------------------------- | ----------------------------------- | ------------------------------------------- |
| **Activation** | Enabled in Shipment Settings | Applied per order via Actions button |
| **Applies To** | All new orders automatically | Only selected orders |
| **Inventory Reservation** | No inventory reserved | Can choose to maintain or release inventory |
| **Use Case** | Batch processing, systematic review | Individual order issues, special handling |
| **Release Method** | Manual release to Processing | Manual release to Processing |
For more information on manually placing orders On-Hold, see [Managing Order Status](/fulfillment/order-management/managing-order-status).
***
## Let's Dive Deeper
Back to the main shipping preferences guide
Require signatures for high-value deliveries
Understand order statuses and workflows
Configure shipping methods while orders are On-Hold
Create conditional fulfillment logic
Control when orders begin shipping

Questions? Contact Jetpack Care.
If you have any questions or run into issues, you can always contact Jetpack Care for help. Our team is always here to assist via Slack, phone, or email!