> ## Documentation Index
> Fetch the complete documentation index at: https://help.jetpack3pl.com/llms.txt
> Use this file to discover all available pages before exploring further.
# NetSuite Integration
> Integrate NetSuite with Jetpack to automatically sync orders, products, inventory, and tracking information between your ERP and fulfillment operations.
Integrating NetSuite with Jetpack enables real-time syncing of B2C orders, product catalogs, inventory quantities, and carrier tracking information between your NetSuite ERP and your Jetpack dashboard. This comprehensive integration requires configuring custom fields in NetSuite, enabling authentication features, creating API credentials, and then connecting the systems through your Jetpack dashboard.

About ShipBob Integration References
During setup, you'll configure the "ShipBob" integration in NetSuite and authorize access through the ShipBob API. This is expected—Jetpack has licensed ShipBob's integration infrastructure to provide reliable connections. Your data flows seamlessly to your Jetpack dashboard.
## Integration Overview
When you integrate NetSuite and Jetpack, B2C orders from NetSuite will automatically sync in real time, or you can manually sync orders from NetSuite to your Jetpack dashboard. This integration provides comprehensive order, product, inventory, and tracking synchronization to keep your ERP and fulfillment operations aligned.
This integration does not support NetSuite's Intercompany Cross-Subsidiary Fulfillment or automatically create Warehouse Receiving Orders (WROs) from NetSuite Purchase/Transfer Orders—you must create WROs manually in Jetpack. Only orders created or updated after the integration date will sync from NetSuite.
***
## Setting Up Your NetSuite Integration
Prior to integrating NetSuite and Jetpack, you must add custom Transaction Body Fields within NetSuite and configure your NetSuite Account Settings.
To allow NetSuite to receive order import acknowledgments from Jetpack (when an order has been successfully imported to Jetpack), you must add custom fields in NetSuite.
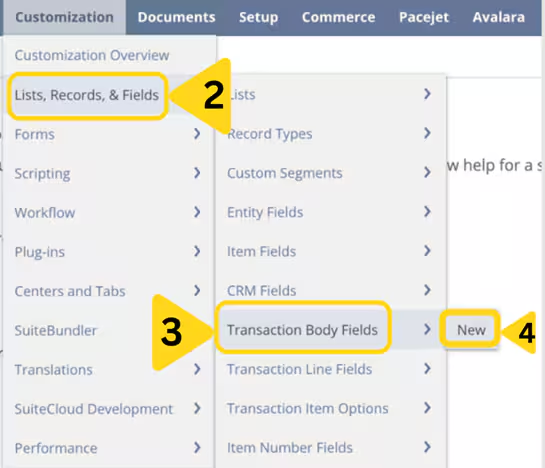
From NetSuite, click **Customization** on the top navigation bar, then select **Lists, Records, & Fields** from the drop-down options. Additional menu options will appear. Select **Transaction Body Fields**, then select **New**. You will be redirected.
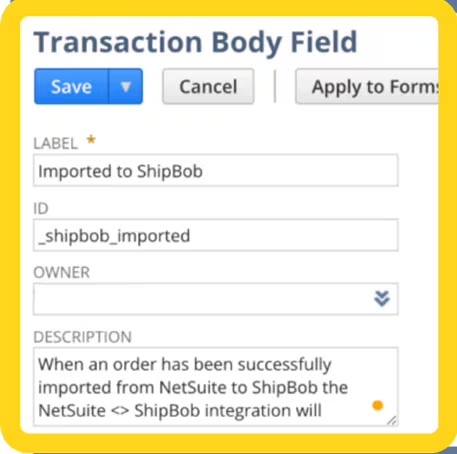
 Input the following verbatim in the respective fields:
* **LABEL:** Imported to ShipBob
* **ID:** \_shipbob\_imported
* **DESCRIPTION:** When an order has been successfully imported from NetSuite to ShipBob the integration will automatically update this field to be TRUE. It should not be manually adjusted
Input the following verbatim in the respective fields:
* **LABEL:** Imported to ShipBob
* **ID:** \_shipbob\_imported
* **DESCRIPTION:** When an order has been successfully imported from NetSuite to ShipBob the integration will automatically update this field to be TRUE. It should not be manually adjusted
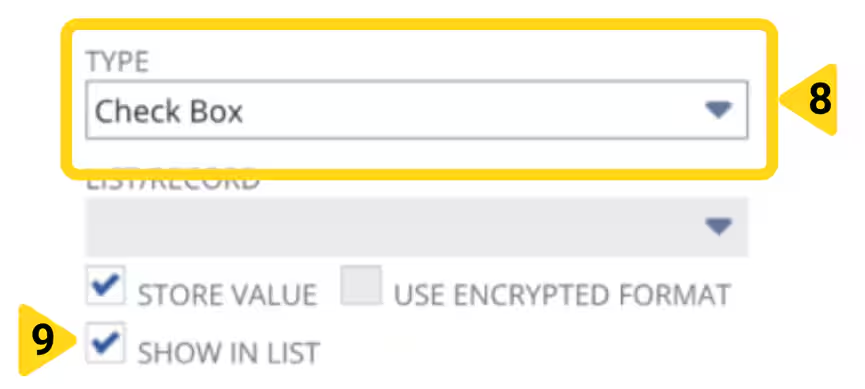
 Select **Check Box** from the drop-down options under TYPE. Check the box next to **SHOW IN LIST** (checking this option allows you to see which NetSuite orders have been imported into the Jetpack dashboard when viewing a list of orders, rather than reviewing each order individually).
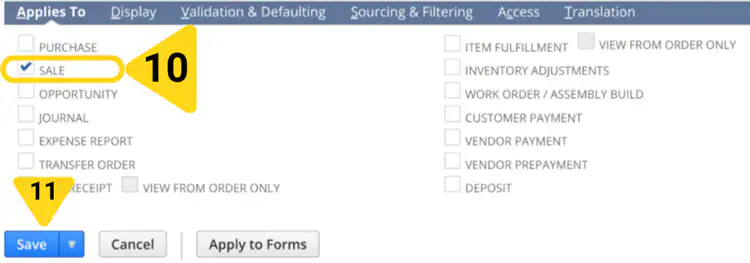
 Check the box next to **SALE** under the Applies To tab, then click **Save**. Click the down arrow next to Save if you want to be redirected to create a new record after saving.
 Create additional Transaction Body Fields for the following custom fields:
| Field Label | ID | Description | Type | Show in List | Applies To |
| --------------------------------------------------- | -------------------------------------- | ------------------------------------------------------------------------------------------------------------------------------------------------------------------------------------------- | ----------------------------------------- | ------------ | ---------------- |
| **Imported to ShipBob** | \_shipbob\_imported | When an order has been successfully imported from NetSuite to ShipBob the NetSuite integration will automatically update this field to be TRUE. It should not be manually adjusted. | Check Box | Y | SALE |
| **ShipBob Shipment ID** | \_shipbob\_shipmentid | | Free Form Text | N | ITEM FULFILLMENT |
| **Sales Channel** | custbody\_shipbob\_sales\_channel | Once an order has been successfully imported from NetSuite into Jetpack, Jetpack orders will be assigned the appropriate Sales Channel from NetSuite (e.g., TikTok, Amazon, Shopify, etc.). | Free Form Text or Drop Down Single-Select | Y | SALE |
| **ShipBob Carrier (Optional, Recommended)** | \_shipbob\_shipping\_carrier | | Free Form Text | N | ITEM FULFILLMENT |
| **ShipBob Tracking URL (Optional, Recommended)** | \_shipbob\_tracking\_url | | Free Form Text | N | ITEM FULFILLMENT |
| **ShipBob Shipping Method (Optional, Recommended)** | \_shipbob\_shipping\_method | | Free Form Text | N | ITEM FULFILLMENT |
| **ShipBob Order Routing Override (Optional)** | \_custbody\_shipbob\_routing\_override | | Check Box | N | SALE |
For the Sales Channel field, the value must be one of the following verbatim: amazon, bigcommerce, ebay, faire, macy, magento, shein, shopify, squarespace, targetplus, temu, tiktok, unleashed, walmart, woocommerce
To import B2B orders into Jetpack, create Transaction Body Fields based on the table below.
Once imported into the Jetpack dashboard, B2B orders will use Jetpack's standard GS1 labels and packing slips.
| Field Label | ID | Type | Applies To |
| ----------------------------- | ----------------------------------- | -------------------------------------------------------------------------- | ---------- |
| **ShipBob B2B Order** | \_custbody\_shipbob\_b2b | Check Box | SALE |
| **ShipBob B2B Carrier Type** | \_custbody\_shipbob\_carrier\_type | Single-select dropdown with the values "Parcel" and "Freight" | SALE |
| **ShipBob B2B Payment Terms** | \_custbody\_shipbob\_payment\_terms | Single-select dropdown with the values "Prepaid" and "MerchantResponsible" | SALE |
You can have Return orders automatically imported into Jetpack based on Return Authorization (RA) records in NetSuite. RAs are based on the following criteria:
* RA must not be voided
* RA must not be marked as already imported into ShipBob
* RA must have been created within the last two weeks (14 days)
* RA must have a To Location in NetSuite configured to a Jetpack fulfillment center (to which your customer will ship the order)
* RA record must be linked to a Sales Order that was fulfilled by Jetpack via the NetSuite integration
To import Return Authorizations (RAs) as returns in Jetpack, navigate to your **Account Preferences** page in NetSuite.
Create additional Transaction Body Fields for the following custom fields:
| Field Label | ID | Description | Type | Show in List | Applies To |
| --------------------------------------------------- | -------------------------------------- | ------------------------------------------------------------------------------------------------------------------------------------------------------------------------------------------- | ----------------------------------------- | ------------ | ---------------- |
| **Imported to ShipBob** | \_shipbob\_imported | When an order has been successfully imported from NetSuite to ShipBob the NetSuite integration will automatically update this field to be TRUE. It should not be manually adjusted. | Check Box | Y | SALE |
| **ShipBob Shipment ID** | \_shipbob\_shipmentid | | Free Form Text | N | ITEM FULFILLMENT |
| **Sales Channel** | custbody\_shipbob\_sales\_channel | Once an order has been successfully imported from NetSuite into Jetpack, Jetpack orders will be assigned the appropriate Sales Channel from NetSuite (e.g., TikTok, Amazon, Shopify, etc.). | Free Form Text or Drop Down Single-Select | Y | SALE |
| **ShipBob Carrier (Optional, Recommended)** | \_shipbob\_shipping\_carrier | | Free Form Text | N | ITEM FULFILLMENT |
| **ShipBob Tracking URL (Optional, Recommended)** | \_shipbob\_tracking\_url | | Free Form Text | N | ITEM FULFILLMENT |
| **ShipBob Shipping Method (Optional, Recommended)** | \_shipbob\_shipping\_method | | Free Form Text | N | ITEM FULFILLMENT |
| **ShipBob Order Routing Override (Optional)** | \_custbody\_shipbob\_routing\_override | | Check Box | N | SALE |
For the Sales Channel field, the value must be one of the following verbatim: amazon, bigcommerce, ebay, faire, macy, magento, shein, shopify, squarespace, targetplus, temu, tiktok, unleashed, walmart, woocommerce
To import B2B orders into Jetpack, create Transaction Body Fields based on the table below.
Once imported into the Jetpack dashboard, B2B orders will use Jetpack's standard GS1 labels and packing slips.
| Field Label | ID | Type | Applies To |
| ----------------------------- | ----------------------------------- | -------------------------------------------------------------------------- | ---------- |
| **ShipBob B2B Order** | \_custbody\_shipbob\_b2b | Check Box | SALE |
| **ShipBob B2B Carrier Type** | \_custbody\_shipbob\_carrier\_type | Single-select dropdown with the values "Parcel" and "Freight" | SALE |
| **ShipBob B2B Payment Terms** | \_custbody\_shipbob\_payment\_terms | Single-select dropdown with the values "Prepaid" and "MerchantResponsible" | SALE |
You can have Return orders automatically imported into Jetpack based on Return Authorization (RA) records in NetSuite. RAs are based on the following criteria:
* RA must not be voided
* RA must not be marked as already imported into ShipBob
* RA must have been created within the last two weeks (14 days)
* RA must have a To Location in NetSuite configured to a Jetpack fulfillment center (to which your customer will ship the order)
* RA record must be linked to a Sales Order that was fulfilled by Jetpack via the NetSuite integration
To import Return Authorizations (RAs) as returns in Jetpack, navigate to your **Account Preferences** page in NetSuite.
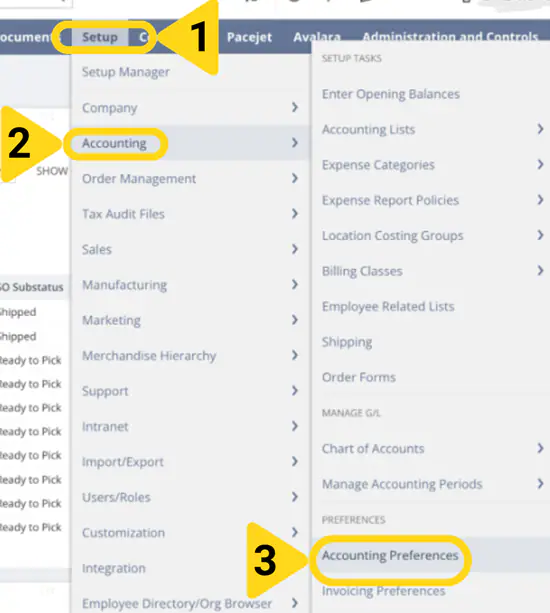 Review the **WRITE-OFF ACCOUNT FOR RETURNS** field (from the Order Management section under the Returns panel) to ensure it has the desired account selected.
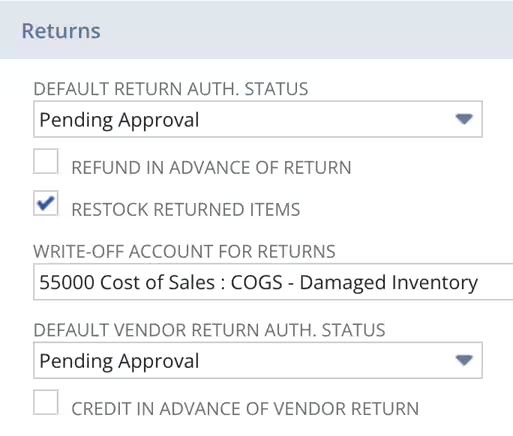 Create the following Transaction Body Fields:
| Field Label | ID | Type | Applies To |
| ---------------------------------- | ------------------------------------- | -------------- | -------------------- |
| **ShipBob Imported Return** | \_custbody\_shipbob\_imported\_return | Check Box | Return Authorization |
| **ShipBob Return Tracking Number** | \_custbody\_shipbob\_return\_tracking | Free Form Text | Return Authorization |
You must configure your NetSuite account settings to allow Jetpack to update NetSuite order statuses.
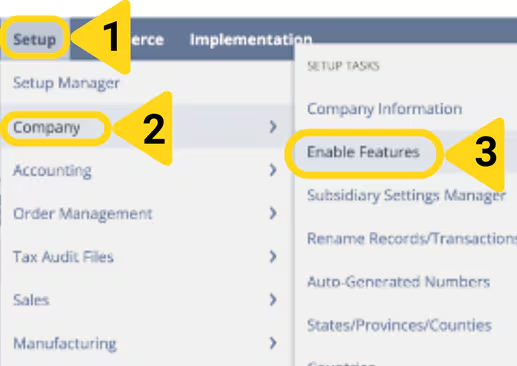
From NetSuite, navigate to **Setup**, click **Company**, and select **Enable Features**. You will be redirected to the Enable Features page.
Create the following Transaction Body Fields:
| Field Label | ID | Type | Applies To |
| ---------------------------------- | ------------------------------------- | -------------- | -------------------- |
| **ShipBob Imported Return** | \_custbody\_shipbob\_imported\_return | Check Box | Return Authorization |
| **ShipBob Return Tracking Number** | \_custbody\_shipbob\_return\_tracking | Free Form Text | Return Authorization |
You must configure your NetSuite account settings to allow Jetpack to update NetSuite order statuses.
From NetSuite, navigate to **Setup**, click **Company**, and select **Enable Features**. You will be redirected to the Enable Features page.
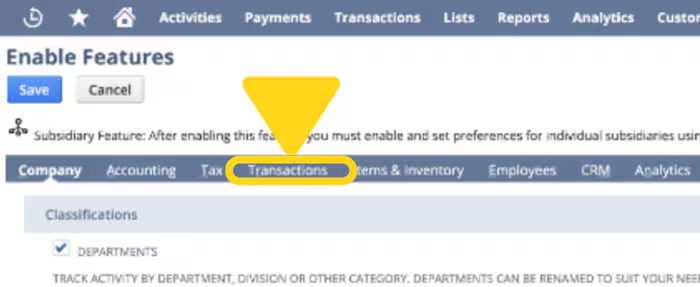
 Click the **Transactions** tab, then click **Save**.
 Click the **Suite Cloud** tab. In the SuiteTalk (Web Services) panel, check the box next to **SOAP WEB SERVICES** and **REST WEB SERVICES**. In the Manage Authentication panel, check the box next to **TOKEN-BASED AUTHENTICATION**. Click **Save**.
To retrieve the Consumer Key and Consumer Secret that are required to integrate NetSuite, you must create an Integration Record in NetSuite.
These credentials will only be provided once. Be sure to copy and save them immediately.
From NetSuite, navigate to **Setup**, click **Integration**, select **Manage Integrations**, and click **New**. You will be redirected.
Click the **Suite Cloud** tab. In the SuiteTalk (Web Services) panel, check the box next to **SOAP WEB SERVICES** and **REST WEB SERVICES**. In the Manage Authentication panel, check the box next to **TOKEN-BASED AUTHENTICATION**. Click **Save**.
To retrieve the Consumer Key and Consumer Secret that are required to integrate NetSuite, you must create an Integration Record in NetSuite.
These credentials will only be provided once. Be sure to copy and save them immediately.
From NetSuite, navigate to **Setup**, click **Integration**, select **Manage Integrations**, and click **New**. You will be redirected.
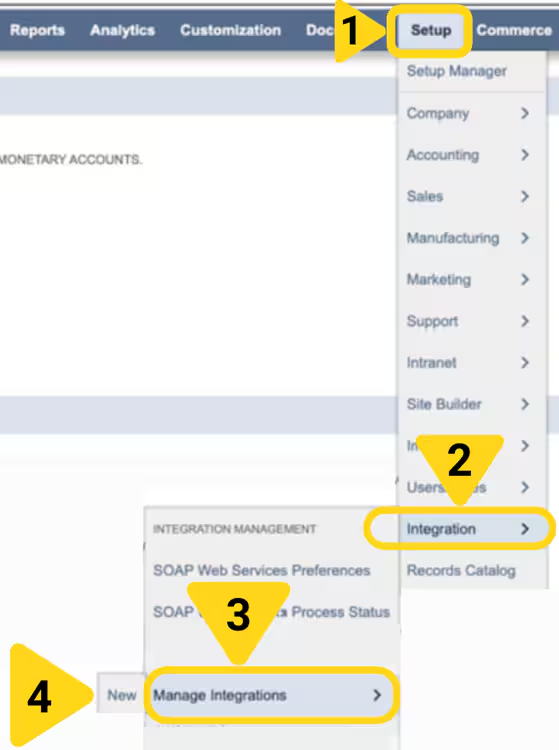 Input a name for the integration in the textbox under Name. Check **TOKEN-BASED AUTHENTICATION** and **TBA: AUTHORIZATION FLOW** under the Token-based Authentication panel.
Paste the following URL under **CALLBACK URL:** `https://api.pandium.io/v0/author/callback/netsuite`
Check **PUBLIC CLIENT** under the OAuth 2.0 panel. Paste the following URL under **REDIRECT URL:** `https://api.pandium.io/v0/author/callback/netsuite`
Check **RESTLETS** and **REST WEB SERVICES** under the OAuth 2.0 panel. Click **Save**. You will be redirected.
Input a name for the integration in the textbox under Name. Check **TOKEN-BASED AUTHENTICATION** and **TBA: AUTHORIZATION FLOW** under the Token-based Authentication panel.
Paste the following URL under **CALLBACK URL:** `https://api.pandium.io/v0/author/callback/netsuite`
Check **PUBLIC CLIENT** under the OAuth 2.0 panel. Paste the following URL under **REDIRECT URL:** `https://api.pandium.io/v0/author/callback/netsuite`
Check **RESTLETS** and **REST WEB SERVICES** under the OAuth 2.0 panel. Click **Save**. You will be redirected.
 Copy the **Consumer Key** and **Consumer Secret** and save this information.
Locate your **Account ID** in your NetSuite URL. This is required when integrating NetSuite and Jetpack. Example: If the URL is `https://1234567.app.netsuite.com/`, your account ID is `1234567`. If you are using a sandbox NetSuite account, it will have a suffix. When inputting your Account ID in the Jetpack dashboard, you must input your suffix with a hyphen (-) instead of an underscore (\_). Example: If your suffix is \_SB2, you would input –SB2 instead.
You must create a Role and configure Permissions within NetSuite before integrating.
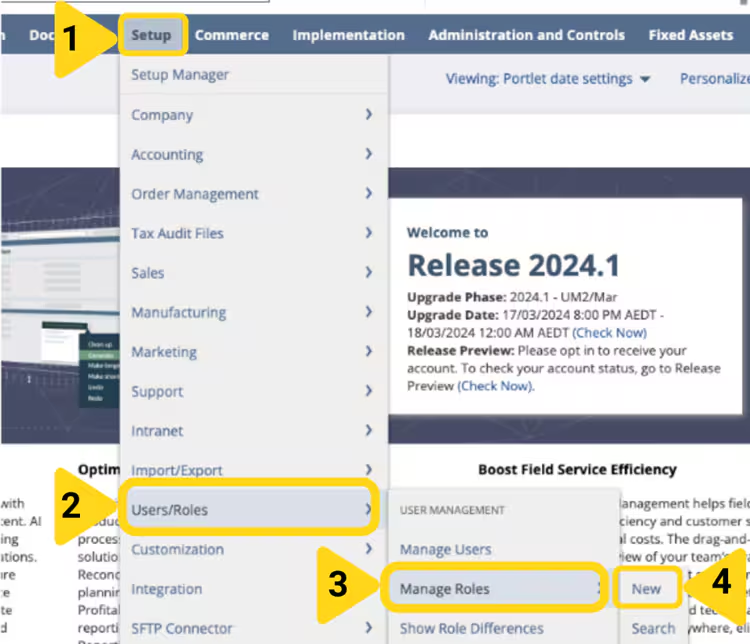
From NetSuite, navigate to **Setup**, select **User/Roles**, click **Manage Roles**, and click **New**.
Name the role (e.g., "ShipBob API Role"). Add the required Permissions based on the permissions tabs:
* **Setup Tab**
* **Lists Tab:** If your NetSuite account does not have the ability to grant List permission for the Subsidiary, Department, Class, or Source records, the integration will still work, but the order sync filter for any missing record will not work
* **Transactions Tab**
* **Custom Records Tab**
* **Reports Tab**
Click **Save**.
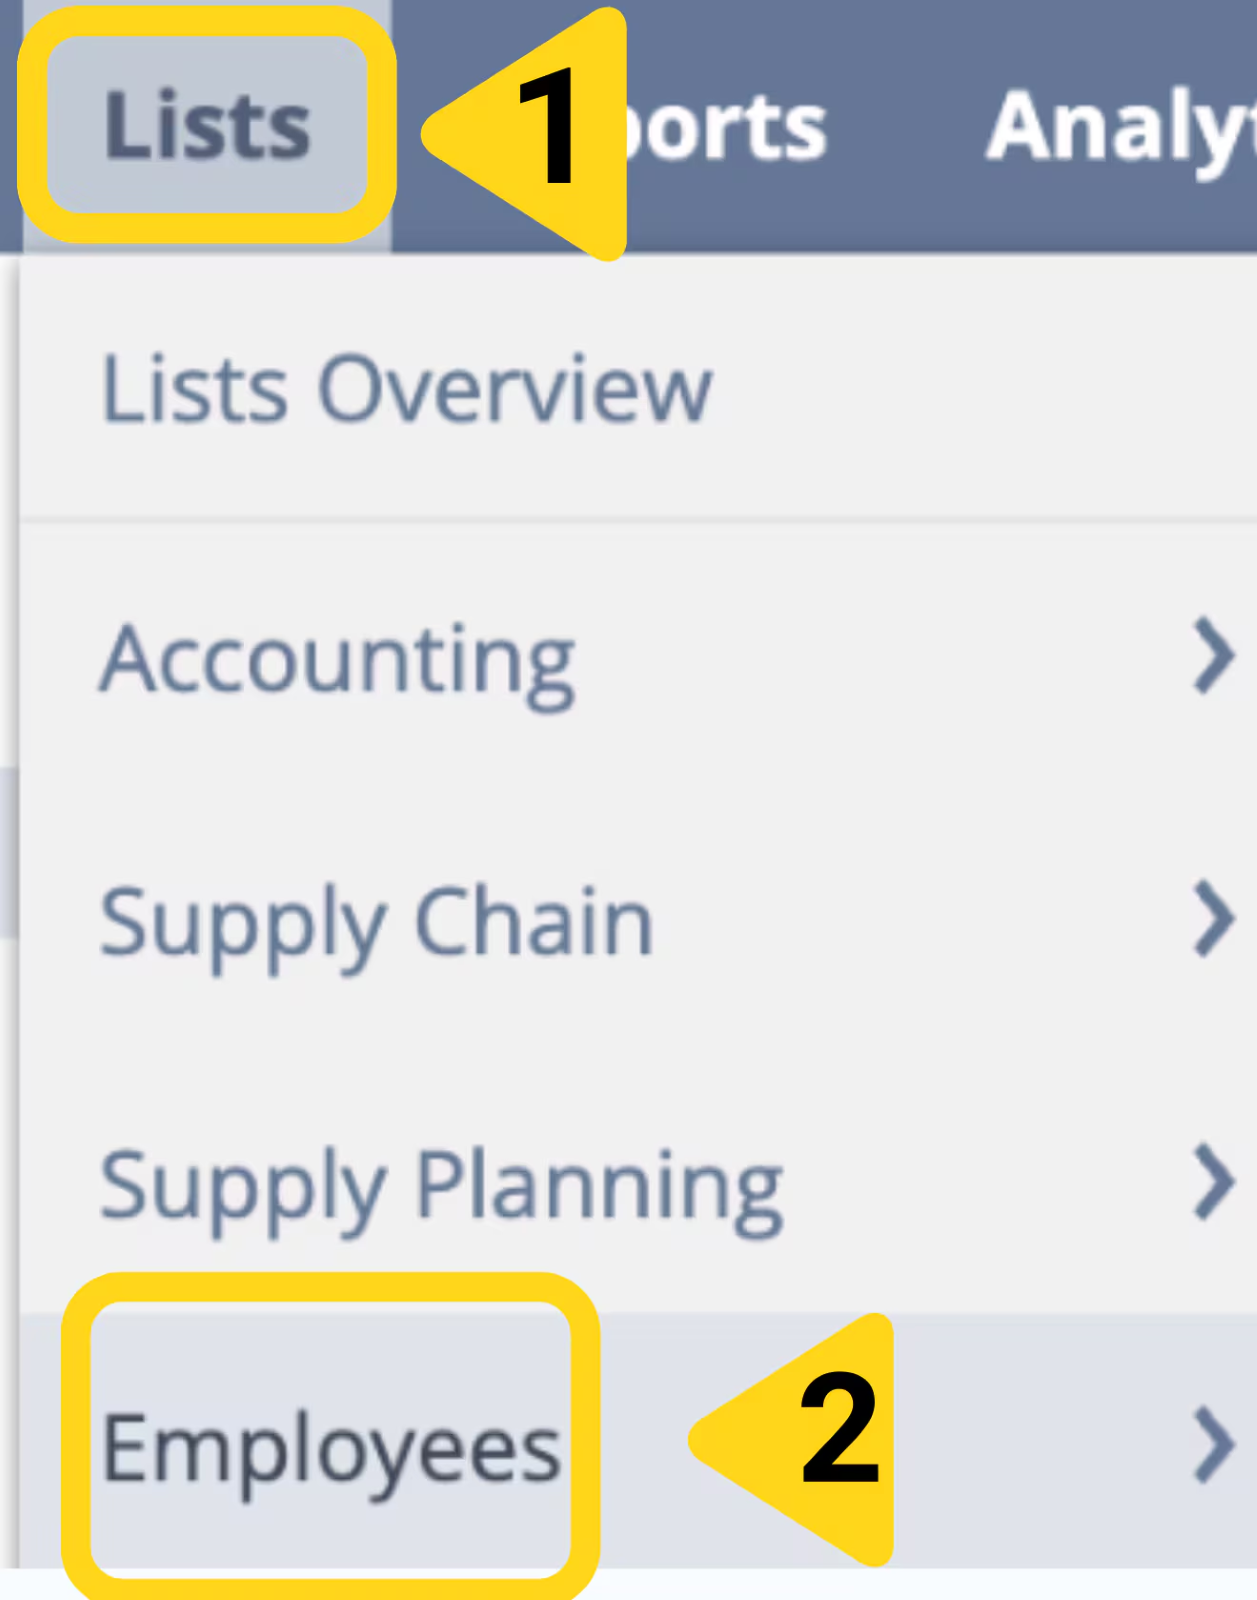
Once the Role is created, it must be added to a NetSuite User. Click **Lists** on the top navigation bar and select **Employees**. You will be redirected.
Copy the **Consumer Key** and **Consumer Secret** and save this information.
Locate your **Account ID** in your NetSuite URL. This is required when integrating NetSuite and Jetpack. Example: If the URL is `https://1234567.app.netsuite.com/`, your account ID is `1234567`. If you are using a sandbox NetSuite account, it will have a suffix. When inputting your Account ID in the Jetpack dashboard, you must input your suffix with a hyphen (-) instead of an underscore (\_). Example: If your suffix is \_SB2, you would input –SB2 instead.
You must create a Role and configure Permissions within NetSuite before integrating.
From NetSuite, navigate to **Setup**, select **User/Roles**, click **Manage Roles**, and click **New**.
Name the role (e.g., "ShipBob API Role"). Add the required Permissions based on the permissions tabs:
* **Setup Tab**
* **Lists Tab:** If your NetSuite account does not have the ability to grant List permission for the Subsidiary, Department, Class, or Source records, the integration will still work, but the order sync filter for any missing record will not work
* **Transactions Tab**
* **Custom Records Tab**
* **Reports Tab**
Click **Save**.
Once the Role is created, it must be added to a NetSuite User. Click **Lists** on the top navigation bar and select **Employees**. You will be redirected.
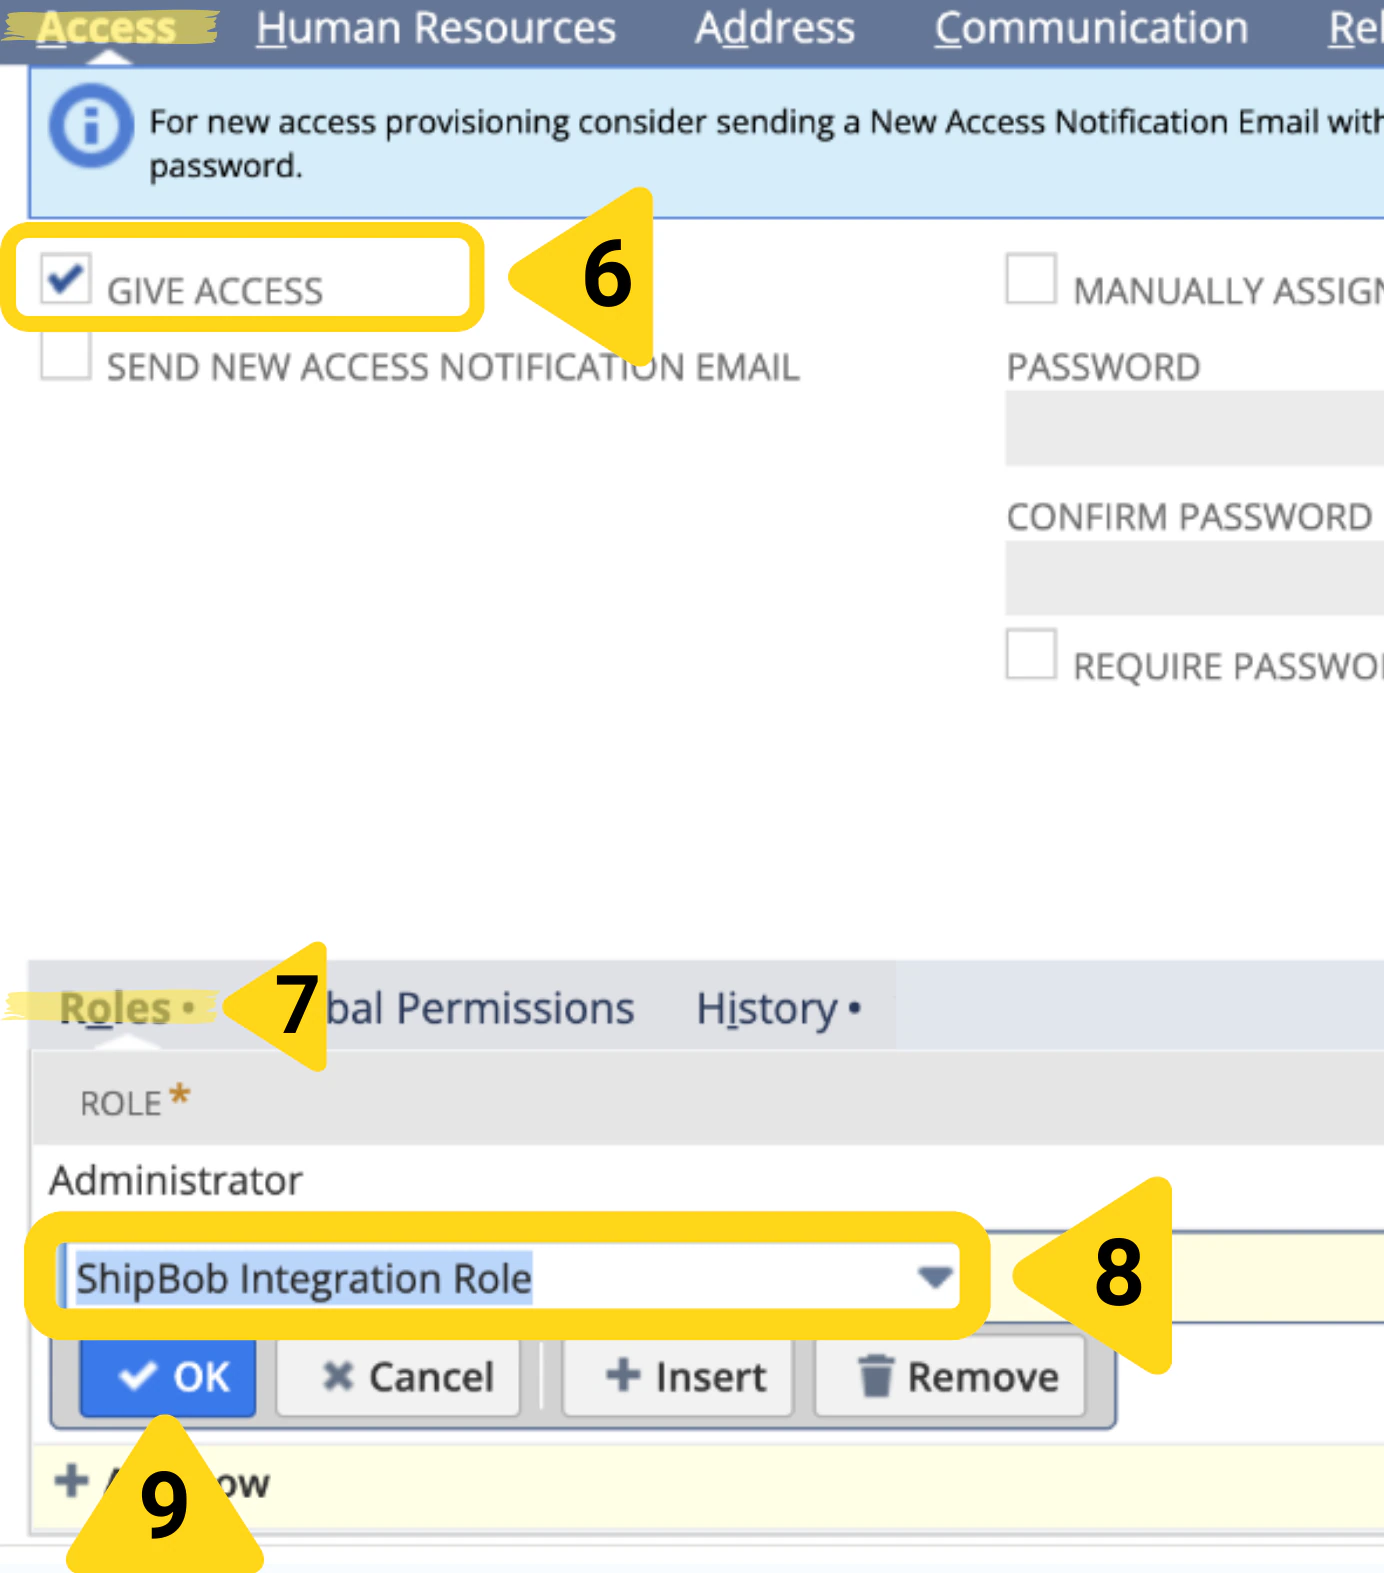
 Locate the user you want to utilize for this role and click **Edit** next to their name. Scroll down to Access panel and check **GIVE ACCESS**. Click the **Roles** tab. Select the Role (created above) from the drop-down menu and click **OK**.
 Click **Save**.
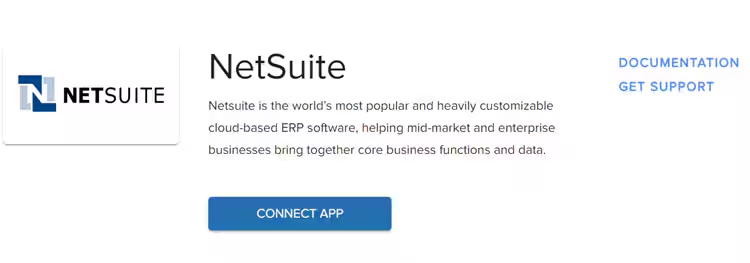
From the Jetpack dashboard, navigate to **Integrations** and find NetSuite, then click **CONNECT APP**.
Click **Save**.
From the Jetpack dashboard, navigate to **Integrations** and find NetSuite, then click **CONNECT APP**.
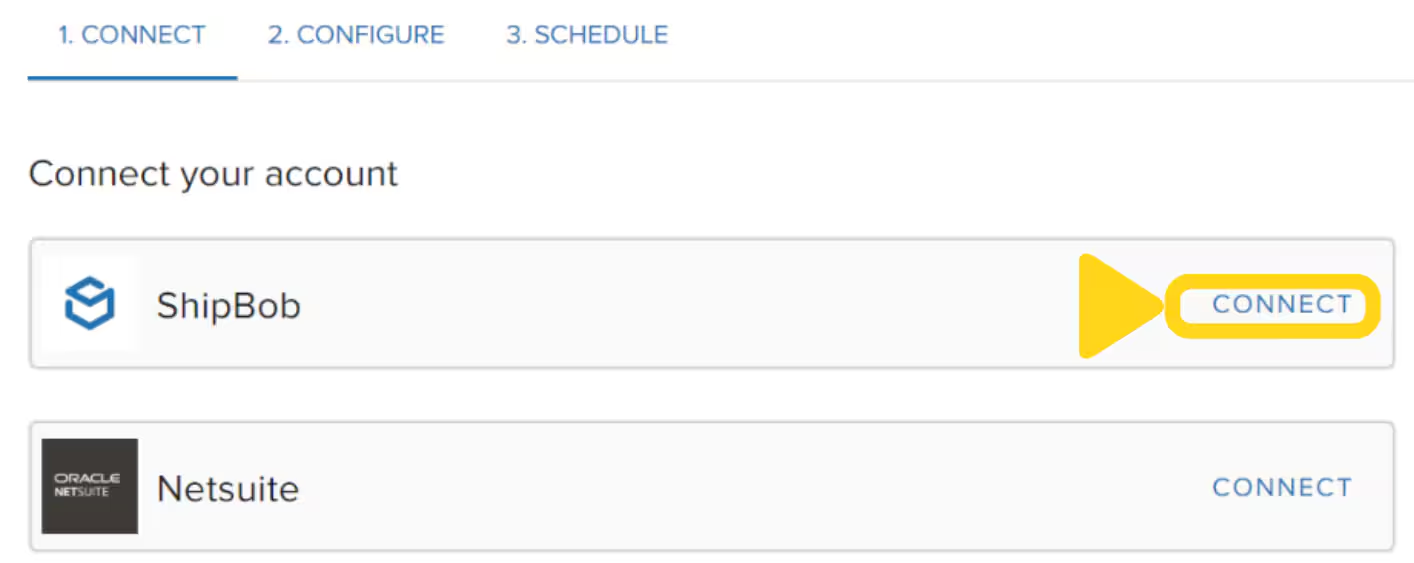
 Click **CONNECT** next to NetSuite, then enter your Account ID (you can locate your NetSuite Account ID at the beginning of your NetSuite URL), Consumer Key, and Consumer Secret.
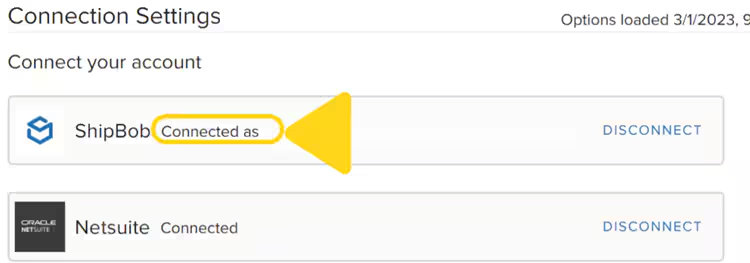
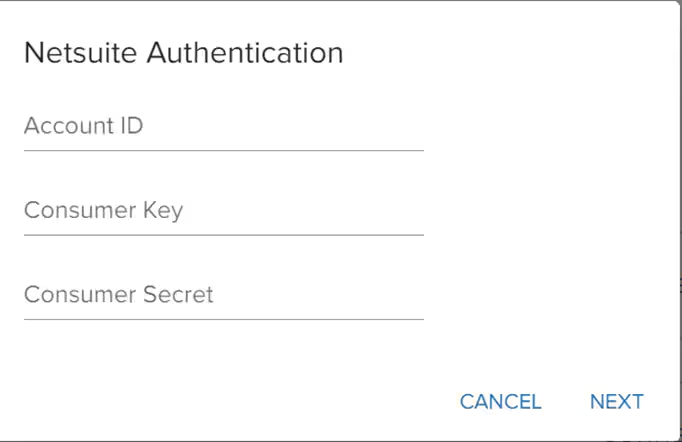 Click **NEXT**. You'll see Connected next to NetSuite.
 Click **CONNECT** next to ShipBob.
 Name the channel and grant permissions.
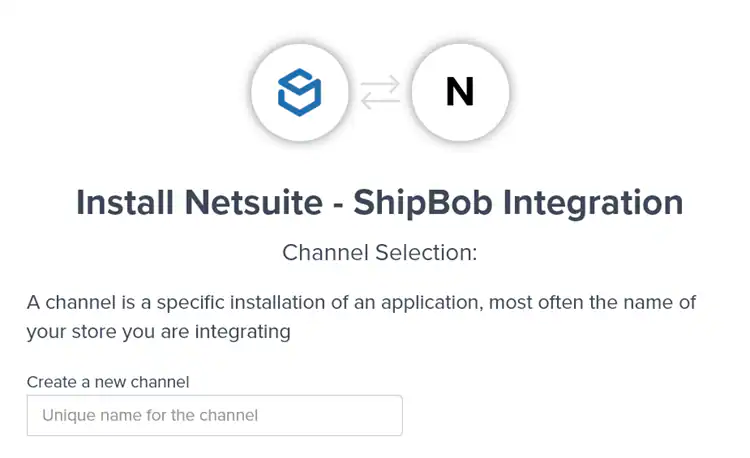 Click **Authorize & Install**. The pop-up window will close, and you will see Connected next to ShipBob.
 ***
## NetSuite Features and Capabilities
After completing the initial setup, you can configure and manage sync features between NetSuite and Jetpack, including Order Sync, Product Sync, Inventory Quantity Sync, and Carrier Tracking Sync.
### Order Sync
Order sync allows you to automatically import orders from NetSuite to Jetpack. Once enabled, orders will be imported automatically based on your workflow cadence.
#### B2B Orders
By default, B2B orders are not automatically imported from NetSuite into the Jetpack dashboard. To enable automatic import, follow the steps under the (Optional) Import B2B Orders into Jetpack from NetSuite section. Alternatively, you can [manually create B2B orders](/fulfillment/b2b/creating-manual-b2b-orders) in Jetpack.
Once imported, B2B orders will use Jetpack's standard GS1 labels for tracking and packing slips. These GS1 labels are printed on a 4 x 6-inch (10.16 x 15.24 cm) label and cannot be customized, though the information can vary. The label includes a unique serial shipping container code (SSCC) for each box or pallet. Placement of GS1 labels on shipments are allowed to vary.
#### Return Orders
By default, customer return orders are not automatically imported from NetSuite. Alternatively, you can [manually create return orders](/fulfillment/returns/creating-return-order) in the Jetpack dashboard.
Orders created manually within the Jetpack dashboard or imported from your ecommerce platforms that are integrated with Jetpack will not sync back to NetSuite.
### Enabling Order Sync
To import orders automatically from NetSuite, enable the Sync Orders and Start Shipping Date features in Jetpack.
From the Jetpack dashboard, click **Integration** on the left-hand navigation bar and select **My Apps** from the dropdown menu. Locate your NetSuite integration and click the three vertical dots, then select **Connection Settings** from the dropdown menu.
Scroll down to the **Sync Orders** section. Check the box next to **Enable** under Sync Orders to enable order auto sync (uncheck the box to disable the feature). Input a **Start Shipping Date** to fetch orders created on or after the specified date (maximum 14 days in the past).
To further refine which orders are imported from NetSuite, you can filter by one or more of the following:
* **Subsidiaries**
* **Classifications**
* **Departments**
* **Sources**
* **Statuses** - This filter allows you to specify which orders Jetpack will import based on their status. If no status is selected, orders with the following statuses will be synced from NetSuite: Pending Fulfillment, Partially Fulfilled, or Pending Billing/Partially Fulfilled.
You can also Map NetSuite Transaction Property object fields to specific Jetpack Mappable Order Properties.
For more information on the terms mentioned above, please refer to NetSuite's support portal.
### Import Delay
If updates are made to orders in NetSuite after being imported to Jetpack, they will not be reflected in your Jetpack dashboard and vice versa. Please make updates in both NetSuite and Jetpack if there are changes to orders to ensure the changes are accurately made everywhere.
To give you enough time to make updates to orders in NetSuite before they are imported to Jetpack, use the order Import Delay feature.
From the Jetpack dashboard, click **Integrations** on your left-hand navigation bar and select **My Apps** from the dropdown menu. Locate your NetSuite integration, click the three vertical dots, and select **Connection Settings** from the dropdown menu. Select the text box under **Import Delay** and select the desired order Import Delay option from the dropdown menu. Choose from: 30 minutes, 1 hour, 2 hours, 3 hours, 6 hours, 12 hours, or 24 hours.
***
### Product Sync
Product Sync allows you to automatically sync your NetSuite product catalog with Jetpack, based on your sync cadence. This includes syncing inventory items, kits, and assemblies to Jetpack.
Available configurations include:
* **Enable/Disable Sync Products:** Control whether the sync is active or not
* **Custom Product Field Mapper:** Map specific NetSuite Item object fields to corresponding Jetpack product properties
#### Important Considerations When Using Product Sync
* **Syncing limitations:** This feature only syncs products from NetSuite to Jetpack. Products created in Jetpack will not be synced back to NetSuite.
* **Kits and assemblies:** Kit or assembly items are decoupled during import. This means that the child SKUs, which make up the kits or assemblies, will be imported into Jetpack, but the parent SKU from NetSuite will not.
* **(Required) Custom Item Field Mapping:** Each product must have a Custom Item field applied for it to sync from NetSuite to Jetpack. This custom field must be a checkbox value and have the following name verbatim upon creation: `custitem_push_to_shipbob`
***
### Lot Numbered Items and Inventory Quantity Sync
Lot Numbered Items in NetSuite are supported by the Inventory Quantity Sync feature in Jetpack. Lot numbers are also supported by the Sync Tracking Information feature in Jetpack, which ensures that tracking information can be uploaded to NetSuite for fulfillment.
Lot numbers must match exactly between NetSuite and Jetpack.
Example: A product in NetSuite has a lot number of "ABC-123," the corresponding product in Jetpack must have the exact same lot number ("ABC-123"). Mismatched lot numbers will cause issues with the integration.
Serial scans are not supported in the Jetpack-NetSuite integration. If orders contain products requiring serial scans, tracking information cannot be synced back to NetSuite.
***
### Configuring Product Sync in Jetpack
Use the steps below to configure product sync and ensure smooth integration between NetSuite and Jetpack.
From the Jetpack dashboard, click **Integration** on the left-hand navigation bar and select **My Apps** from the dropdown menu. Locate your NetSuite integration and click the three horizontal dots, then select **Connection Settings** from the dropdown menu.
Scroll down to the **Sync Products** and **Custom Product Field Mapper** section. To enable product sync, check the box next to **Enable** under Sync Products.
Use the dropdown menus under **Custom Product Field Mapper** to map NetSuite properties to corresponding Jetpack product fields. Example: You can map a custom SKU field (e.g., "myStoreSKU\_forEuropeRegion") in NetSuite to the Jetpack sku field. Available product properties to map include: sku, barcode, gtin, and unit\_price.
***
### Inventory Quantity Sync
Enabling Inventory Quantity Sync ensures that inventory counts for your products are synchronized from Jetpack to NetSuite. You can choose to sync inventory counts either for all Jetpack fulfillment centers or from a specific fulfillment center.
The Inventory Quantity Sync feature handles:
* **Order fulfillment:** Inventory deductions caused by fulfilling orders are automatically handled when generating item fulfillment records (see Carrier Tracking Sync section below)
* **Inventory adjustments:** Adjustments from cycle counts, returned orders, and incoming WROs are covered as part of a True Up sync. This sync can be scheduled less frequently than other workflows
* **Lot numbered items:** The Inventory Quantity Sync feature supports Lot Numbered Items in NetSuite. If you use Lot Numbered Items, the lot numbers must match exactly in both NetSuite and Jetpack
* **Kitting:** Inventory quantities for kits will be updated per child item back to NetSuite
Available configurations include:
| Configuration | Description |
| ------------------------------------------------ | -------------------------------------------------------------------------------------------------------- |
| **Enable/Disable Inventory Quantity Sync** | Toggle the sync on or off |
| **Inventory True Up Type** | Choose whether inventory counts should update for all Jetpack fulfillment centers or only a specific one |
| **Inventory True Up Cadence** | Select the frequency for syncing inventory counts. Options include: 1x per day, 2x per day, 4x per day |
| **Subsidiary for Inventory Adjustments** | Specify which NetSuite subsidiary to apply inventory adjustments |
| **Adjustment Account for Inventory Adjustments** | Required for Inventory Sync; typically refers to an expense account for inventory adjustments |
| **NetSuite Location for Aggregated Inventory** | Select the NetSuite location where inventory quantities will be synced (if syncing across the network) |
***
### Carrier Tracking Sync
Sync Tracking Information allows you to generate item fulfillment records and sync tracking numbers from Jetpack to NetSuite once shipping labels have been generated.
An item fulfillment transaction records the shipment of some or all items on an order to the customer and is directly connected to the original Sales Order in NetSuite. This sync supports split shipment orders (i.e., multiple fulfillment records) in NetSuite, each with their own tracking information and still linked back to the original sales order.
Available configurations include:
* Toggle tracking sync on/off
* Notify Jetpack if your NetSuite account has "carrier registrations" established
* Map NetSuite fulfillment center locations to Jetpack fulfillment center locations
***
### Product, Order, and Carrier Tracking Sync Cadence
Order, Product, and Tracking Information syncs can be run at a set cadence of your choosing. All three of these syncs will run at the same cadence.
The available options are:
* Every 30 minutes
* Every 1 hour
* Every 4 hours
* Every 6 hours
* Every 12 hours
* Once Per Day
* Paused
***
### Inventory Quantity True Up Sync Cadence
Inventory Quantity True Up Cadence can be set separately from the Order, Product, And Tracking Information cadences.
The available options are:
* 1x per day
* 2x per day
* 4x per day
***
## Let's Dive Deeper
Back to the main integrations guide
Understand integration management
Set up your product catalog
Understand how orders flow into Jetpack
Another ERP integration option
Explore B2B fulfillment options
***
## NetSuite Features and Capabilities
After completing the initial setup, you can configure and manage sync features between NetSuite and Jetpack, including Order Sync, Product Sync, Inventory Quantity Sync, and Carrier Tracking Sync.
### Order Sync
Order sync allows you to automatically import orders from NetSuite to Jetpack. Once enabled, orders will be imported automatically based on your workflow cadence.
#### B2B Orders
By default, B2B orders are not automatically imported from NetSuite into the Jetpack dashboard. To enable automatic import, follow the steps under the (Optional) Import B2B Orders into Jetpack from NetSuite section. Alternatively, you can [manually create B2B orders](/fulfillment/b2b/creating-manual-b2b-orders) in Jetpack.
Once imported, B2B orders will use Jetpack's standard GS1 labels for tracking and packing slips. These GS1 labels are printed on a 4 x 6-inch (10.16 x 15.24 cm) label and cannot be customized, though the information can vary. The label includes a unique serial shipping container code (SSCC) for each box or pallet. Placement of GS1 labels on shipments are allowed to vary.
#### Return Orders
By default, customer return orders are not automatically imported from NetSuite. Alternatively, you can [manually create return orders](/fulfillment/returns/creating-return-order) in the Jetpack dashboard.
Orders created manually within the Jetpack dashboard or imported from your ecommerce platforms that are integrated with Jetpack will not sync back to NetSuite.
### Enabling Order Sync
To import orders automatically from NetSuite, enable the Sync Orders and Start Shipping Date features in Jetpack.
From the Jetpack dashboard, click **Integration** on the left-hand navigation bar and select **My Apps** from the dropdown menu. Locate your NetSuite integration and click the three vertical dots, then select **Connection Settings** from the dropdown menu.
Scroll down to the **Sync Orders** section. Check the box next to **Enable** under Sync Orders to enable order auto sync (uncheck the box to disable the feature). Input a **Start Shipping Date** to fetch orders created on or after the specified date (maximum 14 days in the past).
To further refine which orders are imported from NetSuite, you can filter by one or more of the following:
* **Subsidiaries**
* **Classifications**
* **Departments**
* **Sources**
* **Statuses** - This filter allows you to specify which orders Jetpack will import based on their status. If no status is selected, orders with the following statuses will be synced from NetSuite: Pending Fulfillment, Partially Fulfilled, or Pending Billing/Partially Fulfilled.
You can also Map NetSuite Transaction Property object fields to specific Jetpack Mappable Order Properties.
For more information on the terms mentioned above, please refer to NetSuite's support portal.
### Import Delay
If updates are made to orders in NetSuite after being imported to Jetpack, they will not be reflected in your Jetpack dashboard and vice versa. Please make updates in both NetSuite and Jetpack if there are changes to orders to ensure the changes are accurately made everywhere.
To give you enough time to make updates to orders in NetSuite before they are imported to Jetpack, use the order Import Delay feature.
From the Jetpack dashboard, click **Integrations** on your left-hand navigation bar and select **My Apps** from the dropdown menu. Locate your NetSuite integration, click the three vertical dots, and select **Connection Settings** from the dropdown menu. Select the text box under **Import Delay** and select the desired order Import Delay option from the dropdown menu. Choose from: 30 minutes, 1 hour, 2 hours, 3 hours, 6 hours, 12 hours, or 24 hours.
***
### Product Sync
Product Sync allows you to automatically sync your NetSuite product catalog with Jetpack, based on your sync cadence. This includes syncing inventory items, kits, and assemblies to Jetpack.
Available configurations include:
* **Enable/Disable Sync Products:** Control whether the sync is active or not
* **Custom Product Field Mapper:** Map specific NetSuite Item object fields to corresponding Jetpack product properties
#### Important Considerations When Using Product Sync
* **Syncing limitations:** This feature only syncs products from NetSuite to Jetpack. Products created in Jetpack will not be synced back to NetSuite.
* **Kits and assemblies:** Kit or assembly items are decoupled during import. This means that the child SKUs, which make up the kits or assemblies, will be imported into Jetpack, but the parent SKU from NetSuite will not.
* **(Required) Custom Item Field Mapping:** Each product must have a Custom Item field applied for it to sync from NetSuite to Jetpack. This custom field must be a checkbox value and have the following name verbatim upon creation: `custitem_push_to_shipbob`
***
### Lot Numbered Items and Inventory Quantity Sync
Lot Numbered Items in NetSuite are supported by the Inventory Quantity Sync feature in Jetpack. Lot numbers are also supported by the Sync Tracking Information feature in Jetpack, which ensures that tracking information can be uploaded to NetSuite for fulfillment.
Lot numbers must match exactly between NetSuite and Jetpack.
Example: A product in NetSuite has a lot number of "ABC-123," the corresponding product in Jetpack must have the exact same lot number ("ABC-123"). Mismatched lot numbers will cause issues with the integration.
Serial scans are not supported in the Jetpack-NetSuite integration. If orders contain products requiring serial scans, tracking information cannot be synced back to NetSuite.
***
### Configuring Product Sync in Jetpack
Use the steps below to configure product sync and ensure smooth integration between NetSuite and Jetpack.
From the Jetpack dashboard, click **Integration** on the left-hand navigation bar and select **My Apps** from the dropdown menu. Locate your NetSuite integration and click the three horizontal dots, then select **Connection Settings** from the dropdown menu.
Scroll down to the **Sync Products** and **Custom Product Field Mapper** section. To enable product sync, check the box next to **Enable** under Sync Products.
Use the dropdown menus under **Custom Product Field Mapper** to map NetSuite properties to corresponding Jetpack product fields. Example: You can map a custom SKU field (e.g., "myStoreSKU\_forEuropeRegion") in NetSuite to the Jetpack sku field. Available product properties to map include: sku, barcode, gtin, and unit\_price.
***
### Inventory Quantity Sync
Enabling Inventory Quantity Sync ensures that inventory counts for your products are synchronized from Jetpack to NetSuite. You can choose to sync inventory counts either for all Jetpack fulfillment centers or from a specific fulfillment center.
The Inventory Quantity Sync feature handles:
* **Order fulfillment:** Inventory deductions caused by fulfilling orders are automatically handled when generating item fulfillment records (see Carrier Tracking Sync section below)
* **Inventory adjustments:** Adjustments from cycle counts, returned orders, and incoming WROs are covered as part of a True Up sync. This sync can be scheduled less frequently than other workflows
* **Lot numbered items:** The Inventory Quantity Sync feature supports Lot Numbered Items in NetSuite. If you use Lot Numbered Items, the lot numbers must match exactly in both NetSuite and Jetpack
* **Kitting:** Inventory quantities for kits will be updated per child item back to NetSuite
Available configurations include:
| Configuration | Description |
| ------------------------------------------------ | -------------------------------------------------------------------------------------------------------- |
| **Enable/Disable Inventory Quantity Sync** | Toggle the sync on or off |
| **Inventory True Up Type** | Choose whether inventory counts should update for all Jetpack fulfillment centers or only a specific one |
| **Inventory True Up Cadence** | Select the frequency for syncing inventory counts. Options include: 1x per day, 2x per day, 4x per day |
| **Subsidiary for Inventory Adjustments** | Specify which NetSuite subsidiary to apply inventory adjustments |
| **Adjustment Account for Inventory Adjustments** | Required for Inventory Sync; typically refers to an expense account for inventory adjustments |
| **NetSuite Location for Aggregated Inventory** | Select the NetSuite location where inventory quantities will be synced (if syncing across the network) |
***
### Carrier Tracking Sync
Sync Tracking Information allows you to generate item fulfillment records and sync tracking numbers from Jetpack to NetSuite once shipping labels have been generated.
An item fulfillment transaction records the shipment of some or all items on an order to the customer and is directly connected to the original Sales Order in NetSuite. This sync supports split shipment orders (i.e., multiple fulfillment records) in NetSuite, each with their own tracking information and still linked back to the original sales order.
Available configurations include:
* Toggle tracking sync on/off
* Notify Jetpack if your NetSuite account has "carrier registrations" established
* Map NetSuite fulfillment center locations to Jetpack fulfillment center locations
***
### Product, Order, and Carrier Tracking Sync Cadence
Order, Product, and Tracking Information syncs can be run at a set cadence of your choosing. All three of these syncs will run at the same cadence.
The available options are:
* Every 30 minutes
* Every 1 hour
* Every 4 hours
* Every 6 hours
* Every 12 hours
* Once Per Day
* Paused
***
### Inventory Quantity True Up Sync Cadence
Inventory Quantity True Up Cadence can be set separately from the Order, Product, And Tracking Information cadences.
The available options are:
* 1x per day
* 2x per day
* 4x per day
***
## Let's Dive Deeper
Back to the main integrations guide
Understand integration management
Set up your product catalog
Understand how orders flow into Jetpack
Another ERP integration option
Explore B2B fulfillment options

Questions? Contact Jetpack Care.
If you have any questions or run into issues, you can always contact Jetpack Care for help. Our team is always here to assist via Slack, phone, or email!