> ## Documentation Index
> Fetch the complete documentation index at: https://help.jetpack3pl.com/llms.txt
> Use this file to discover all available pages before exploring further.
# Inventory Planner
> Integrate Inventory Planner with Jetpack to centralize your product data, leverage advanced inventory forecasting, and automate Warehouse Receiving Orders.
Integrating Inventory Planner with Jetpack brings your product and inventory data into Inventory Planner for advanced forecasting, replenishment recommendations, and automated WRO creation. This integration streamlines your inventory management by combining Jetpack's fulfillment data with Inventory Planner's demand forecasting and purchasing tools.

About ShipBob Integration References
During setup, you'll connect Inventory Planner to "ShipBob" through the Apps & Integrations page. This is expected—Jetpack has licensed ShipBob's integration infrastructure to provide reliable connections. Your data flows seamlessly between Inventory Planner and your Jetpack dashboard.
## Integration Overview
The Inventory Planner integration (available on the ShipBob Apps & Integrations page in your Jetpack dashboard) brings your Jetpack product and inventory data into Inventory Planner for:
* **Advanced forecasting** - Customize demand forecasts using historical sales, seasonality, and promotions
* **Replenishment recommendations** - Receive suggested reorder quantities and low-stock alerts
* **WRO automation** - Automatically generate and send purchase orders to suppliers and create WROs in Jetpack, saving time and reducing manual steps
Lot numbers and expiration dates must still be managed manually in Jetpack.
***
## Inventory Planner Features & Capabilities
Inventory Planner offers several benefits for managing your Jetpack inventory:
**Product Records Sync**
Inventory Planner imports all SKUs and on-hand quantities from Jetpack so you can view your entire catalog in one place.
**Advanced and Customizable Forecasting**
Choose to forecast automatically based on sales data or customize your calculations to account for seasonality or promotions.
**Alerts and Recommendations**
Get notifications when inventory dips below your defined thresholds and see recommended purchase quantities.
**Automatic WRO Creation**
After you approve a purchase order in Inventory Planner, the integration can email the PO to your manufacturer and create the corresponding WRO in Jetpack automatically.
***
## Setting Up Your Inventory Planner Integration
Follow these steps to connect Inventory Planner to your Jetpack account:
From the Jetpack dashboard, navigate to **Apps & Integrations**.
Locate **Inventory Planner** in the list and click **Get App**.
 Complete the sign-up process for Inventory Planner's free trial.
Once in Inventory Planner, navigate to **Settings**.
In the Settings panel, click **New Connection**.
Complete the sign-up process for Inventory Planner's free trial.
Once in Inventory Planner, navigate to **Settings**.
In the Settings panel, click **New Connection**.
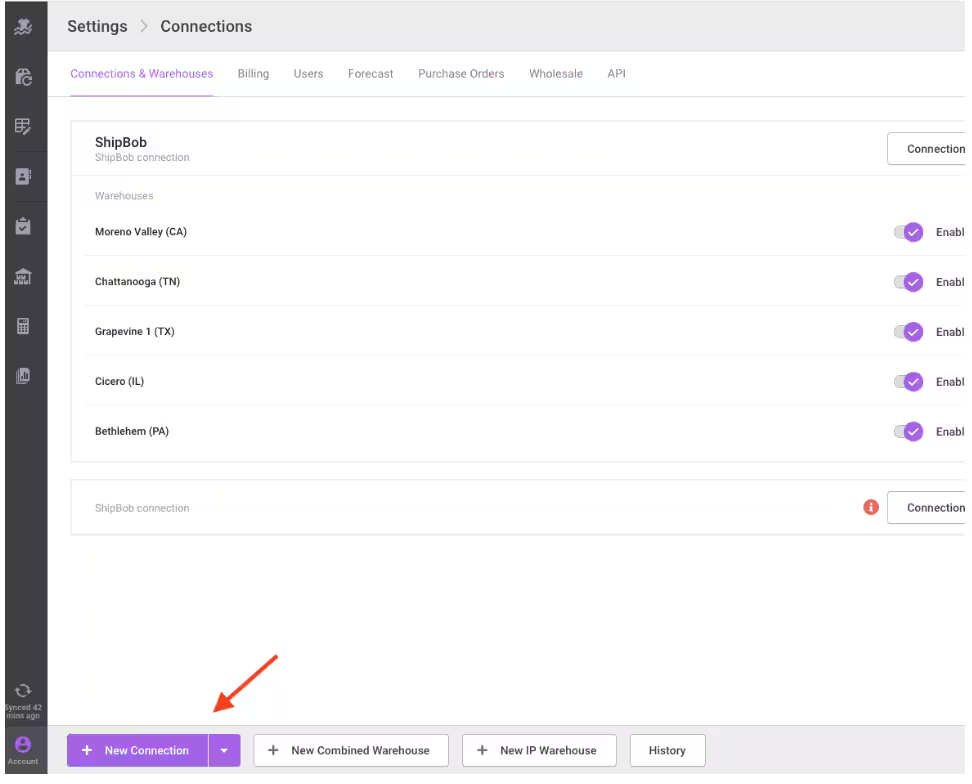 From the connection options, select the **ShipBob** tile.
You'll be redirected to ShipBob. Log in with your Jetpack account credentials and click **Allow** to authorize the connection.
Inventory Planner will list only the fulfillment centers you're authorized for.
Once you complete these steps, you'll return to Inventory Planner. Your Jetpack data will now sync automatically.
***
## Support and Assistance
This integration is maintained by Inventory Planner. For help with setup, forecasting configurations, or WRO automation, contact **[support@inventory-planner.com](mailto:support@inventory-planner.com)**.
For questions about your Jetpack account or WROs created through Inventory Planner, contact Jetpack Care.
***
## Let's Dive Deeper
Back to the main integrations guide
Learn about all integration types
How to send inventory to Jetpack
Monitor and manage your inventory levels
Set up and manage your product catalog
Track your fulfillment performance
From the connection options, select the **ShipBob** tile.
You'll be redirected to ShipBob. Log in with your Jetpack account credentials and click **Allow** to authorize the connection.
Inventory Planner will list only the fulfillment centers you're authorized for.
Once you complete these steps, you'll return to Inventory Planner. Your Jetpack data will now sync automatically.
***
## Support and Assistance
This integration is maintained by Inventory Planner. For help with setup, forecasting configurations, or WRO automation, contact **[support@inventory-planner.com](mailto:support@inventory-planner.com)**.
For questions about your Jetpack account or WROs created through Inventory Planner, contact Jetpack Care.
***
## Let's Dive Deeper
Back to the main integrations guide
Learn about all integration types
How to send inventory to Jetpack
Monitor and manage your inventory levels
Set up and manage your product catalog
Track your fulfillment performance

Questions? Contact Jetpack Care.
If you have any questions or run into issues, you can always contact Jetpack Care for help. Our team is always here to assist via Slack, phone, or email!