> ## Documentation Index
> Fetch the complete documentation index at: https://help.jetpack3pl.com/llms.txt
> Use this file to discover all available pages before exploring further.
# WooCommerce Integration
> Connect your WooCommerce store to Jetpack for automatic product syncing, order importing, and inventory management.
Connecting your WooCommerce (WordPress) store to Jetpack enables automatic synchronization of products and orders, streamlining your fulfillment workflow. This integration handles product syncing, order importing, real-time inventory updates, and tracking synchronization—all without manual data entry.

About ShipBob Integration References
During setup, you'll authorize the "ShipBob" integration in your WooCommerce store. This is expected—Jetpack has licensed ShipBob's integration infrastructure to provide reliable connections. Your data flows seamlessly to your Jetpack dashboard.
***
## Prerequisites
Before starting the integration, ensure you have:
* WordPress website with WooCommerce plugin installed
* Active WooCommerce store
* Jetpack merchant account
***
## Important Guidelines
Before integrating WooCommerce with Jetpack, review these important guidelines:
### Unique SKUs
Each WooCommerce product must have a unique SKU. If SKUs are not unique, products may be mapped to the same base/variant product in Jetpack.
To update SKUs after syncing, add the new SKU to the Sales Channel of the existing product in your Jetpack dashboard. Avoid updating order numbers or other unique values once products are synced, as this can disrupt order fulfillment.
### Multiple WooCommerce Stores
If you plan to connect multiple WooCommerce stores to Jetpack, use a unique WooCommerce user account per store. Using the same user across multiple stores can cause duplicate store order IDs, which prevents proper order fulfillment.
### API Token & Firewall Considerations
**Do not change your WooCommerce API token** after the integration is established, as this will break the connection between WooCommerce and Jetpack.
Ensure your WordPress site's firewall settings allow Jetpack (ShipBob infrastructure) to connect to the WooCommerce API. Some security plugins or hosting providers may block API connections by default.
***
## Connecting WooCommerce to Jetpack
Follow these steps to connect your WooCommerce store to your Jetpack dashboard:
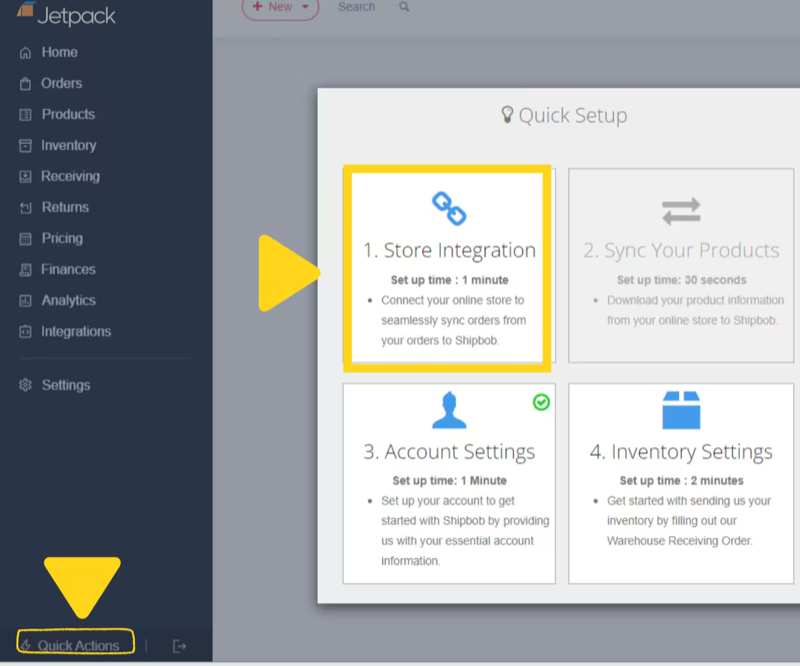
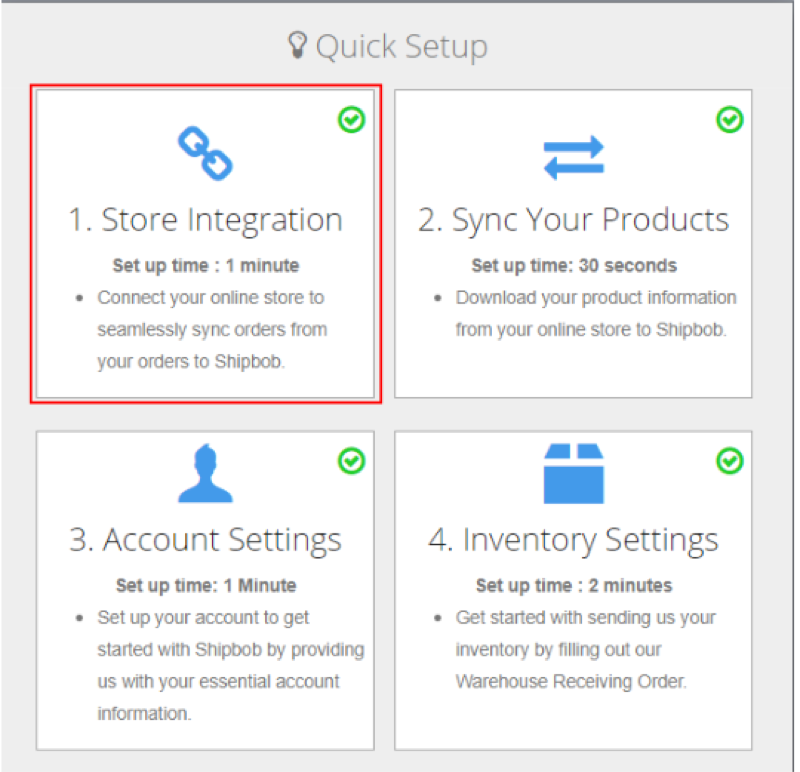
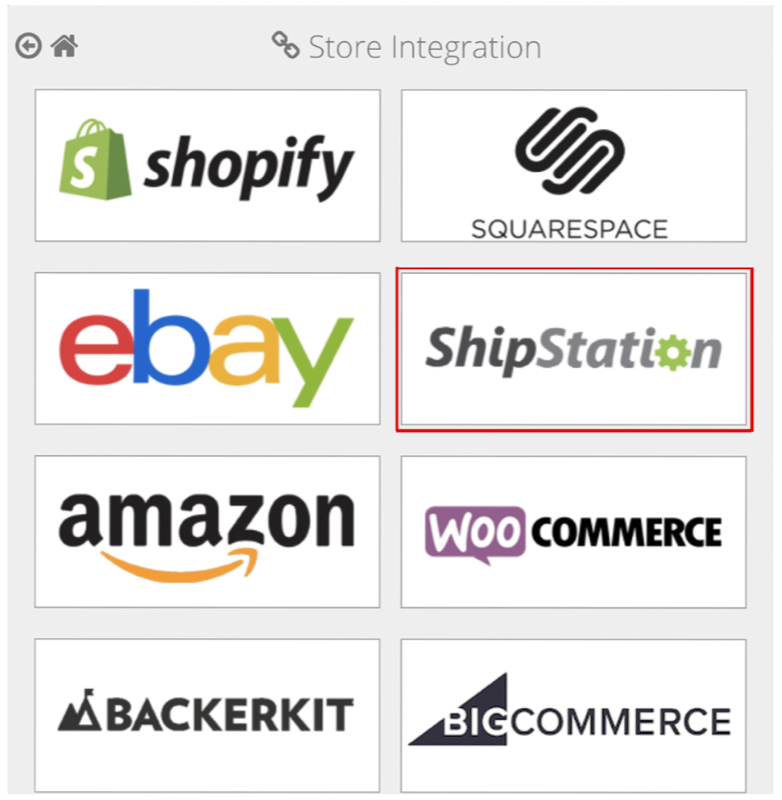 Find **WooCommerce** in the list and click **+ Connect**.
You will be redirected to the WooCommerce Integration page.
Find **WooCommerce** in the list and click **+ Connect**.
You will be redirected to the WooCommerce Integration page.
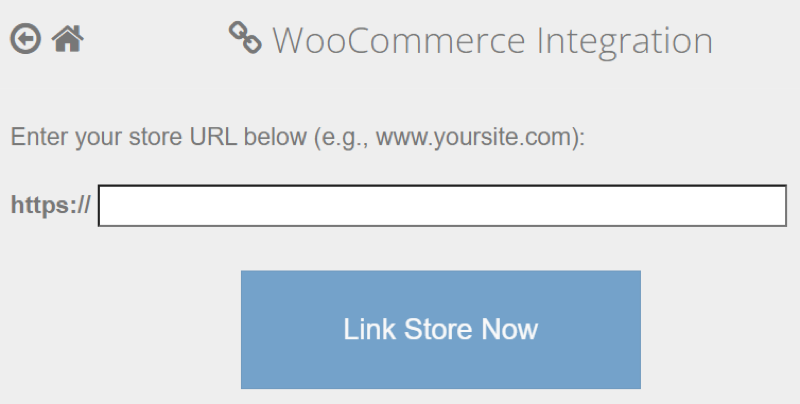 Enter your store URL in the format shown (e.g., [www.yoursite.com](http://www.yoursite.com)) without the https\:// prefix.
Click **Link Store Now**.
Enter your store URL in the format shown (e.g., [www.yoursite.com](http://www.yoursite.com)) without the https\:// prefix.
Click **Link Store Now**.
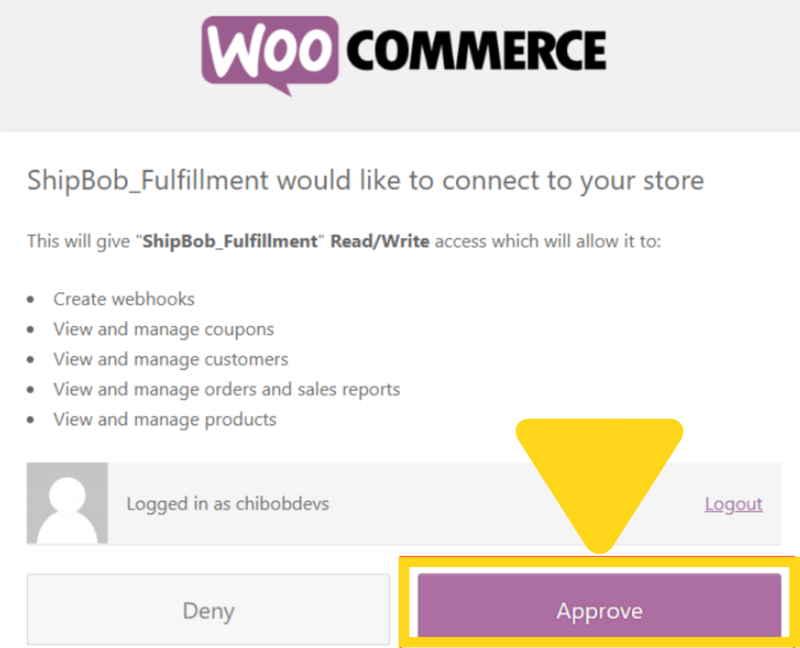 You'll be redirected to your WooCommerce store to approve the connection.
Review the permissions requested:
* Access to read and modify orders
* Access to read products and inventory data
* Ability to update tracking information
Click **Approve** to authorize the connection.
You will be redirected back to Jetpack's Integrations page.
Your WooCommerce integration will now show as **Connected**.
***
## Syncing Products
After connecting your WooCommerce store, you need to sync your products from WooCommerce to Jetpack's Product Catalog.
You'll be redirected to your WooCommerce store to approve the connection.
Review the permissions requested:
* Access to read and modify orders
* Access to read products and inventory data
* Ability to update tracking information
Click **Approve** to authorize the connection.
You will be redirected back to Jetpack's Integrations page.
Your WooCommerce integration will now show as **Connected**.
***
## Syncing Products
After connecting your WooCommerce store, you need to sync your products from WooCommerce to Jetpack's Product Catalog.
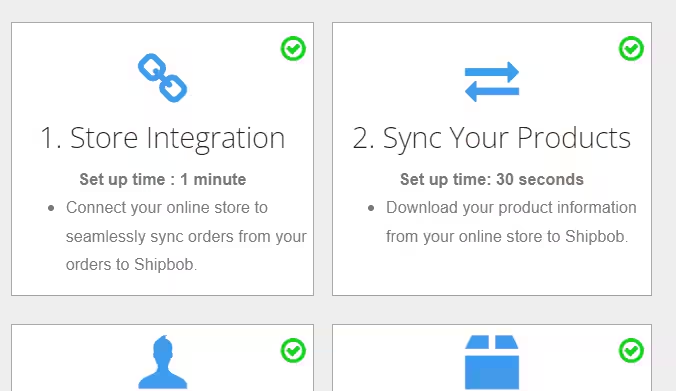 In the Quick Setup tiles, click **2. Sync Your Products**.
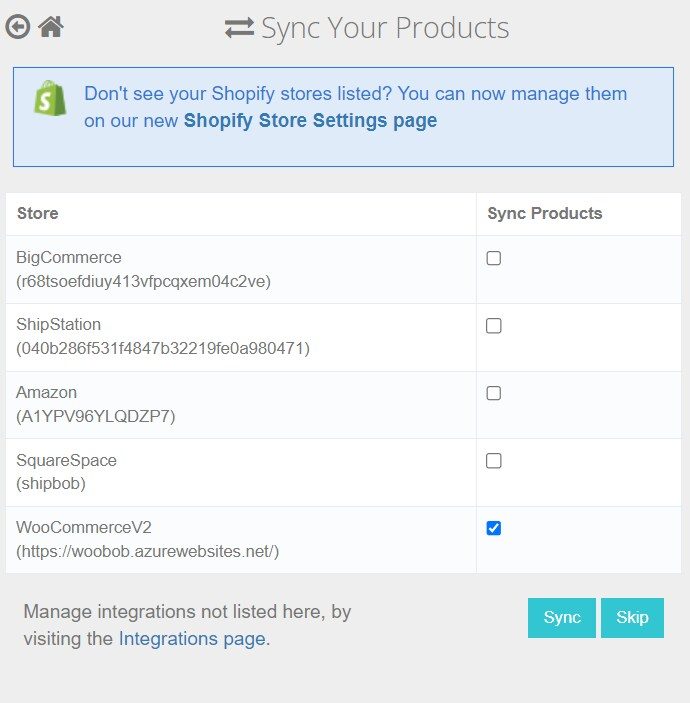 Check the box under **Sync Products** for your WooCommerce store.
Click **Sync** to begin the product sync process.
A success message will appear to confirm the product sync has started.
***
## Enabling Automatic Order Import
Jetpack automatically imports orders from WooCommerce every 30 minutes. Orders must have a valid shipping address and be in "Processing" status in WooCommerce to be imported.
Check the box under **Sync Products** for your WooCommerce store.
Click **Sync** to begin the product sync process.
A success message will appear to confirm the product sync has started.
***
## Enabling Automatic Order Import
Jetpack automatically imports orders from WooCommerce every 30 minutes. Orders must have a valid shipping address and be in "Processing" status in WooCommerce to be imported.
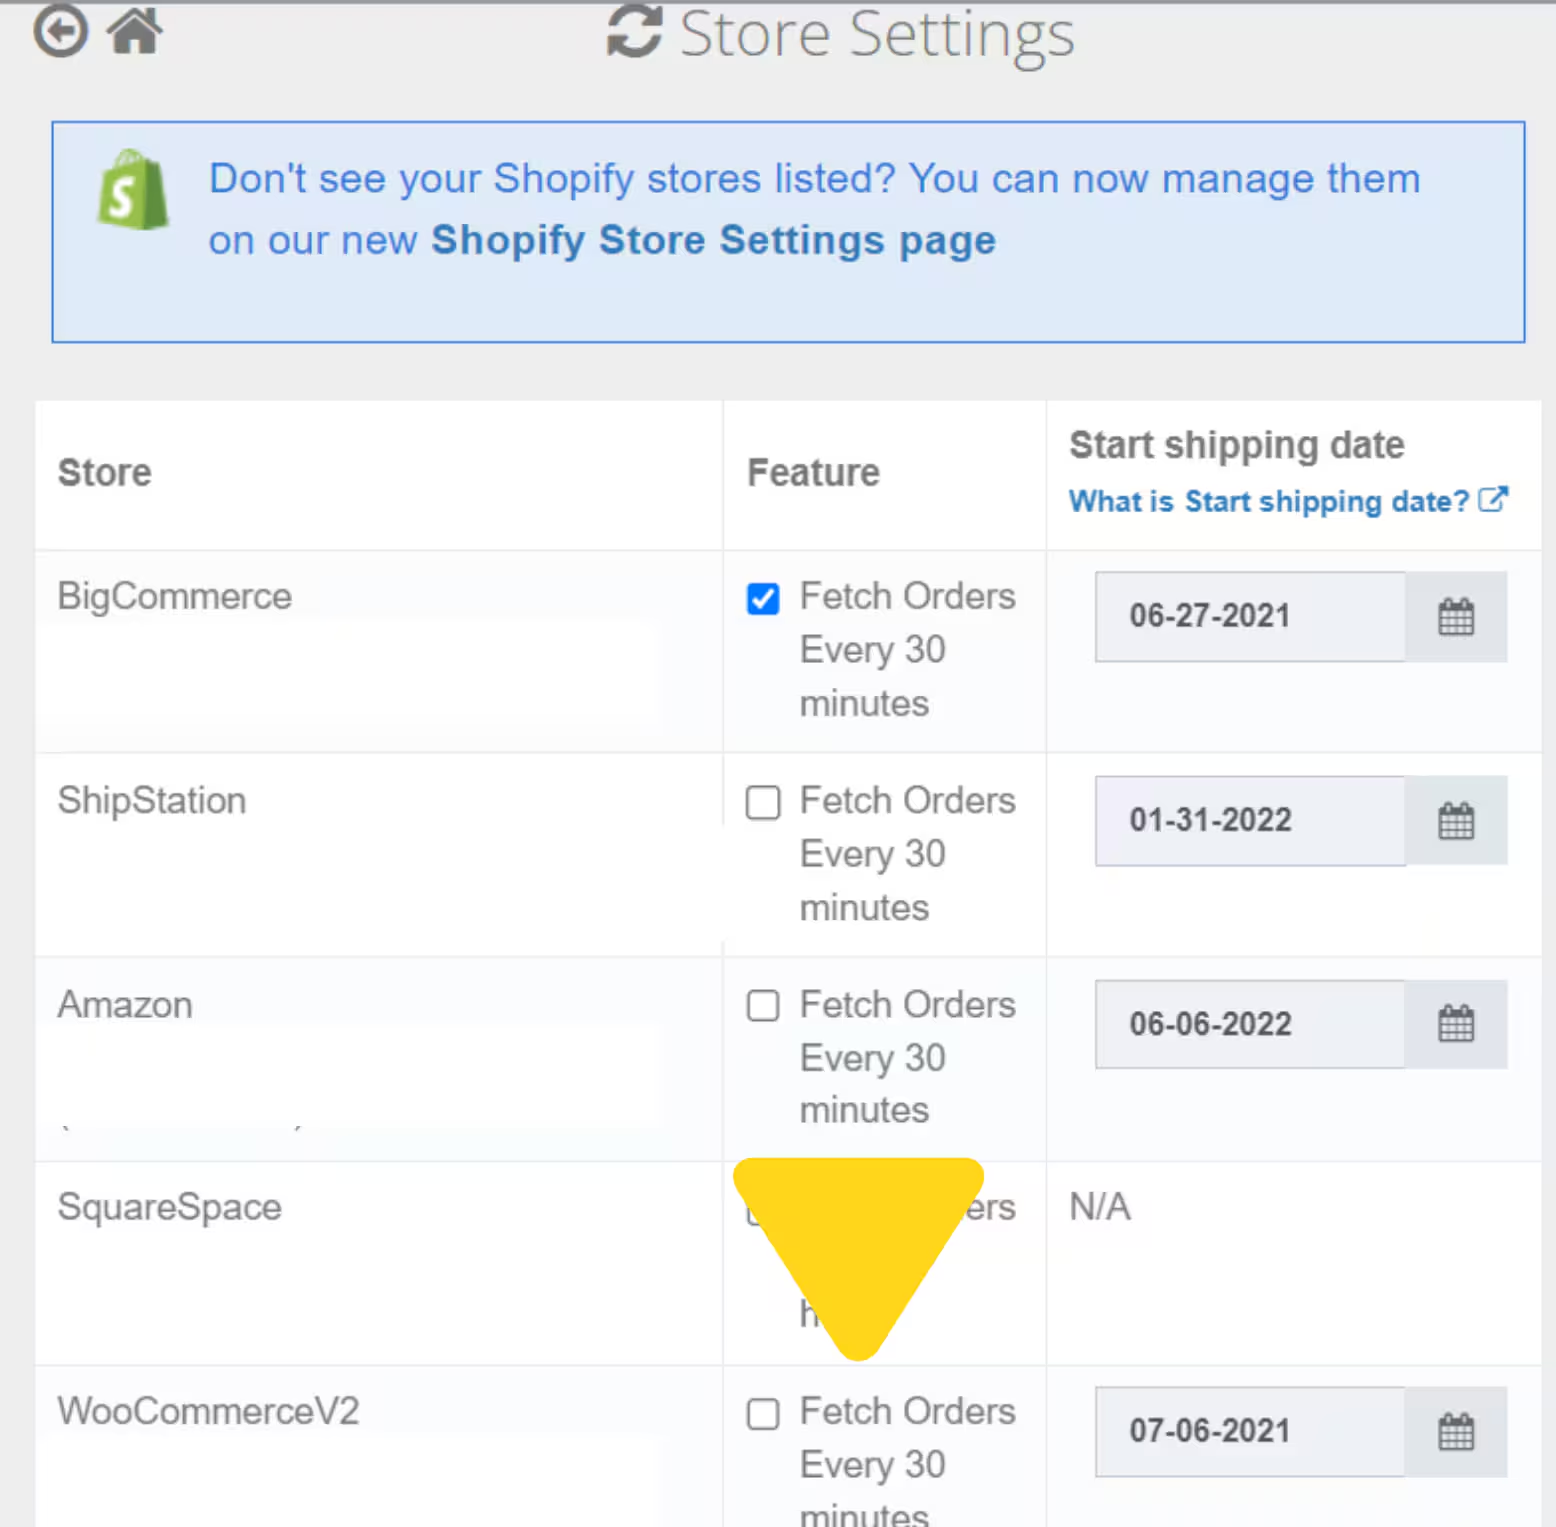 Check the **Fetch Orders Every 30 minutes** box for your WooCommerce store.
Select the **Start shipping date** using the calendar picker. This determines how far back Jetpack will look to import orders (up to 120 days in the past, or a future date).
Click **Save** to enable automatic order import.
Check the **Fetch Orders Every 30 minutes** box for your WooCommerce store.
Select the **Start shipping date** using the calendar picker. This determines how far back Jetpack will look to import orders (up to 120 days in the past, or a future date).
Click **Save** to enable automatic order import.
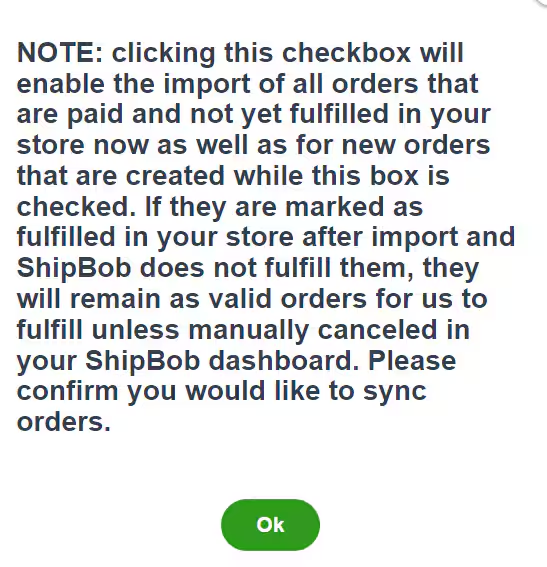 A pop-up will appear explaining that enabling this feature will import all paid and unfulfilled orders. Review and click **Ok**.
A success message will appear to confirm automatic order import is enabled.
Jetpack automatically imports orders with "Processing" status in WooCommerce. If you use custom order statuses, contact Jetpack Care to configure which statuses should trigger imports.
***
## Enabling WooCommerce Shipment Tracking Extension
To have tracking information updated back to WooCommerce when an order is shipped, you can enable the WooCommerce Shipment Tracking extension.
### Installing the Extension
First, download and install the [WooCommerce Shipment Tracking extension](https://woocommerce.com/products/shipment-tracking/) in your WordPress admin portal.
### Enabling Automatic Tracking Updates in Jetpack
Once the extension is installed in WooCommerce:
This option tells Jetpack to use the WooCommerce Shipment Tracking extension to update tracking information.
Do not check this option if you do not plan to use the extension, as it can interfere with tracking updates.
Complete the setup to enable automatic tracking updates.
### How Tracking Updates Work
**With the extension enabled:**
* Jetpack uses the Shipment Tracking extension fields to update tracking information
* Tracking details appear in WooCommerce's shipment tracking section
* Customers receive tracking notifications according to your WooCommerce email settings
**Without the extension:**
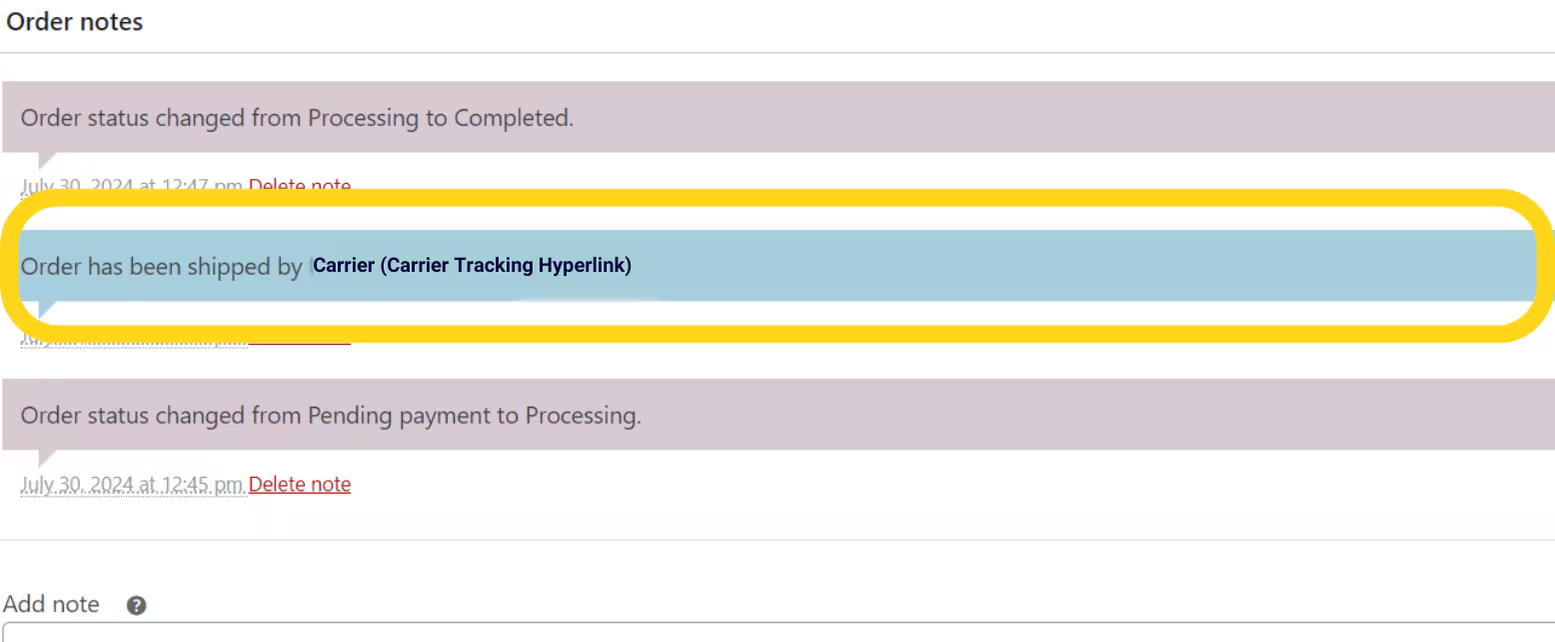
* Jetpack updates tracking information in the WooCommerce **Order notes** section
* Tracking details are visible to store administrators but may require manual customer notification
A pop-up will appear explaining that enabling this feature will import all paid and unfulfilled orders. Review and click **Ok**.
A success message will appear to confirm automatic order import is enabled.
Jetpack automatically imports orders with "Processing" status in WooCommerce. If you use custom order statuses, contact Jetpack Care to configure which statuses should trigger imports.
***
## Enabling WooCommerce Shipment Tracking Extension
To have tracking information updated back to WooCommerce when an order is shipped, you can enable the WooCommerce Shipment Tracking extension.
### Installing the Extension
First, download and install the [WooCommerce Shipment Tracking extension](https://woocommerce.com/products/shipment-tracking/) in your WordPress admin portal.
### Enabling Automatic Tracking Updates in Jetpack
Once the extension is installed in WooCommerce:
This option tells Jetpack to use the WooCommerce Shipment Tracking extension to update tracking information.
Do not check this option if you do not plan to use the extension, as it can interfere with tracking updates.
Complete the setup to enable automatic tracking updates.
### How Tracking Updates Work
**With the extension enabled:**
* Jetpack uses the Shipment Tracking extension fields to update tracking information
* Tracking details appear in WooCommerce's shipment tracking section
* Customers receive tracking notifications according to your WooCommerce email settings
**Without the extension:**
* Jetpack updates tracking information in the WooCommerce **Order notes** section
* Tracking details are visible to store administrators but may require manual customer notification
 ***
## Post-Installation Configuration
Once your integration is set up and products are syncing, you may want to configure additional settings:
***
## Ship Option Mapping
Before orders can be fulfilled, you need to map your WooCommerce shipping methods to Jetpack ship options. This ensures customer shipping selections in WooCommerce are matched to the appropriate fulfillment speed.
[Learn how to configure Ship Option Mapping here](/fulfillment/account-setup/shipping-preferences/choosing-default-carriers).
***
## Verifying Your Connection
To confirm the integration is working properly:
Place a test order in your WooCommerce store.
Check your Jetpack dashboard under **Orders** to see if the order imported.
Verify the product catalog synced by navigating to **Products** in Jetpack.
Cancel the test order in Jetpack once you've verified the connection to avoid fulfillment charges.
***
## Integration Features & Capabilities
### Product Syncing
When you connect WooCommerce to Jetpack, all published products in your WooCommerce store sync to Jetpack's Product Catalog. The integration syncs:
* Product name
* SKU
* Barcode
* Weight
* Dimensions
**Product Variations**: WooCommerce product variations (such as size or color options) sync to Jetpack as separate SKUs. Each variation is treated independently, with variation attributes appended to the product name or SKU in Jetpack. Inventory is tracked separately for each variation.
**Example**:
* WooCommerce: T-Shirt (Small, Blue)
* Jetpack: T-Shirt-Small-Blue or SKU: TSHIRT-SM-BL
### Order Importing
The integration automatically imports WooCommerce orders to Jetpack for fulfillment.
**What Syncs**:
***
## Post-Installation Configuration
Once your integration is set up and products are syncing, you may want to configure additional settings:
***
## Ship Option Mapping
Before orders can be fulfilled, you need to map your WooCommerce shipping methods to Jetpack ship options. This ensures customer shipping selections in WooCommerce are matched to the appropriate fulfillment speed.
[Learn how to configure Ship Option Mapping here](/fulfillment/account-setup/shipping-preferences/choosing-default-carriers).
***
## Verifying Your Connection
To confirm the integration is working properly:
Place a test order in your WooCommerce store.
Check your Jetpack dashboard under **Orders** to see if the order imported.
Verify the product catalog synced by navigating to **Products** in Jetpack.
Cancel the test order in Jetpack once you've verified the connection to avoid fulfillment charges.
***
## Integration Features & Capabilities
### Product Syncing
When you connect WooCommerce to Jetpack, all published products in your WooCommerce store sync to Jetpack's Product Catalog. The integration syncs:
* Product name
* SKU
* Barcode
* Weight
* Dimensions
**Product Variations**: WooCommerce product variations (such as size or color options) sync to Jetpack as separate SKUs. Each variation is treated independently, with variation attributes appended to the product name or SKU in Jetpack. Inventory is tracked separately for each variation.
**Example**:
* WooCommerce: T-Shirt (Small, Blue)
* Jetpack: T-Shirt-Small-Blue or SKU: TSHIRT-SM-BL
### Order Importing
The integration automatically imports WooCommerce orders to Jetpack for fulfillment.
**What Syncs**:
- Customer name and shipping address
- Products and quantities
- Shipping method selected at checkout
- Order notes
- Order number (mapped to Jetpack Reference ID)
**What Doesn't Sync**:
- Draft or pending payment orders (only "Processing" or "Completed" orders sync)
- Canceled orders
- Orders marked as fulfilled by other methods
By default, WooCommerce orders with "Processing" status are imported to Jetpack. If you use custom order statuses, contact Jetpack Care to configure which statuses should trigger imports.
### Inventory Management
Jetpack syncs available inventory back to WooCommerce, updating the "Stock Quantity" field for each product. Inventory updates are triggered by:
* Receiving new inventory at Jetpack
* Fulfilling orders
* Inventory adjustments
* Returns processing
Inventory changes typically sync within 15-30 minutes.
### Tracking Number Syncing
When Jetpack ships an order:
1. The tracking number syncs to WooCommerce
2. The order status is updated to "Completed"
3. WooCommerce sends a shipment notification email to the customer with the tracking link
**Tracking Details Synced**:
* Carrier name
* Tracking number
* Tracking URL
### Split Shipments
If an order ships from multiple Jetpack fulfillment centers or in multiple packages, each shipment is updated in WooCommerce separately. Each tracking number is added to the order, and customers receive separate notifications for each shipment (depending on your WooCommerce email settings).
### Order Notes and Gift Messages
**Order Notes**: Customer notes from WooCommerce orders sync to Jetpack and are visible in the order details.
**Gift Messages**: If your WooCommerce store supports gift messages (via a plugin or custom field), contact Jetpack Care to map the gift message field to appear on Jetpack's packing slip.
### Bundled Products
If you sell bundled products in WooCommerce using a bundle plugin, you'll need to configure bundles in Jetpack as well:
1. Map the WooCommerce bundle SKU to a Jetpack bundle parent SKU
2. Ensure component products are available in Jetpack inventory
Learn more about [creating product bundles](/fulfillment/managing-products/more-tools/creating-product-bundles).
### Subscriptions
WooCommerce Subscriptions (recurring orders) are fully supported. Each subscription renewal order is imported to Jetpack as a separate order, and Jetpack fulfills each order as it's placed.
### Returns Processing
Jetpack does not automatically create return orders in WooCommerce. You'll need to manage returns as follows:
1. Create the return order in Jetpack (manually or via API)
2. Once processed, manually mark the order as returned or refunded in WooCommerce
Alternatively, use a returns management integration to automate the returns process between WooCommerce and Jetpack.
***
## Feature Support Summary
| Feature | Supported | Notes |
| ------------------------------- | -------------------- | ---------------------------------------- |
| **Product variations** | Yes | Each variation syncs as a separate SKU |
| **Bundled products** | Yes | Requires setup in Jetpack |
| **Subscriptions** | Yes | Each renewal imports as a separate order |
| **Gift messages** | Yes | Requires configuration via Jetpack Care |
| **Order notes** | Yes | Syncs automatically |
| **Multiple WooCommerce stores** | Yes | Each store connects separately |
| **Custom order statuses** | Contact Jetpack Care | Requires configuration |
***
## Offering ShipBob 2-Day Express Shipping
You can offer ShipBob 2-Day Express as a shipping option at checkout in your WooCommerce store.
From your WordPress admin portal:
1. Navigate to **WooCommerce > Settings**
2. Click the **Shipping** tab
3. Click the **Shipping Zone** where you want to add 2-Day Express (or create a new zone)
4. Click **Add shipping method**
5. From the dropdown, select **Flat rate** (or your preferred method type)
6. Click **Add shipping method**
7. Name the method **"2-Day Express"** or similar
8. Set the cost (or leave at \$0 if using real-time rates)
9. Click **Save changes**
From your Jetpack dashboard:
1. Navigate to **Settings > Ship Option Mapping**
2. Locate the **"2-Day Express"** shipping method (it may take a few minutes to appear after creating it in WooCommerce)
3. From the **Domestic Ship Option** dropdown, select **ShipBob 2-Day Express**
4. Check the box to mark the method as **Active**
5. Click **Save Mapping**
From your WooCommerce storefront:
1. Add a product to your cart
2. Proceed to checkout
3. Verify that **"2-Day Express"** appears as a shipping option
4. Complete a test order using the 2-Day Express method
5. Check the Jetpack dashboard to confirm the order imported with **Ship Option: ShipBob 2-Day Express**
Cancel the test order in Jetpack after verification to avoid fulfillment charges.
### Understanding 2-Day Express Delivery
ShipBob 2-Day Express targets delivery within 2 business days from shipment:
* **Orders placed before cutoff**: Ship same day or next business day
* **Transit time**: 2 business days after shipment
* **Not guaranteed**: Delivery dates are estimates, not guarantees
**Factors Affecting Delivery**:
- Carrier delays
- Weather events
- Address issues
- Peak shipping periods
The 2-day delivery is calculated from the date Jetpack ships the order, not from the date the customer places the order. Business days exclude weekends and carrier holidays.
### Pricing Options for 2-Day Express
Ensure your WooCommerce shipping rates are set appropriately for the higher cost of express shipping:
* **Option 1: Flat Rate** - Charge a fixed fee (e.g., \$9.99) for 2-Day Express
* **Option 2: Real-Time Rates** - Use the ShipBob Express Rates plugin to display estimated ShipBob 2-Day Express rates at checkout (see below)
***
## Real-Time Shipping Rates (ShipBob Express Rates Plugin)
The ShipBob Express Rates plugin for WooCommerce displays estimated shipping rates at checkout based on order weight, dimensions, destination, carrier, and service level. This allows shoppers to see rates closer to what Jetpack will actually charge, rather than a flat fee.
Rates shown at checkout are estimates and may differ from the final shipping cost on Jetpack's invoice. Merchants are responsible for paying the actual shipping charge.
### Factors That May Affect Final Shipping Cost
Estimated rates displayed at checkout may differ from final costs due to:
| Factor | Impact |
| ------------------------------- | ----------------------------------------------------------------------------------------------------------------------------------- |
| **Surcharges** | Estimates do not include carrier surcharges or additional picking fees |
| **USPS Media Mail eligibility** | If an order is mapped to Media Mail but contains ineligible items, Jetpack defaults to Standard shipping, which may change the rate |
| **Automation Rules** | If rules add products after import, final weight and dimensions may differ, altering the rate |
| **Product data accuracy** | Inaccurate weight or dimensions result in incorrect estimates |
| **Packaging discretion** | Though Jetpack's Box Selection Algorithm suggests packaging, the packer's choice (box, poly mailer, tube, etc.) can affect cost |
### Installing the ShipBob Express Rates Plugin
From your WordPress admin portal, click **Plugins** in the left-hand navigation, then select **Add New**.
In the search bar, enter **"ShipBob Express Rates"** and locate the **ShipBob Express Rates** plugin.
Click **Install Now**. When installation completes, click **Activate**.
After activation, the plugin appears on your Installed Plugins page.
### Configuring Product Weight and Dimensions
Once the ShipBob Express Rates plugin is installed, provide accurate weight and dimensions for your products:
From your WordPress admin portal, click **Products** in the left-hand navigation, then select **All Products**.
Click the **name** of the product you want to edit.
Scroll to the **Product data** panel and select the **Shipping** tab.
* In **Weight (oz)**, enter the product's weight (match what's in your Jetpack dashboard)
* In **Dimensions (in)**, enter **Length**, **Width**, and **Height** (as shown in Jetpack)
Click **Update** under the Publish tile.
Ensure weight and dimensions match exactly what is configured in Jetpack for accurate rate estimates. For orders with multiple products, the plugin calculates the total estimated weight and dimensions.
### Verifying Real-Time Rates at Checkout
To confirm the Express Rates plugin is working:
On your WooCommerce storefront, add a product to your cart.
Proceed to checkout and enter a shipping address.
Verify that estimated Jetpack shipping rates appear (e.g., "ShipBob Standard - \$5.43").
Real-time rates may take a few seconds to load at checkout as the plugin queries Jetpack's API. The plugin supports estimated rates for both domestic and international destinations from Jetpack fulfillment centers.
***
## Important Notes
Periodically check for updates to both the ShipBob for WooCommerce plugin and the ShipBob Express Rates plugin in your WordPress admin portal. Keeping plugins updated ensures compatibility and access to new features.
If you cancel an order in WooCommerce, manually cancel it in Jetpack to prevent fulfillment. Canceled orders do not automatically sync cancellation status.
If you have inventory in multiple Jetpack fulfillment centers, Jetpack routes orders to the closest center to the customer for faster delivery and lower shipping costs. Learn more about [MultiHub IQ](/fulfillment/multi-hub-iq).
The ShipBob Express Rates plugin requires an active ShipBob for WooCommerce connection. It will not function without valid API credentials configured in the main plugin.
***
## WooCommerce Integration FAQs
By default, orders with "Processing" or "Completed" status sync to Jetpack. Draft orders, pending payment orders, and canceled orders do not sync. If you use custom order statuses, contact Jetpack Care to configure which statuses should trigger order imports.
From your Jetpack dashboard, navigate to Settings > Ship Option Mapping. All shipping methods from your WooCommerce store will appear in this list. Select the corresponding Jetpack ship option from the dropdown for each method, mark it as Active, and click Save Mapping.
Yes, you can connect multiple WooCommerce stores. Each store connects separately using its own API credentials. Install the ShipBob for WooCommerce plugin on each WordPress site and configure it with your Jetpack API credentials.
Incorrect product weight or dimensions will result in inaccurate shipping rate estimates (if using the Express Rates plugin) and may cause issues during fulfillment if the actual package dimensions differ significantly. Ensure all product data in WooCommerce matches what's configured in your Jetpack Product Catalog.
If you sell product bundles in WooCommerce (using a bundle plugin), you need to configure the same bundles in Jetpack. Map the WooCommerce bundle SKU to a Jetpack bundle parent SKU, and ensure all component products are available in Jetpack inventory. See [Creating Product Bundles](/fulfillment/managing-products/more-tools/creating-product-bundles) for detailed instructions.
Yes, WooCommerce Subscriptions are fully supported. Each subscription renewal order is imported to Jetpack as a separate order for fulfillment. Jetpack treats each renewal as a standard order.
If your WooCommerce store supports gift messages (via a plugin or custom field), contact Jetpack Care to map the gift message field to Jetpack's packing slip. Gift message configuration requires assistance from Jetpack Care to ensure the field is properly mapped.
First, verify your API credentials are correct in the ShipBob for WooCommerce plugin settings. Check that Ship Option Mapping is configured in your Jetpack dashboard for all shipping methods. Confirm the orders have "Processing" or "Completed" status. If issues persist, contact Jetpack Care for troubleshooting assistance.
***
## Let's Dive Deeper
Back to the integrations guide
How product syncing works across integrations
Configure shipping settings and preferences
Set up bundled products for fulfillment
Configure shipping method mappings
Configure your Product Catalog

Questions? Contact Jetpack Care.
If you have any questions or run into issues, you can always contact Jetpack Care for help. Our team is always here to assist via Slack, phone, or email!