> ## Documentation Index
> Fetch the complete documentation index at: https://help.jetpack3pl.com/llms.txt
> Use this file to discover all available pages before exploring further.
# Wix Integration
> Connect your Wix store to Jetpack for automatic product syncing, order importing, and real-time inventory updates
Connecting your Wix store to Jetpack creates a seamless fulfillment workflow where products, orders, and inventory sync automatically between platforms. Once connected, your Wix orders flow directly into Jetpack for fulfillment, and inventory levels update in real-time as items ship. This guide covers the complete setup process, from initial installation through configuring sync settings and understanding how your integration works.

About ShipBob Integration References
During setup, you'll install the "ShipBob" app via Wix's App Market and authorize ShipBob to access your store. This is expected—Jetpack has licensed ShipBob's integration infrastructure to provide reliable, battle-tested connections. Your data flows seamlessly to your Jetpack dashboard.
## Prerequisites
Before connecting Wix to Jetpack, ensure you have:
* **Active Wix Website** with Wix Stores (ecommerce) enabled
* **Jetpack Merchant Account** set up and ready to receive inventory
Without these prerequisites in place, you won't be able to complete the integration setup.
***
## Installing the ShipBob Integration
When you set up your Wix integration, you'll initiate the connection from your Jetpack dashboard using the App Store. The process involves authorizing ShipBob to access your Wix store data, then configuring which information syncs between the platforms.
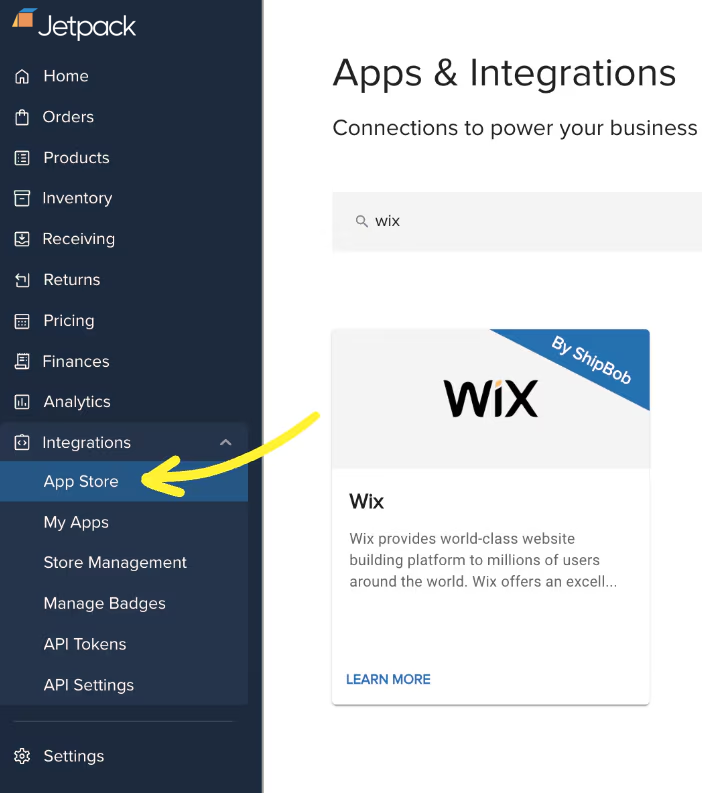 You can scroll through the page or use the search bar to locate Wix.
A pop-up window will appear prompting you to grant ShipBob permission to access your Wix store data.
You can scroll through the page or use the search bar to locate Wix.
A pop-up window will appear prompting you to grant ShipBob permission to access your Wix store data.
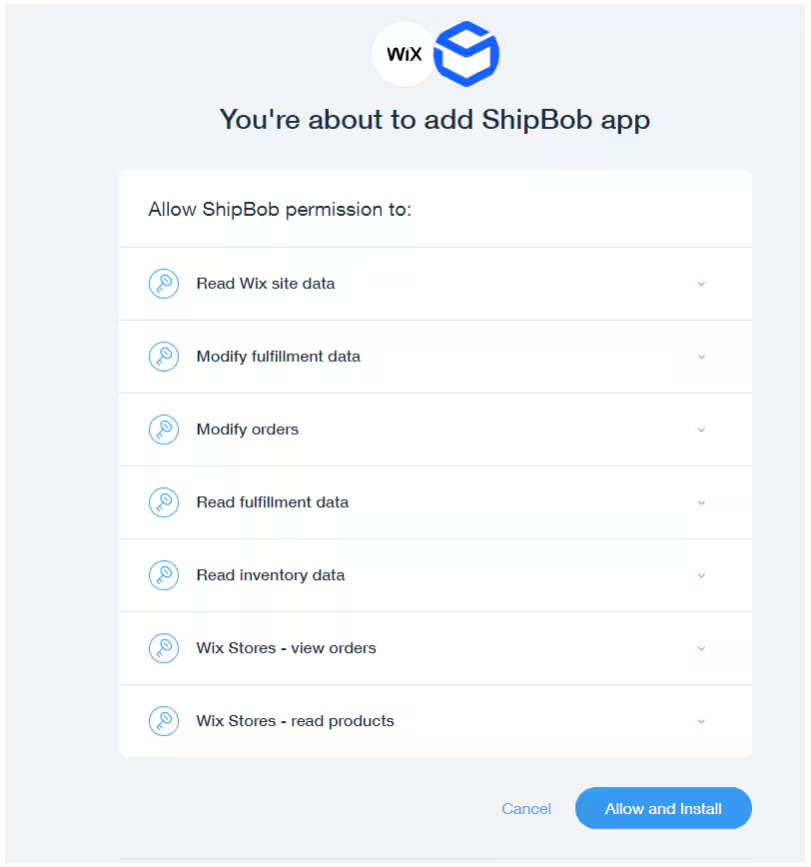 The permissions include:
* Read Wix site data
* Modify fulfillment data
* Modify orders
* Read fulfillment data
* Read inventory data
* Wix Stores - view orders
* Wix Stores - read products
You will receive a success message confirming the connection.
The permissions include:
* Read Wix site data
* Modify fulfillment data
* Modify orders
* Read fulfillment data
* Read inventory data
* Wix Stores - view orders
* Wix Stores - read products
You will receive a success message confirming the connection.
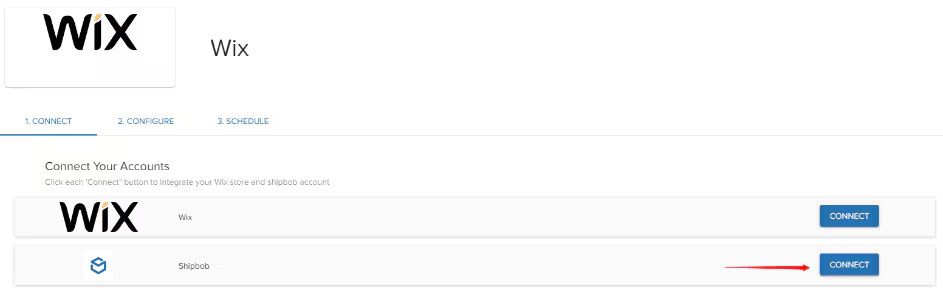
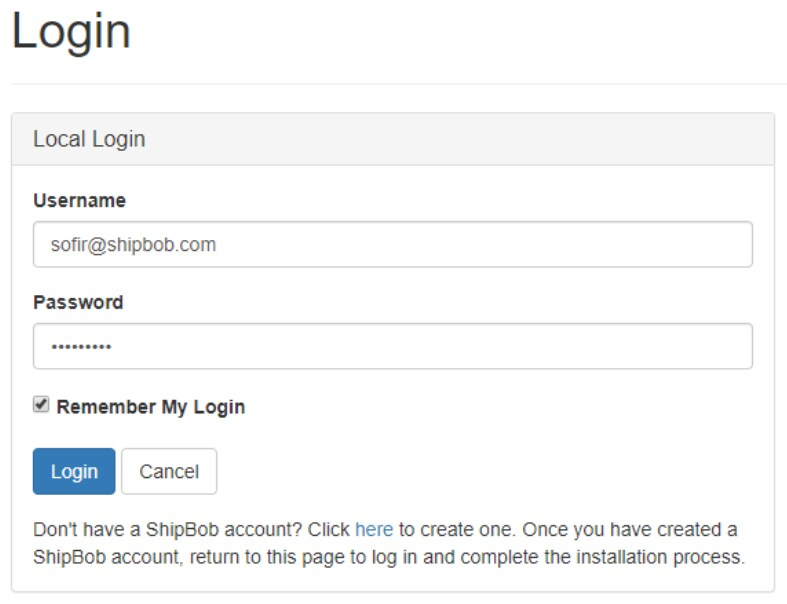 Type your Wix store name under the "Enter a Channel" section. This helps you identify this integration if you connect multiple stores.
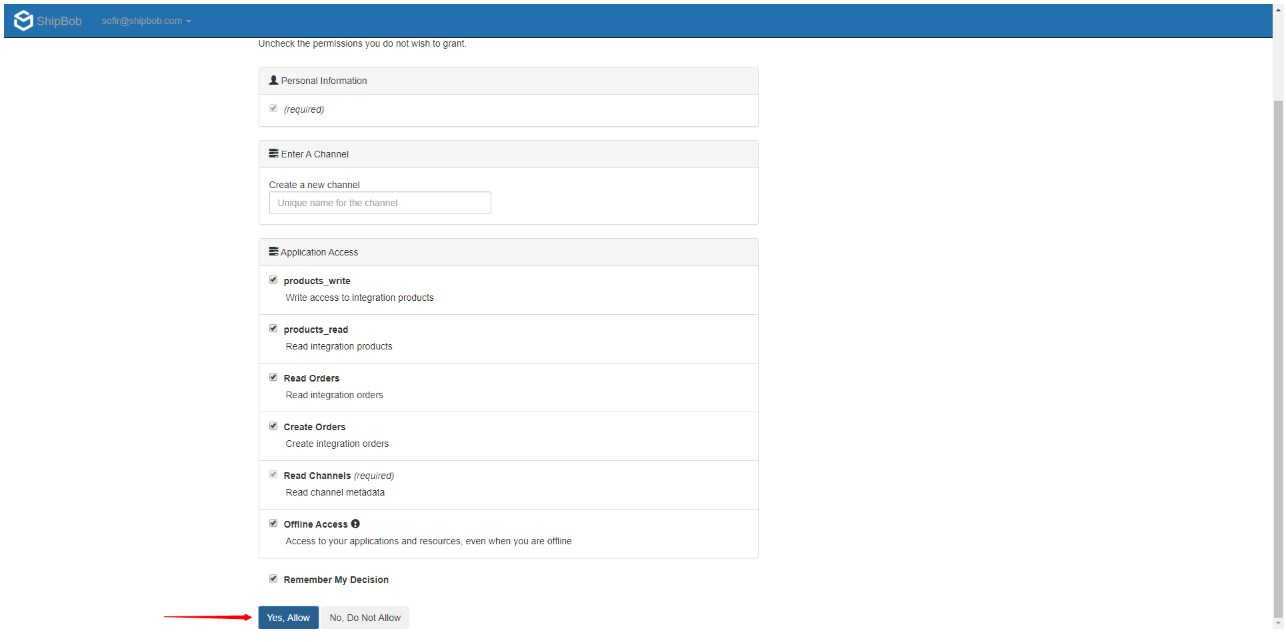 A success message will confirm that the Jetpack account is now connected.
Check the boxes next to products, orders, and tracking information.
A success message will confirm that the Jetpack account is now connected.
Check the boxes next to products, orders, and tracking information.
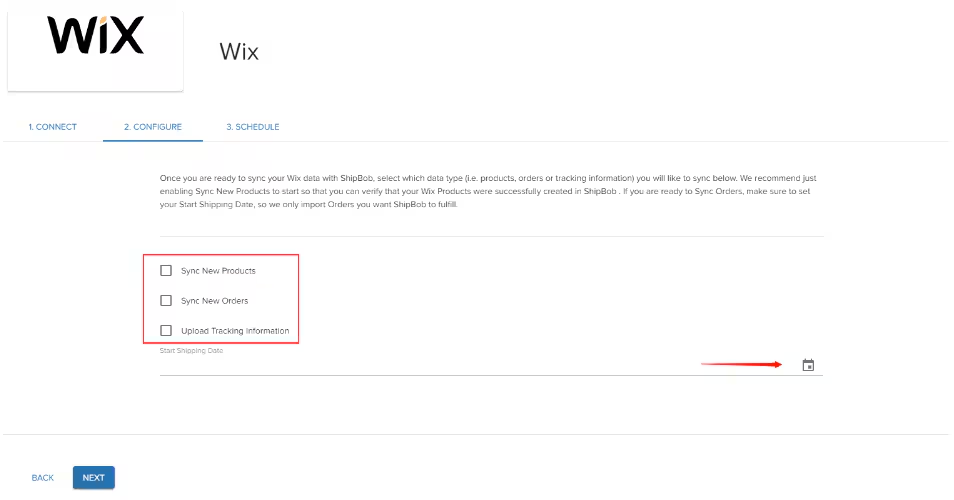 It is highly recommended to start by syncing only products. Once you verify the products are synced correctly, you can proceed to sync orders. This staged approach helps ensure your product data is accurate before orders begin importing.
This is the date from which Jetpack will begin importing and shipping your orders. The ship start date can be set to a past date (up to 120 days ago) or a future date.
Orders created on or after the selected date will be imported into Jetpack.
It is highly recommended to start by syncing only products. Once you verify the products are synced correctly, you can proceed to sync orders. This staged approach helps ensure your product data is accurate before orders begin importing.
This is the date from which Jetpack will begin importing and shipping your orders. The ship start date can be set to a past date (up to 120 days ago) or a future date.
Orders created on or after the selected date will be imported into Jetpack.
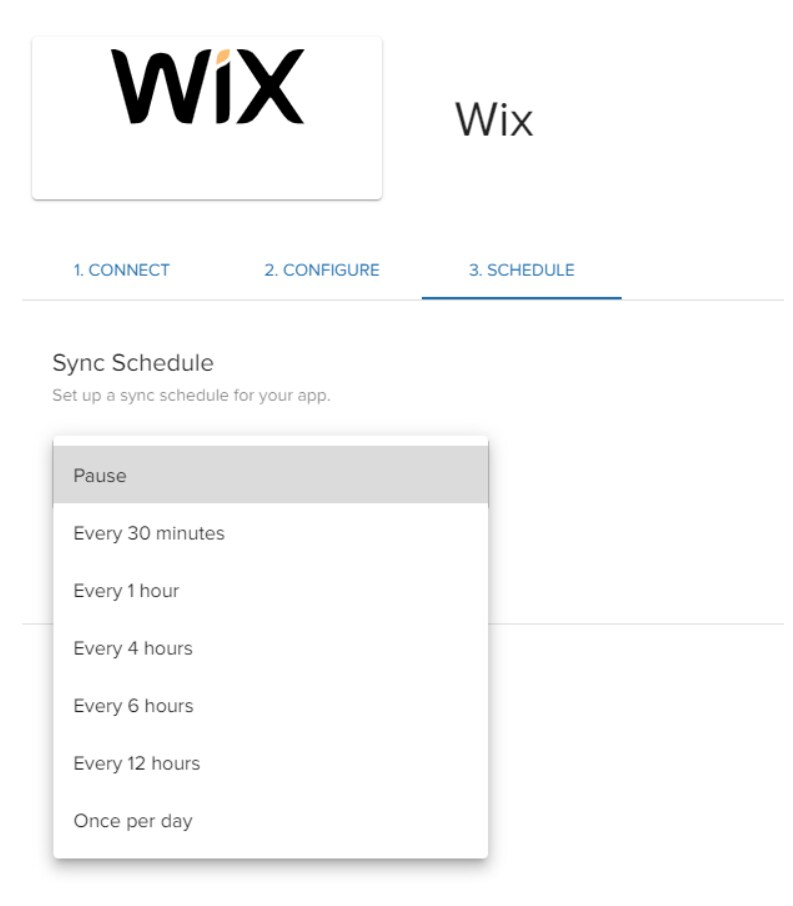 If you prefer not to have automatic syncing, select **Pause** (this is the default option). Otherwise, choose a syncing frequency from the dropdown list:
* Every 30 minutes
* Every 1 hour
* Every 4 hours
* Every 6 hours
* Every 12 hours
* Once per day
Your Wix integration will now be marked as **Active**. You can click **Sync Now** at any time to trigger the syncing process, or change connection settings or the syncing schedule by clicking the relevant links.
If you prefer not to have automatic syncing, select **Pause** (this is the default option). Otherwise, choose a syncing frequency from the dropdown list:
* Every 30 minutes
* Every 1 hour
* Every 4 hours
* Every 6 hours
* Every 12 hours
* Once per day
Your Wix integration will now be marked as **Active**. You can click **Sync Now** at any time to trigger the syncing process, or change connection settings or the syncing schedule by clicking the relevant links.
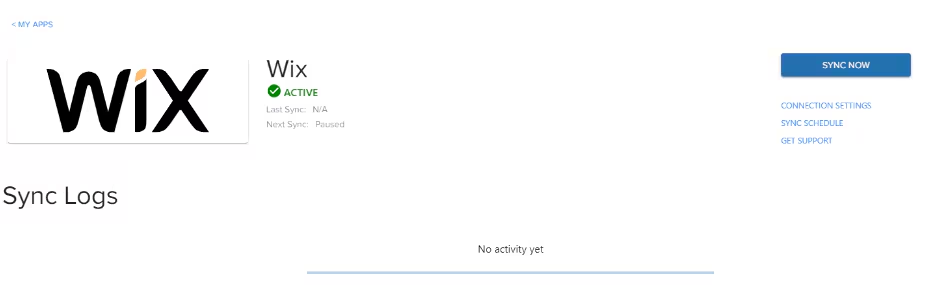 Under **Sync Logs**, you can review all syncing jobs that have occurred for this integration.
***
## Configuring Ship Option Mapping
Before Jetpack can fulfill your Wix orders, you need to map your Wix shipping methods to Jetpack ship options. This tells Jetpack which carrier service to use based on what your customer selected at checkout.
### Setting Up Ship Options
Examples include ShipBob Standard, ShipBob 2-Day, ShipBob Expedited.
Without proper ship option mapping configured, orders cannot be fulfilled by Jetpack. Each Wix shipping method you offer at checkout must be mapped to a ShipBob carrier service.
Learn more about [choosing default carriers](/fulfillment/account-setup/shipping-preferences/choosing-default-carriers) to understand how Jetpack selects the best shipping service for each order.
***
## Verifying Your Connection
After completing the installation and ship option mapping, create a test order to ensure everything is working correctly.
### Test Order Process
Check customer info, products, and shipping method.
This prevents fulfillment and avoids charges.
Always cancel test orders in Jetpack after verification to prevent them from being fulfilled and avoid charges. Test orders behave exactly like real orders once imported.
***
## How Products Sync
When you connect Wix to Jetpack, all products in your Wix Stores catalog automatically sync to Jetpack's Product Catalog. This happens immediately upon connection and continues for any products you add or update in the future.
### Automatic New Product Sync
To have new products created in Wix automatically sync to Jetpack, enable this option under **Integrations** (Click **Wix** and select **Connection Settings**).
If an order is placed that contains a product not yet synced, Jetpack will automatically create a new product record.
### What Syncs from Wix to Jetpack
| Product Detail | What Transfers |
| ---------------- | ---------------------------------------------------------------------------------------------------------------------------------------------------------------------------------------------------------------------------- |
| **Product Name** | The product title from Wix appears in your Jetpack Product Catalog |
| **SKU** | The product SKU identifier syncs to match between platforms. Jetpack uses a unique identifier to match products from Wix to those in the Jetpack dashboard, ensuring the correct product is sent when an order is processed. |
| **Weight** | Product weight (if provided in Wix) transfers to Jetpack |
| **Dimensions** | Product dimensions (if provided in Wix) transfer to Jetpack |
Product images are not imported for the Wix integration. You'll need to add product images separately in Jetpack if needed for visual identification.
### Product Variants
Wix product variants (such as size or color options) sync to Jetpack as separate SKUs. Each variant is treated as an individual product in Jetpack's system:
* Variant options are appended to the product name in Jetpack
* Inventory is tracked separately for each variant
* Each variant receives its own SKU in the Product Catalog
**Important**: Make sure you have the **"Manage Variants"** option checked in Wix. If you don't enable variant management, products with options won't be imported, and any orders containing them will not be imported either.
### Sync Timing
Products sync immediately when created or updated in Wix. Changes to product details, new products added to your catalog, and variant configurations all trigger automatic updates in Jetpack within minutes.
After products sync, you'll need to configure packaging preferences and other product settings in Jetpack. Learn more about the [Product Details page](/fulfillment/managing-products/product-details-page) to set up your product specifications.
***
## How Orders Import
Once your Wix integration is active and ship options are mapped, orders automatically import from Wix to Jetpack for fulfillment. Only orders that are ready to fulfill transfer to Jetpack's system.
### Order Syncing Methods
You can trigger order imports in two ways:
**Manual Order Sync**: Click **Sync Orders** under Integrations (Select **Wix** and click **Sync Now**). Only orders with a valid shipping address and the correct status (**Paid** and **Not Fulfilled/Partially Fulfilled**) are synced.
**Automatic Order Sync**: Set up a sync schedule via Integrations (Select **Wix** and click **Sync Schedule**) to have orders automatically imported as they are placed. Use the same frequency options available during initial setup (every 30 minutes, hourly, etc.).
### What Syncs from Orders
Once orders are synced, they will appear under the **Orders** tab in the Jetpack dashboard. Your Wix order ID is recorded under the store ID column.
| Order Information | Details |
| -------------------------------------- | ----------------------------------------------- |
| **Customer Name and Shipping Address** | Full recipient details transfer for fulfillment |
| **Products and Quantities** | All items in the order with quantities |
| **Shipping Method** | The shipping option selected at checkout |
| **Order Notes** | Customer notes and order instructions |
| **Order Number** | Wix order number maps to Jetpack Reference ID |
### What Doesn't Import
Jetpack does not import the following order types from Wix:
* **Unpaid Orders** - Only paid orders are eligible for fulfillment
* **Draft Orders** - Orders must be finalized before importing
* **Canceled Orders** - Canceled orders in Wix are not sent to Jetpack
### Import Timing and Status
Orders meeting the import criteria sync from Wix to Jetpack within 15 minutes of being placed. Specifically, Wix orders with **"Unfulfilled"** or **"Partially Fulfilled"** status are imported to Jetpack's system.
If an order contains a product that isn't yet synced to Jetpack, the system will automatically create the new product record (**Auto Sync Products from Order**).
Once imported, orders follow Jetpack's standard fulfillment workflow. Learn more about [order status](/fulfillment/d2c/order-status) to understand how orders move through the fulfillment process.
***
## How Inventory Syncs
Jetpack syncs available inventory back to Wix in near real-time, ensuring your store always displays accurate stock levels. This prevents overselling and keeps your customers informed about product availability.
### Sync Triggers
Inventory updates from Jetpack to Wix are triggered by these events:
* Receiving new inventory at Jetpack fulfillment centers
* Fulfilling and shipping orders
* Processing inventory adjustments
* Receiving and restocking returns
### Sync Timing and Behavior
Inventory syncs from Jetpack to Wix typically occur within 15 minutes of the triggering event. Jetpack updates the **"In Stock"** quantity in Wix for each product, reflecting the total available inventory across all Jetpack fulfillment centers.
Near real-time inventory syncing ensures your Wix store reflects current stock levels, reducing the risk of selling products that are out of stock at Jetpack.
***
## How Tracking Information Updates
When Jetpack ships a Wix order, tracking details automatically sync back to Wix and the order status updates to reflect fulfillment. This triggers Wix's fulfillment notification to your customer.
Once an order is fulfilled, a unique tracking number is uploaded to the order details page and linked to the carrier's website. This tracking information is automatically sent back to your Wix store, and the order is marked as fulfilled in Jetpack.
### What Syncs After Shipping
| Tracking Detail | What Updates in Wix |
| ------------------- | --------------------------------------------- |
| **Carrier Name** | The shipping carrier (e.g., USPS, FedEx, UPS) |
| **Tracking Number** | The unique tracking number for the shipment |
| **Tracking URL** | A clickable link to track the package |
| **Order Status** | Order status updates to **"Fulfilled"** |
### Customer Notifications
When tracking information syncs to Wix, Wix automatically sends a fulfillment notification email to your customer. This email includes the tracking number and link, allowing customers to monitor their shipment's progress.
***
## Gift Messages and Order Notes
Your Wix integration supports both order notes and gift messages, ensuring customer requests and special instructions transfer to Jetpack.
### Order Notes
Order notes entered by customers during checkout in Wix automatically sync to Jetpack. These notes are visible in your order details in the Jetpack dashboard, allowing you to review any special instructions before fulfillment.
### Gift Messages
Gift messages can be supported with additional configuration. If you need gift messages to appear on packing slips included with orders, contact Jetpack Care to set up this feature for your account.
Learn more about [gift notes](/fulfillment/labels-and-packaging/gift-notes) to understand the standard and premium gift message options available.
***
## Split Shipments
If a Wix order ships from multiple Jetpack fulfillment centers or requires multiple packages, each shipment is tracked and updated in Wix separately.
### How Split Shipments Work
* Each shipment receives its own tracking number
* Each tracking number is added to the Wix order individually
* Customers receive separate notification emails for each shipment
* The order status in Wix updates as each shipment completes
This ensures customers have visibility into all packages associated with their order, even when inventory is distributed across multiple locations.
***
## Returns Processing
Jetpack does not automatically create return orders in Wix. Returns must be managed manually between the two platforms to ensure proper inventory and refund handling.
### Managing Returns
Learn more about [returns preferences](/fulfillment/returns/setting-returns-preferences).
This manual process ensures you have full control over return approvals, restocking decisions, and refund amounts.
***
## Disabling the Wix Integration
If you need to disconnect or temporarily disable your Wix integration, follow these steps:
Under **Sync Logs**, you can review all syncing jobs that have occurred for this integration.
***
## Configuring Ship Option Mapping
Before Jetpack can fulfill your Wix orders, you need to map your Wix shipping methods to Jetpack ship options. This tells Jetpack which carrier service to use based on what your customer selected at checkout.
### Setting Up Ship Options
Examples include ShipBob Standard, ShipBob 2-Day, ShipBob Expedited.
Without proper ship option mapping configured, orders cannot be fulfilled by Jetpack. Each Wix shipping method you offer at checkout must be mapped to a ShipBob carrier service.
Learn more about [choosing default carriers](/fulfillment/account-setup/shipping-preferences/choosing-default-carriers) to understand how Jetpack selects the best shipping service for each order.
***
## Verifying Your Connection
After completing the installation and ship option mapping, create a test order to ensure everything is working correctly.
### Test Order Process
Check customer info, products, and shipping method.
This prevents fulfillment and avoids charges.
Always cancel test orders in Jetpack after verification to prevent them from being fulfilled and avoid charges. Test orders behave exactly like real orders once imported.
***
## How Products Sync
When you connect Wix to Jetpack, all products in your Wix Stores catalog automatically sync to Jetpack's Product Catalog. This happens immediately upon connection and continues for any products you add or update in the future.
### Automatic New Product Sync
To have new products created in Wix automatically sync to Jetpack, enable this option under **Integrations** (Click **Wix** and select **Connection Settings**).
If an order is placed that contains a product not yet synced, Jetpack will automatically create a new product record.
### What Syncs from Wix to Jetpack
| Product Detail | What Transfers |
| ---------------- | ---------------------------------------------------------------------------------------------------------------------------------------------------------------------------------------------------------------------------- |
| **Product Name** | The product title from Wix appears in your Jetpack Product Catalog |
| **SKU** | The product SKU identifier syncs to match between platforms. Jetpack uses a unique identifier to match products from Wix to those in the Jetpack dashboard, ensuring the correct product is sent when an order is processed. |
| **Weight** | Product weight (if provided in Wix) transfers to Jetpack |
| **Dimensions** | Product dimensions (if provided in Wix) transfer to Jetpack |
Product images are not imported for the Wix integration. You'll need to add product images separately in Jetpack if needed for visual identification.
### Product Variants
Wix product variants (such as size or color options) sync to Jetpack as separate SKUs. Each variant is treated as an individual product in Jetpack's system:
* Variant options are appended to the product name in Jetpack
* Inventory is tracked separately for each variant
* Each variant receives its own SKU in the Product Catalog
**Important**: Make sure you have the **"Manage Variants"** option checked in Wix. If you don't enable variant management, products with options won't be imported, and any orders containing them will not be imported either.
### Sync Timing
Products sync immediately when created or updated in Wix. Changes to product details, new products added to your catalog, and variant configurations all trigger automatic updates in Jetpack within minutes.
After products sync, you'll need to configure packaging preferences and other product settings in Jetpack. Learn more about the [Product Details page](/fulfillment/managing-products/product-details-page) to set up your product specifications.
***
## How Orders Import
Once your Wix integration is active and ship options are mapped, orders automatically import from Wix to Jetpack for fulfillment. Only orders that are ready to fulfill transfer to Jetpack's system.
### Order Syncing Methods
You can trigger order imports in two ways:
**Manual Order Sync**: Click **Sync Orders** under Integrations (Select **Wix** and click **Sync Now**). Only orders with a valid shipping address and the correct status (**Paid** and **Not Fulfilled/Partially Fulfilled**) are synced.
**Automatic Order Sync**: Set up a sync schedule via Integrations (Select **Wix** and click **Sync Schedule**) to have orders automatically imported as they are placed. Use the same frequency options available during initial setup (every 30 minutes, hourly, etc.).
### What Syncs from Orders
Once orders are synced, they will appear under the **Orders** tab in the Jetpack dashboard. Your Wix order ID is recorded under the store ID column.
| Order Information | Details |
| -------------------------------------- | ----------------------------------------------- |
| **Customer Name and Shipping Address** | Full recipient details transfer for fulfillment |
| **Products and Quantities** | All items in the order with quantities |
| **Shipping Method** | The shipping option selected at checkout |
| **Order Notes** | Customer notes and order instructions |
| **Order Number** | Wix order number maps to Jetpack Reference ID |
### What Doesn't Import
Jetpack does not import the following order types from Wix:
* **Unpaid Orders** - Only paid orders are eligible for fulfillment
* **Draft Orders** - Orders must be finalized before importing
* **Canceled Orders** - Canceled orders in Wix are not sent to Jetpack
### Import Timing and Status
Orders meeting the import criteria sync from Wix to Jetpack within 15 minutes of being placed. Specifically, Wix orders with **"Unfulfilled"** or **"Partially Fulfilled"** status are imported to Jetpack's system.
If an order contains a product that isn't yet synced to Jetpack, the system will automatically create the new product record (**Auto Sync Products from Order**).
Once imported, orders follow Jetpack's standard fulfillment workflow. Learn more about [order status](/fulfillment/d2c/order-status) to understand how orders move through the fulfillment process.
***
## How Inventory Syncs
Jetpack syncs available inventory back to Wix in near real-time, ensuring your store always displays accurate stock levels. This prevents overselling and keeps your customers informed about product availability.
### Sync Triggers
Inventory updates from Jetpack to Wix are triggered by these events:
* Receiving new inventory at Jetpack fulfillment centers
* Fulfilling and shipping orders
* Processing inventory adjustments
* Receiving and restocking returns
### Sync Timing and Behavior
Inventory syncs from Jetpack to Wix typically occur within 15 minutes of the triggering event. Jetpack updates the **"In Stock"** quantity in Wix for each product, reflecting the total available inventory across all Jetpack fulfillment centers.
Near real-time inventory syncing ensures your Wix store reflects current stock levels, reducing the risk of selling products that are out of stock at Jetpack.
***
## How Tracking Information Updates
When Jetpack ships a Wix order, tracking details automatically sync back to Wix and the order status updates to reflect fulfillment. This triggers Wix's fulfillment notification to your customer.
Once an order is fulfilled, a unique tracking number is uploaded to the order details page and linked to the carrier's website. This tracking information is automatically sent back to your Wix store, and the order is marked as fulfilled in Jetpack.
### What Syncs After Shipping
| Tracking Detail | What Updates in Wix |
| ------------------- | --------------------------------------------- |
| **Carrier Name** | The shipping carrier (e.g., USPS, FedEx, UPS) |
| **Tracking Number** | The unique tracking number for the shipment |
| **Tracking URL** | A clickable link to track the package |
| **Order Status** | Order status updates to **"Fulfilled"** |
### Customer Notifications
When tracking information syncs to Wix, Wix automatically sends a fulfillment notification email to your customer. This email includes the tracking number and link, allowing customers to monitor their shipment's progress.
***
## Gift Messages and Order Notes
Your Wix integration supports both order notes and gift messages, ensuring customer requests and special instructions transfer to Jetpack.
### Order Notes
Order notes entered by customers during checkout in Wix automatically sync to Jetpack. These notes are visible in your order details in the Jetpack dashboard, allowing you to review any special instructions before fulfillment.
### Gift Messages
Gift messages can be supported with additional configuration. If you need gift messages to appear on packing slips included with orders, contact Jetpack Care to set up this feature for your account.
Learn more about [gift notes](/fulfillment/labels-and-packaging/gift-notes) to understand the standard and premium gift message options available.
***
## Split Shipments
If a Wix order ships from multiple Jetpack fulfillment centers or requires multiple packages, each shipment is tracked and updated in Wix separately.
### How Split Shipments Work
* Each shipment receives its own tracking number
* Each tracking number is added to the Wix order individually
* Customers receive separate notification emails for each shipment
* The order status in Wix updates as each shipment completes
This ensures customers have visibility into all packages associated with their order, even when inventory is distributed across multiple locations.
***
## Returns Processing
Jetpack does not automatically create return orders in Wix. Returns must be managed manually between the two platforms to ensure proper inventory and refund handling.
### Managing Returns
Learn more about [returns preferences](/fulfillment/returns/setting-returns-preferences).
This manual process ensures you have full control over return approvals, restocking decisions, and refund amounts.
***
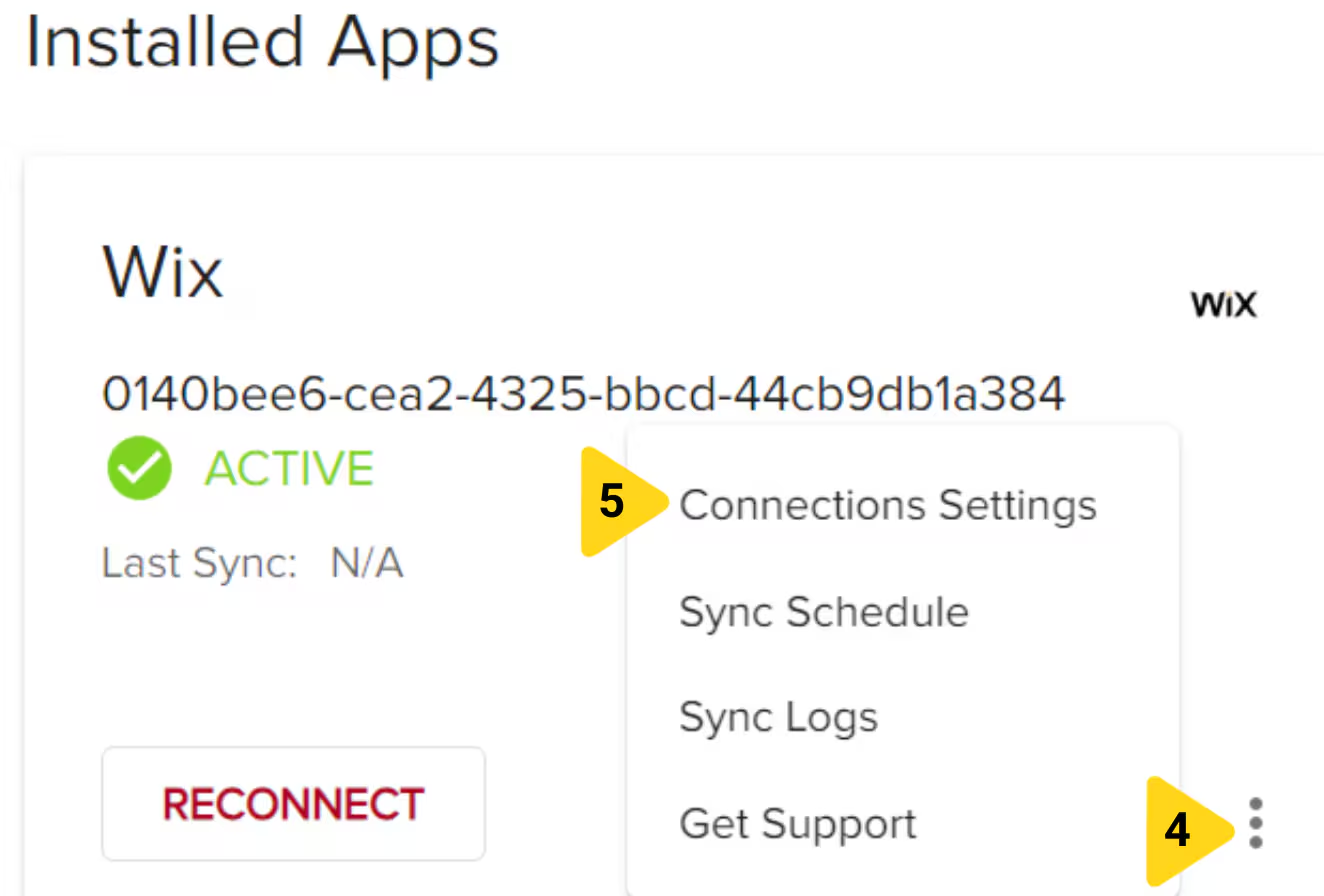
## Disabling the Wix Integration
If you need to disconnect or temporarily disable your Wix integration, follow these steps:
 ***
## Wix Integration FAQs
Yes, you can connect multiple Wix sites to your Jetpack account. Each site connects as a separate integration and must be configured independently through the installation process.
Product updates in Wix sync automatically to Jetpack within minutes. Changes to product names, SKUs, weights, and dimensions will update in your Jetpack Product Catalog. However, you may still need to configure packaging preferences and other Jetpack-specific settings in the Product Details page.
If orders aren't importing from Wix to Jetpack, check the following:
* Verify the order is in "Unfulfilled" or "Partially Fulfilled" status in Wix
* Confirm the order has been paid (unpaid orders don't import)
* Check that your ship option mapping is configured and active
* Review your integration status on the Integrations page to ensure the connection is active
* Wait at least 15 minutes from when the order was placed
* Verify the order date is on or after your Ship Start Date
If issues persist after these checks, contact Jetpack Care for assistance.
Yes, you can edit certain order details in Jetpack after import. Learn more about [editing orders](/fulfillment/order-management/editing-orders) to understand which fields can be modified and any limitations that apply.
Jetpack syncs total available inventory back to each connected platform, including Wix. If you sell on multiple channels (e.g., Wix + Shopify), inventory updates from Jetpack will reflect across all integrations. This helps prevent overselling, but you should monitor inventory levels across all channels to ensure accuracy. Learn more about [inventory management](/fulfillment/managing-inventory) for multi-channel strategies.
***
## Let's Dive Deeper
Back to the main store integrations guide
What happens after products sync from Wix
Understanding order import methods and troubleshooting
Managing all your integrations in one place
How Jetpack selects shipping carriers
Set up your product specifications
***
## Wix Integration FAQs
Yes, you can connect multiple Wix sites to your Jetpack account. Each site connects as a separate integration and must be configured independently through the installation process.
Product updates in Wix sync automatically to Jetpack within minutes. Changes to product names, SKUs, weights, and dimensions will update in your Jetpack Product Catalog. However, you may still need to configure packaging preferences and other Jetpack-specific settings in the Product Details page.
If orders aren't importing from Wix to Jetpack, check the following:
* Verify the order is in "Unfulfilled" or "Partially Fulfilled" status in Wix
* Confirm the order has been paid (unpaid orders don't import)
* Check that your ship option mapping is configured and active
* Review your integration status on the Integrations page to ensure the connection is active
* Wait at least 15 minutes from when the order was placed
* Verify the order date is on or after your Ship Start Date
If issues persist after these checks, contact Jetpack Care for assistance.
Yes, you can edit certain order details in Jetpack after import. Learn more about [editing orders](/fulfillment/order-management/editing-orders) to understand which fields can be modified and any limitations that apply.
Jetpack syncs total available inventory back to each connected platform, including Wix. If you sell on multiple channels (e.g., Wix + Shopify), inventory updates from Jetpack will reflect across all integrations. This helps prevent overselling, but you should monitor inventory levels across all channels to ensure accuracy. Learn more about [inventory management](/fulfillment/managing-inventory) for multi-channel strategies.
***
## Let's Dive Deeper
Back to the main store integrations guide
What happens after products sync from Wix
Understanding order import methods and troubleshooting
Managing all your integrations in one place
How Jetpack selects shipping carriers
Set up your product specifications

Questions? Contact Jetpack Care.
If you have any questions or run into issues with your Wix integration, you can always contact Jetpack Care for help. Our team is always here to assist via Slack, phone, or email!