> ## Documentation Index
> Fetch the complete documentation index at: https://help.jetpack3pl.com/llms.txt
> Use this file to discover all available pages before exploring further.
# Walmart Integration
> Connect your Walmart Marketplace account to Jetpack to automatically sync products, orders, tracking, and inventory.
Integrating Walmart with Jetpack enables automatic or manual syncing of products, orders, tracking information, and inventory between your Walmart Marketplace account and your Jetpack dashboard. This integration streamlines your Walmart operations with real-time order import and configurable sync schedules.

About ShipBob Integration References
During setup, you'll authorize the "ShipBob" integration in Walmart Seller Center. This is expected—Jetpack has licensed ShipBob's integration infrastructure to provide reliable connections. Your data flows seamlessly to your Jetpack dashboard.
## Prerequisites
Before connecting your Walmart Marketplace account to Jetpack, ensure you have:
* An active Walmart Marketplace seller account
* Active listings in Walmart Marketplace
* A Jetpack merchant account
This integration currently supports only the Walmart US marketplace.
***
## Connecting Walmart to Jetpack
From your Jetpack dashboard, click **Integrations** in the left-hand navigation bar. Additional menu options will appear.
Choose **App Store** from the submenu to be redirected to the Apps & Integrations page.
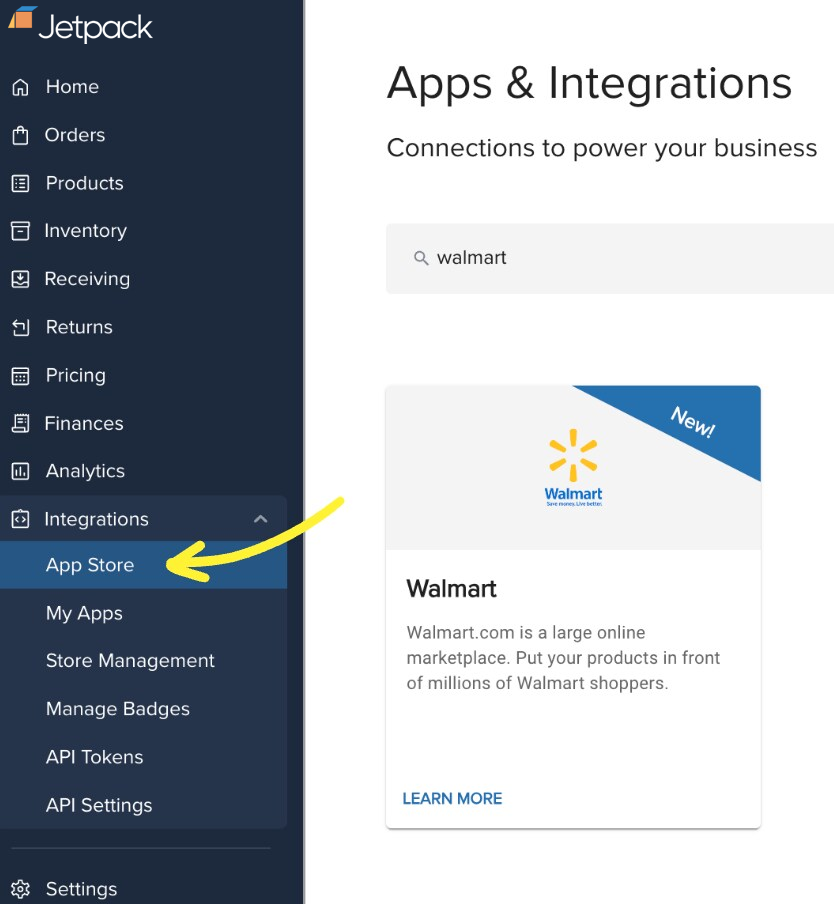 Find the Walmart integration by typing "Walmart" in the search bar or scrolling through the available integrations.
Select the **Walmart** tile to view the integration details.
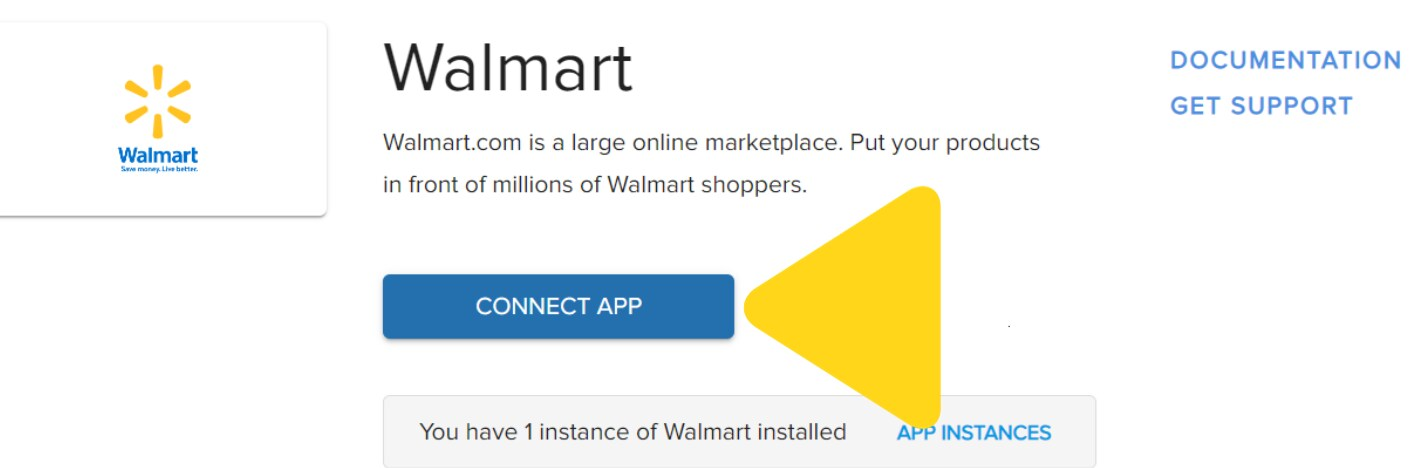
Click the **Connect App** button to begin the setup process.
Find the Walmart integration by typing "Walmart" in the search bar or scrolling through the available integrations.
Select the **Walmart** tile to view the integration details.
Click the **Connect App** button to begin the setup process.
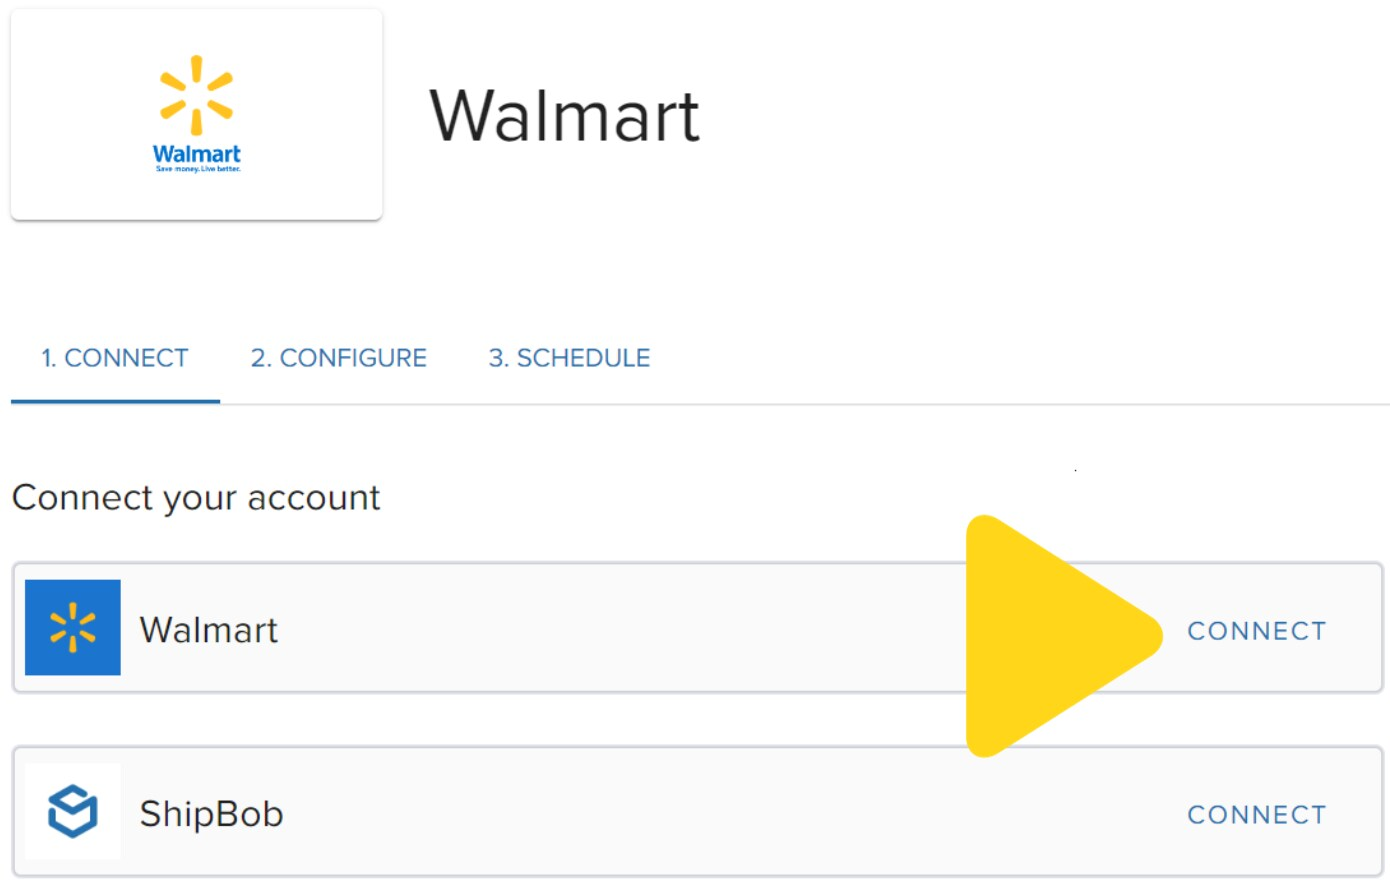
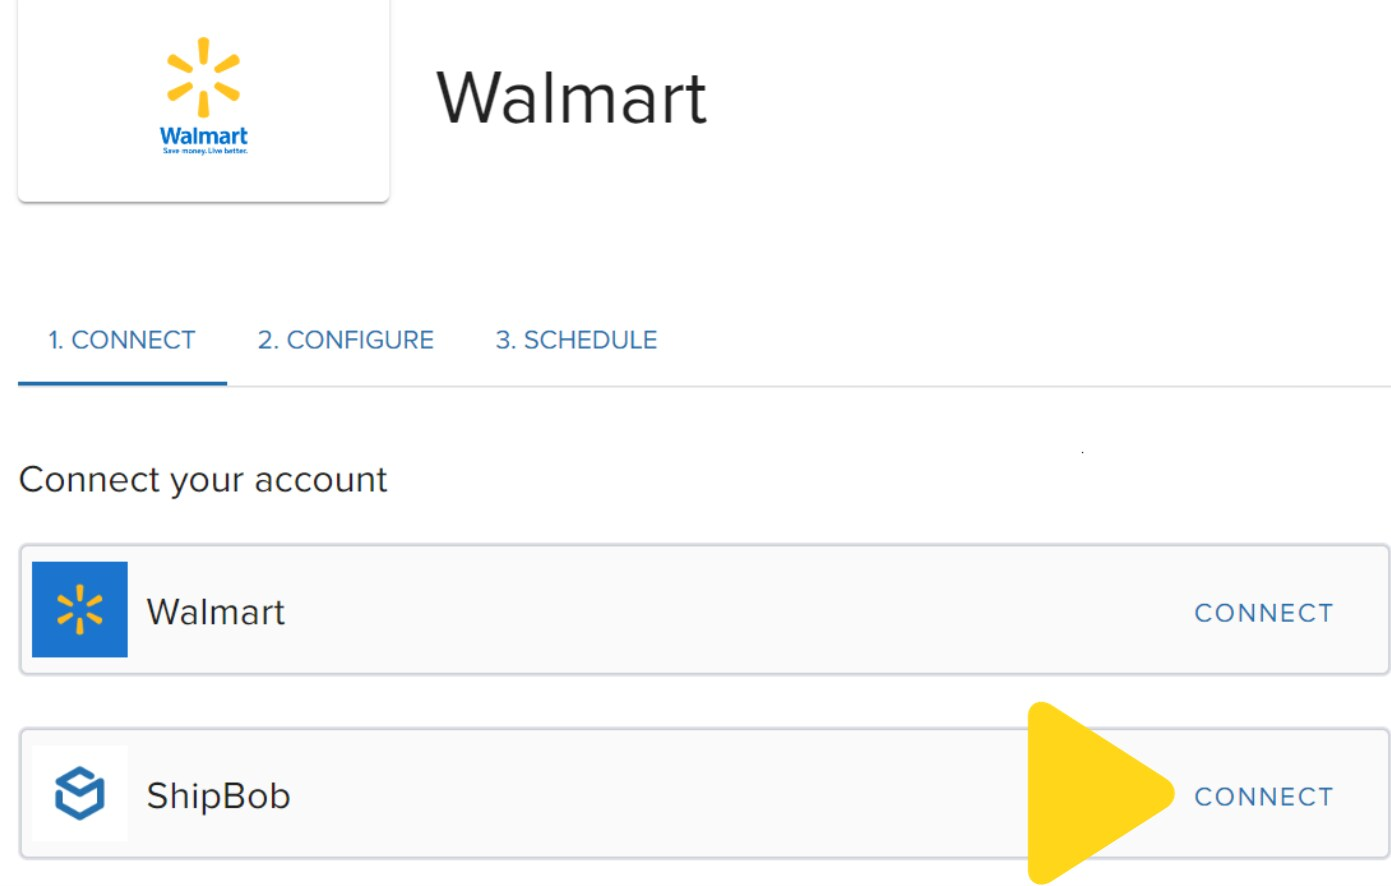
 In the redirected window, click **CONNECT** next to Walmart to begin entering your credentials.
 Before entering credentials, you'll need to generate them from the Walmart Developer Portal. Visit [Walmart Developer Portal](https://developer.walmart.com/) and follow these substeps:
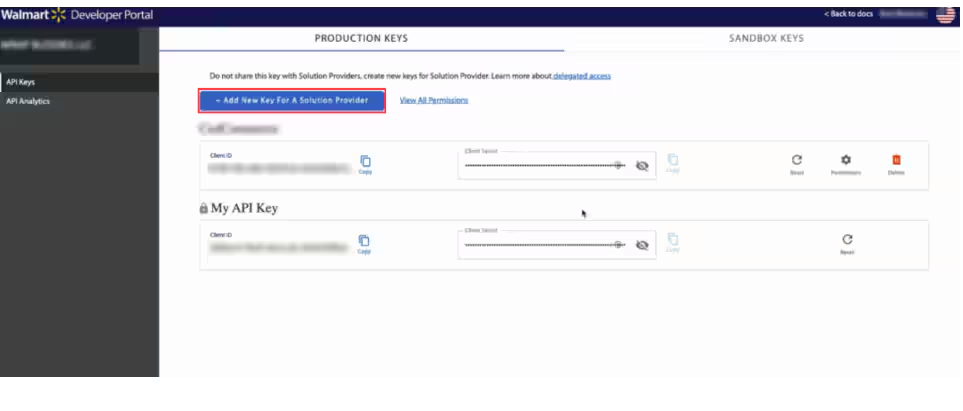 **Log in with your Walmart store credentials**
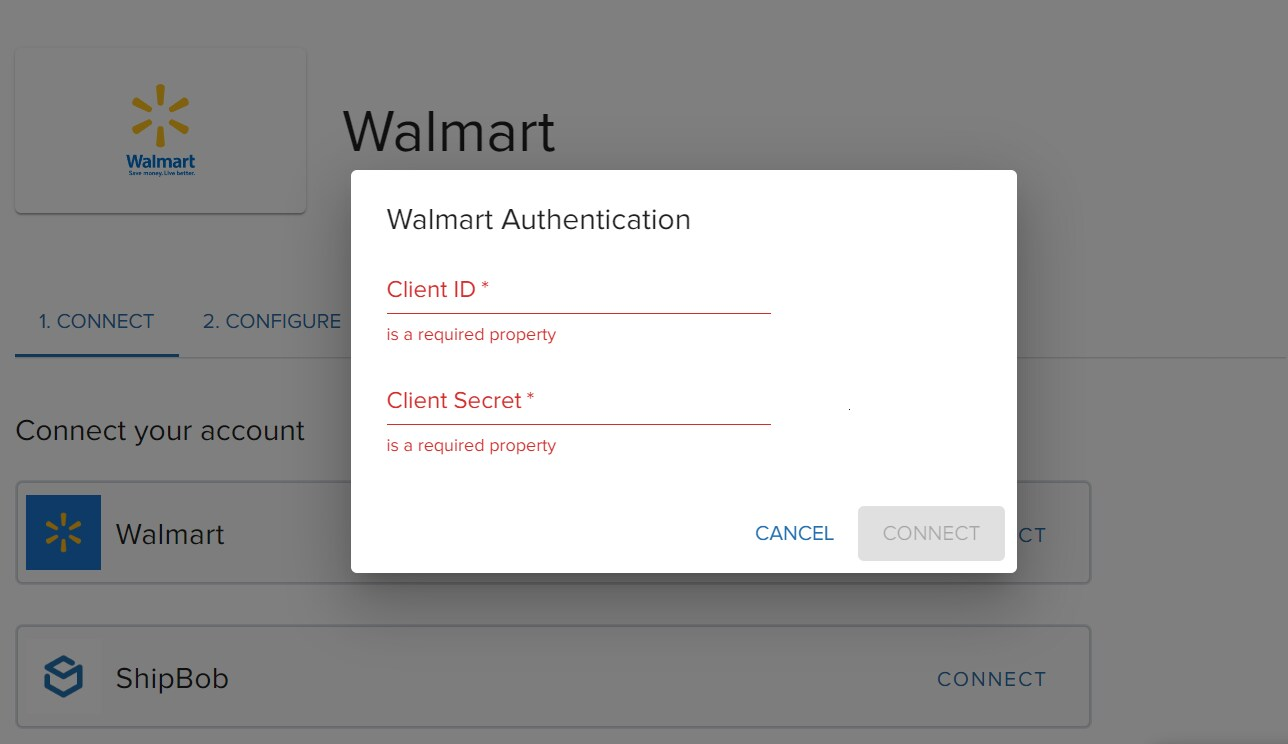 **Click + Add New Key For A Solution Provider**
**Select ShipBob from the dropdown list**
**Click NEXT to proceed to permissions**
**Click + Add New Key For A Solution Provider**
**Select ShipBob from the dropdown list**
**Click NEXT to proceed to permissions**
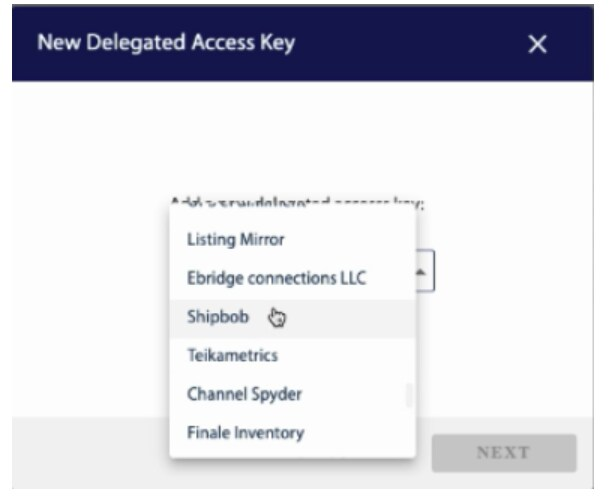 **Grant ShipBob full access permissions** for Items, Inventory, Orders, Returns, Fulfillment, Shipping, and Rules, then click **SUBMIT**
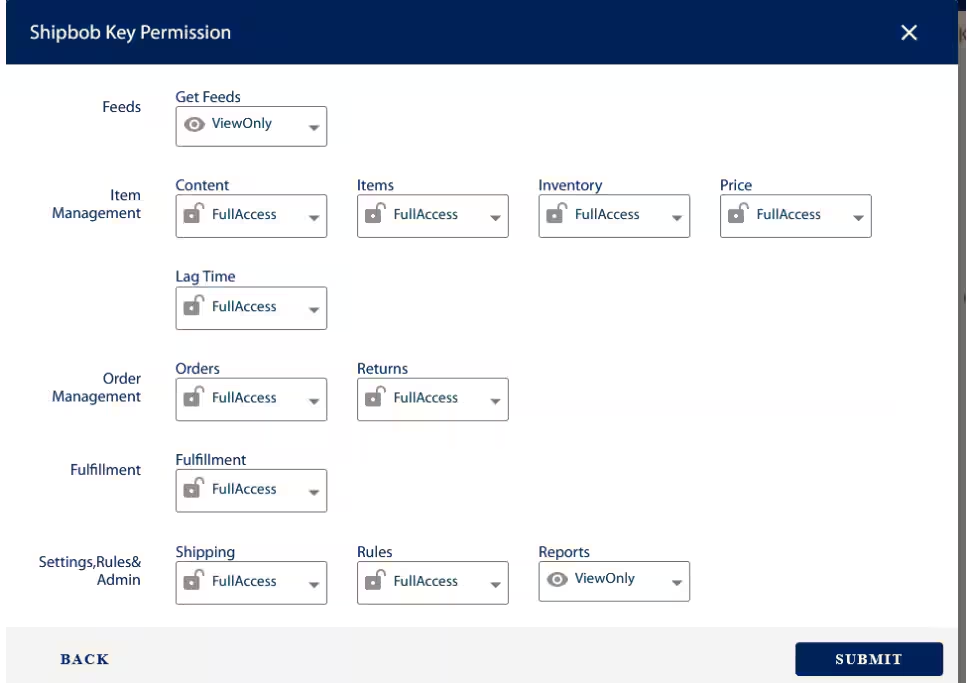 **After receiving your Client ID and Client Secret, return to the Jetpack connection screen**
Enter your **Walmart Client ID** and **Client Secret** in the corresponding fields, then click **CONNECT** next to ShipBob.
**After receiving your Client ID and Client Secret, return to the Jetpack connection screen**
Enter your **Walmart Client ID** and **Client Secret** in the corresponding fields, then click **CONNECT** next to ShipBob.
 When prompted, log in with your Jetpack username and password to authorize the connection.
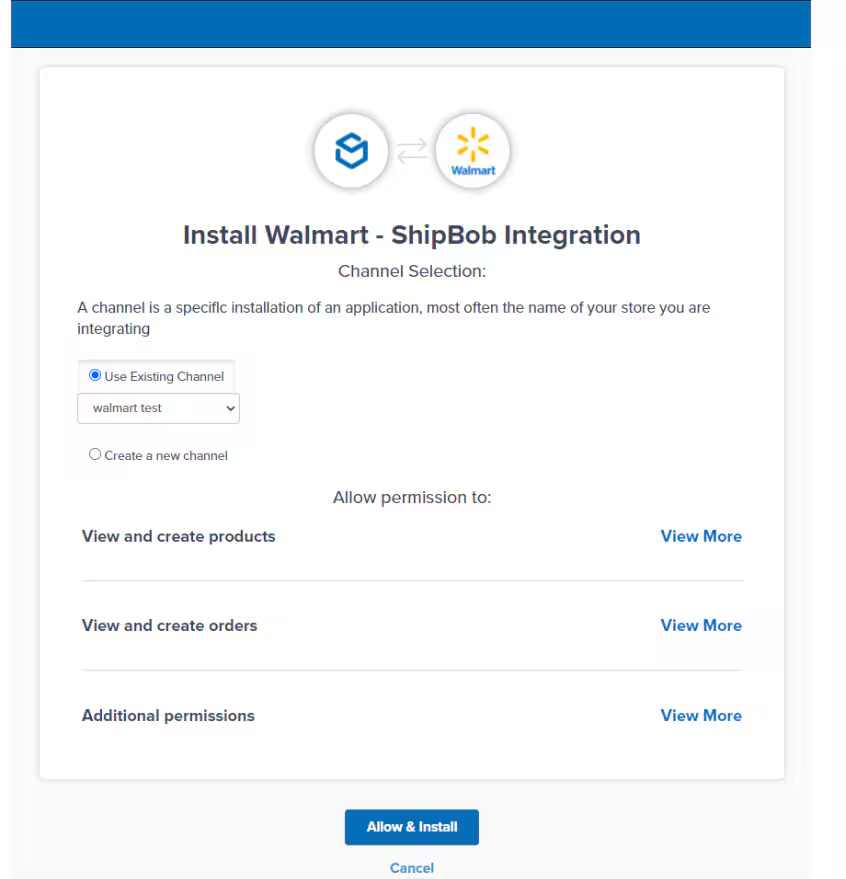
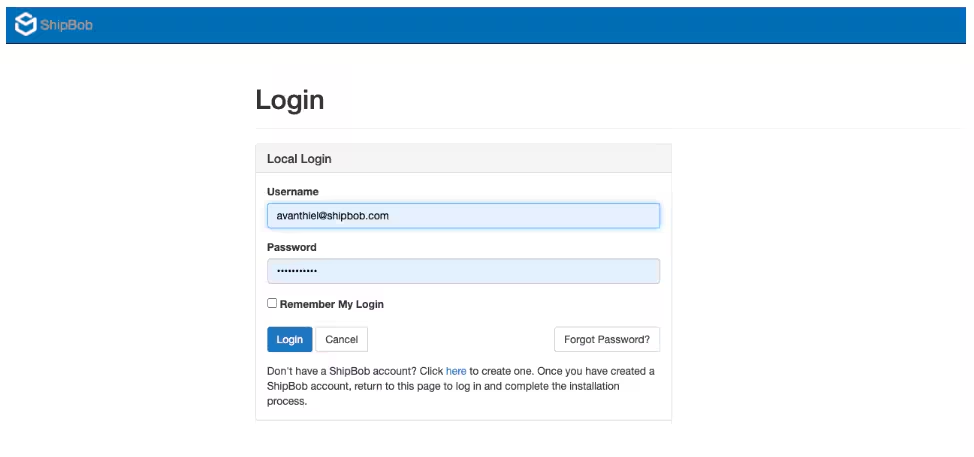 Grant Jetpack access to the necessary Walmart information and choose a name for your integration channel. You can use an existing Walmart channel or create a new one by providing a unique name.
Review the permissions and click the **Allow & Install** button to complete the connection.
Grant Jetpack access to the necessary Walmart information and choose a name for your integration channel. You can use an existing Walmart channel or create a new one by providing a unique name.
Review the permissions and click the **Allow & Install** button to complete the connection.
 A success message will appear to confirm the integration, and you'll be taken to the configuration settings screen.
***
## Configuring Your Walmart Integration Settings
Once your Jetpack and Walmart accounts are connected, you can configure the integration settings.
A success message will appear to confirm the integration, and you'll be taken to the configuration settings screen.
***
## Configuring Your Walmart Integration Settings
Once your Jetpack and Walmart accounts are connected, you can configure the integration settings.
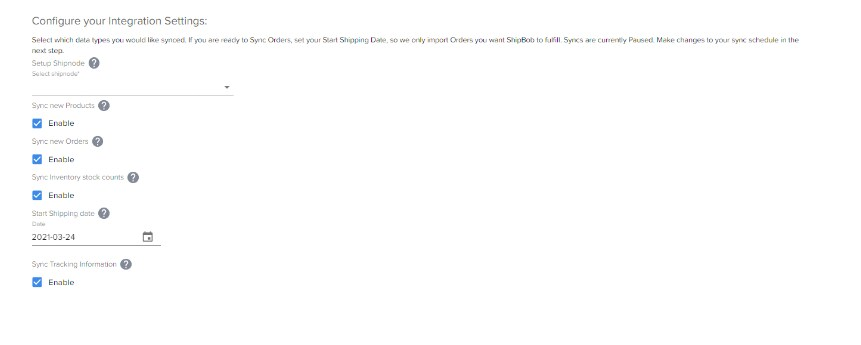 ### Data Sync Settings
Select the data you want to sync to Jetpack (products, orders, inventory, and tracking information) by checking the corresponding boxes.
### Ship Start Date
Set the Ship Start Date, which determines from which date Jetpack will import and start shipping your orders. This date can be set to a past date (up to 120 days ago) or a future date. Click **Save** once the settings are configured.
### Sync Schedule
Choose whether you want Jetpack to automatically sync data from Walmart.
**Manual Syncing (Default)**
If you prefer manual syncing, select **Pause** from the sync schedule dropdown. This is the default option when you first set up the integration.
### Data Sync Settings
Select the data you want to sync to Jetpack (products, orders, inventory, and tracking information) by checking the corresponding boxes.
### Ship Start Date
Set the Ship Start Date, which determines from which date Jetpack will import and start shipping your orders. This date can be set to a past date (up to 120 days ago) or a future date. Click **Save** once the settings are configured.
### Sync Schedule
Choose whether you want Jetpack to automatically sync data from Walmart.
**Manual Syncing (Default)**
If you prefer manual syncing, select **Pause** from the sync schedule dropdown. This is the default option when you first set up the integration.
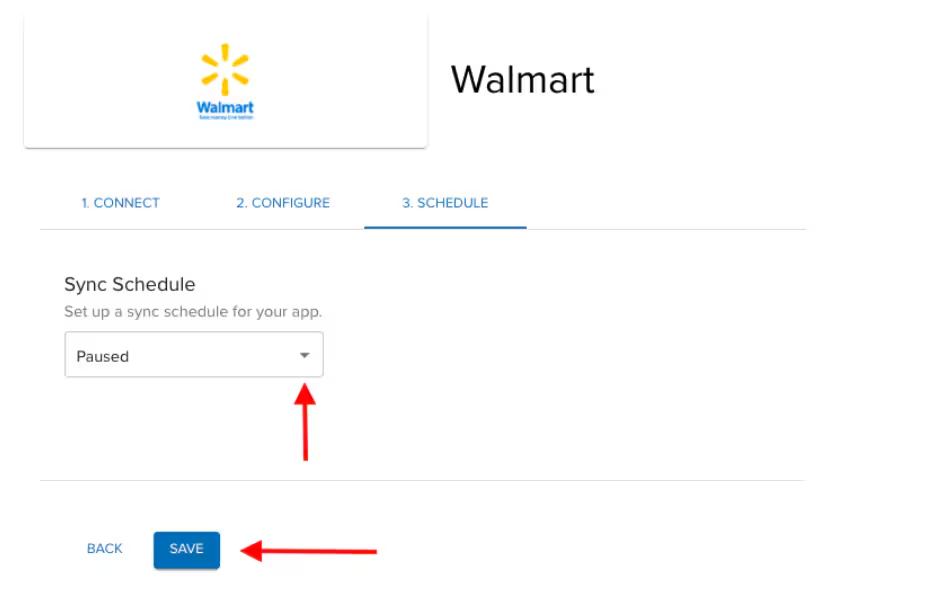 **Automatic Syncing**
To enable automatic syncing, choose a syncing frequency from the dropdown list (options include Every 30 Minutes, Every 1 Hour, Every 4 Hours, etc.) and click **Save**.
### Monitoring Sync Activity
Your integration status will appear as **Active** once syncing is set up. You can trigger an immediate sync by clicking **Sync Now**.
Modify connection settings or syncing schedules at any time via the provided links. Under Sync Logs, you can view all syncing jobs for this integration.
***
## Walmart Integration Features and Capabilities
### Product Syncing
**Unique Identifier:** When syncing products, Jetpack uses the SKU as the unique identifier to locate products within Walmart. Once synced, you can view product details (Inventory ID, name, etc.) on the Jetpack Products page.
#### Auto-Sync Products from Walmart
Automatically import all existing products from your Walmart store into Jetpack. Enable this feature under your Walmart Connection Settings:
1. Navigate to **Integrations**
2. Click **My Apps**
3. Locate your Walmart integration, click the three horizontal dots
4. Select **Connections Settings**
5. Scroll to **Configure your Integration Settings**, check the box for **Sync New Products**, and click **Save**
#### Auto-Sync Products from Imported Orders
For products that have never been imported to Jetpack, a new product will be created automatically when an order containing the product is imported.
This capability cannot be disabled.
#### Sync Product Variants
If your Walmart admin portal includes product variants (e.g., different sizes or colors), Jetpack will import each variant as a separate product with its own unique Inventory ID.
**Example:** A hat available in pink, green, and lavender will be imported as three distinct items under the parent product.
#### Product Images
Product images are not automatically imported from Walmart. To update a product image:
1. Select **Inventory** from the left-hand navigation bar
2. Choose **Products** from the dropdown list
3. Click the Inventory ID hyperlink of the product you wish to update
4. Select **Upload Image** and choose the desired photo
The image will update within a few seconds, and a success message will confirm the change.
### Order Syncing
Once orders are synced from Walmart, they appear under the **Orders** tab in your Jetpack dashboard with the Walmart order ID listed under the **Store Order ID** column.
Orders must have a valid shipping address and be in the Created status. Ensure your Walmart store is live with inventory mapped correctly in the Walmart Seller Center.
#### Manual Order Sync
To manually sync orders:
1. Select **Integrations**
2. Click **My Apps**
3. Locate your Walmart integration
4. Click **Sync Now** to manually trigger order syncing
#### Automatic Order Sync
To automatically sync orders, enable automatic order syncing by configuring the Sync Schedule:
1. Go to **Integrations**
2. Click **My Apps**
3. Locate your Walmart integration and click the three vertical dots
4. Select **Sync Schedule**
5. Choose a syncing frequency from options such as Every 30 Minutes, Every 1 Hour, Every 4 Hours, etc.
6. Click **Save**
#### Start Shipping Date
Set a Start Shipping date (which can be a past date up to 120 days or a future date) to determine when Jetpack will begin importing orders:
1. Navigate to **Integrations**
2. Select **My Apps** and locate your Walmart integration
3. Click the three vertical dots and select **Connections Settings**
4. Scroll to the **Start Shipping Date** section, enter the desired date, and click **Save**
### Canceled Orders
The Walmart–Jetpack integration does not support syncing canceled orders between platforms. Cancellations must be performed separately in both Walmart Seller Center and your Jetpack dashboard. Orders already assigned to a picker or in fulfillment cannot be canceled.
To cancel the order in your Jetpack dashboard:
1. Select **Orders** from the navigation bar
2. Check the box next to the order(s) you want to cancel
3. Click the **Actions** button at the top-right
4. Select **Cancel Orders** from the dropdown
5. Confirm the cancellation when prompted
### Returns
You can create and track returns in your Jetpack dashboard. Once a return is generated, it appears on the Order Details page and under the Returns tab.
Returns cannot be created manually on Walmart or sync back to Walmart after being created in Jetpack.
To generate a return in your Jetpack dashboard:
1. Select **Orders** from the left-hand navigation bar
2. Locate the desired order using customer name, Shipment ID, or Store Order ID
3. Click the **Actions** button
4. Select **Create Return** (available only for orders in the Shipped status)
5. Complete the Return Order Form with product details, fulfillment center, and label type (prepaid or ShipBob parcel)
### Tracking Updates
After Jetpack fulfills an order, a unique tracking number and link are uploaded to the Order Details page. This tracking link directs you to the carrier's website. The tracking number is also automatically uploaded to your Walmart store, marking the shipment as fulfilled.
To enable tracking sync in your Jetpack dashboard:
1. Navigate to **Integrations**
2. Select **My Apps**
3. Locate your Walmart integration, click the three dots, and select **Connections Settings**
4. Scroll to **Configure Your Integration Settings**
5. Check the box for **Sync Tracking Information**
6. Click **Save**
### Automation Rules
Jetpack's automation rules allow you to apply custom rules such as:
* Adding a specific product to orders
* Ignoring certain orders
* Requesting a signature upon delivery
* Excluding gift messages
You can define conditions to further specify when these rules apply. Refer to [this API documentation](https://developer.shipbob.com/) to verify supported conditions.
### Inventory Quantity Sync
The Inventory Qty Sync feature automatically updates inventory levels from Jetpack to Walmart every 15 minutes.
* For non-bundled products, the Sellable quantity (Fulfillable quantity minus Exception quantity) is synced
* For bundled products, the available quantity is determined by the product with the least available units
This sync is not in real time, so overselling may occur, displaying negative quantities if stock is oversold. Inventory sync is not available for digital items and reflects total stock levels across all fulfillment centers.
To enable inventory sync in your Jetpack dashboard:
1. Navigate to **Integrations**
2. Select **My Apps** and locate your Walmart integration
3. Click the three vertical dots and select **Connections Settings**
4. Scroll to **Configure Your Integration Settings**
5. Check the box for **Sync Inventory Stock Counts**
6. Click **Save**
***
## Disabling the Walmart Integration
If you need to disconnect your Walmart integration, follow these steps:
From your Jetpack dashboard, click **Integrations** on the left-hand navigation bar.
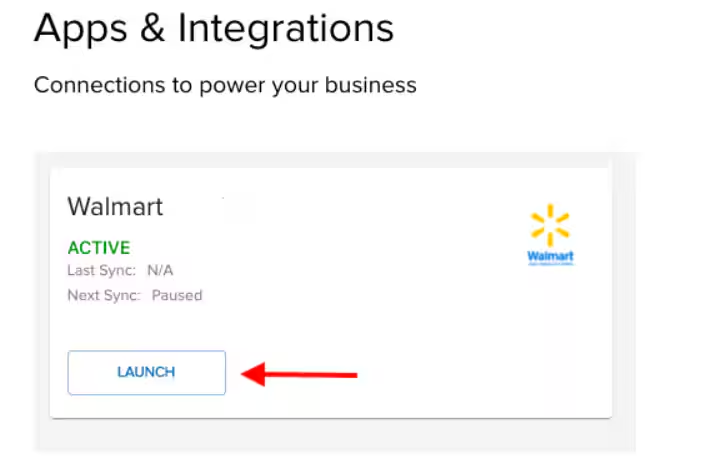
Find the Walmart integration tile and click **Launch** to access the integration management page.
**Automatic Syncing**
To enable automatic syncing, choose a syncing frequency from the dropdown list (options include Every 30 Minutes, Every 1 Hour, Every 4 Hours, etc.) and click **Save**.
### Monitoring Sync Activity
Your integration status will appear as **Active** once syncing is set up. You can trigger an immediate sync by clicking **Sync Now**.
Modify connection settings or syncing schedules at any time via the provided links. Under Sync Logs, you can view all syncing jobs for this integration.
***
## Walmart Integration Features and Capabilities
### Product Syncing
**Unique Identifier:** When syncing products, Jetpack uses the SKU as the unique identifier to locate products within Walmart. Once synced, you can view product details (Inventory ID, name, etc.) on the Jetpack Products page.
#### Auto-Sync Products from Walmart
Automatically import all existing products from your Walmart store into Jetpack. Enable this feature under your Walmart Connection Settings:
1. Navigate to **Integrations**
2. Click **My Apps**
3. Locate your Walmart integration, click the three horizontal dots
4. Select **Connections Settings**
5. Scroll to **Configure your Integration Settings**, check the box for **Sync New Products**, and click **Save**
#### Auto-Sync Products from Imported Orders
For products that have never been imported to Jetpack, a new product will be created automatically when an order containing the product is imported.
This capability cannot be disabled.
#### Sync Product Variants
If your Walmart admin portal includes product variants (e.g., different sizes or colors), Jetpack will import each variant as a separate product with its own unique Inventory ID.
**Example:** A hat available in pink, green, and lavender will be imported as three distinct items under the parent product.
#### Product Images
Product images are not automatically imported from Walmart. To update a product image:
1. Select **Inventory** from the left-hand navigation bar
2. Choose **Products** from the dropdown list
3. Click the Inventory ID hyperlink of the product you wish to update
4. Select **Upload Image** and choose the desired photo
The image will update within a few seconds, and a success message will confirm the change.
### Order Syncing
Once orders are synced from Walmart, they appear under the **Orders** tab in your Jetpack dashboard with the Walmart order ID listed under the **Store Order ID** column.
Orders must have a valid shipping address and be in the Created status. Ensure your Walmart store is live with inventory mapped correctly in the Walmart Seller Center.
#### Manual Order Sync
To manually sync orders:
1. Select **Integrations**
2. Click **My Apps**
3. Locate your Walmart integration
4. Click **Sync Now** to manually trigger order syncing
#### Automatic Order Sync
To automatically sync orders, enable automatic order syncing by configuring the Sync Schedule:
1. Go to **Integrations**
2. Click **My Apps**
3. Locate your Walmart integration and click the three vertical dots
4. Select **Sync Schedule**
5. Choose a syncing frequency from options such as Every 30 Minutes, Every 1 Hour, Every 4 Hours, etc.
6. Click **Save**
#### Start Shipping Date
Set a Start Shipping date (which can be a past date up to 120 days or a future date) to determine when Jetpack will begin importing orders:
1. Navigate to **Integrations**
2. Select **My Apps** and locate your Walmart integration
3. Click the three vertical dots and select **Connections Settings**
4. Scroll to the **Start Shipping Date** section, enter the desired date, and click **Save**
### Canceled Orders
The Walmart–Jetpack integration does not support syncing canceled orders between platforms. Cancellations must be performed separately in both Walmart Seller Center and your Jetpack dashboard. Orders already assigned to a picker or in fulfillment cannot be canceled.
To cancel the order in your Jetpack dashboard:
1. Select **Orders** from the navigation bar
2. Check the box next to the order(s) you want to cancel
3. Click the **Actions** button at the top-right
4. Select **Cancel Orders** from the dropdown
5. Confirm the cancellation when prompted
### Returns
You can create and track returns in your Jetpack dashboard. Once a return is generated, it appears on the Order Details page and under the Returns tab.
Returns cannot be created manually on Walmart or sync back to Walmart after being created in Jetpack.
To generate a return in your Jetpack dashboard:
1. Select **Orders** from the left-hand navigation bar
2. Locate the desired order using customer name, Shipment ID, or Store Order ID
3. Click the **Actions** button
4. Select **Create Return** (available only for orders in the Shipped status)
5. Complete the Return Order Form with product details, fulfillment center, and label type (prepaid or ShipBob parcel)
### Tracking Updates
After Jetpack fulfills an order, a unique tracking number and link are uploaded to the Order Details page. This tracking link directs you to the carrier's website. The tracking number is also automatically uploaded to your Walmart store, marking the shipment as fulfilled.
To enable tracking sync in your Jetpack dashboard:
1. Navigate to **Integrations**
2. Select **My Apps**
3. Locate your Walmart integration, click the three dots, and select **Connections Settings**
4. Scroll to **Configure Your Integration Settings**
5. Check the box for **Sync Tracking Information**
6. Click **Save**
### Automation Rules
Jetpack's automation rules allow you to apply custom rules such as:
* Adding a specific product to orders
* Ignoring certain orders
* Requesting a signature upon delivery
* Excluding gift messages
You can define conditions to further specify when these rules apply. Refer to [this API documentation](https://developer.shipbob.com/) to verify supported conditions.
### Inventory Quantity Sync
The Inventory Qty Sync feature automatically updates inventory levels from Jetpack to Walmart every 15 minutes.
* For non-bundled products, the Sellable quantity (Fulfillable quantity minus Exception quantity) is synced
* For bundled products, the available quantity is determined by the product with the least available units
This sync is not in real time, so overselling may occur, displaying negative quantities if stock is oversold. Inventory sync is not available for digital items and reflects total stock levels across all fulfillment centers.
To enable inventory sync in your Jetpack dashboard:
1. Navigate to **Integrations**
2. Select **My Apps** and locate your Walmart integration
3. Click the three vertical dots and select **Connections Settings**
4. Scroll to **Configure Your Integration Settings**
5. Check the box for **Sync Inventory Stock Counts**
6. Click **Save**
***
## Disabling the Walmart Integration
If you need to disconnect your Walmart integration, follow these steps:
From your Jetpack dashboard, click **Integrations** on the left-hand navigation bar.
Find the Walmart integration tile and click **Launch** to access the integration management page.
 In the redirected window, click the **Connection Settings** link.
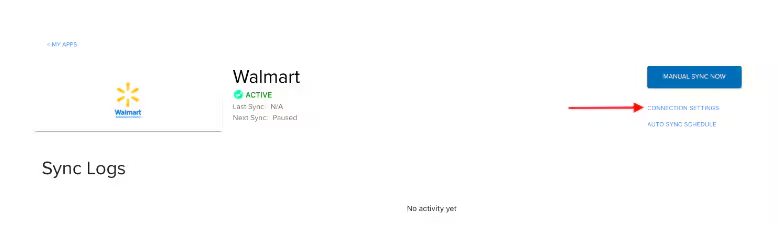 Click the **Uninstall** button at the bottom of the Connection Settings page to disable the integration.
***
## Let's Dive Deeper
Back to the main integrations guide
Set up your product catalog
Understand how orders flow into Jetpack
Inventory management and tracking
Apply custom rules to orders
Set up returns handling
Click the **Uninstall** button at the bottom of the Connection Settings page to disable the integration.
***
## Let's Dive Deeper
Back to the main integrations guide
Set up your product catalog
Understand how orders flow into Jetpack
Inventory management and tracking
Apply custom rules to orders
Set up returns handling

Questions? Contact Jetpack Care.
If you have any questions or run into issues, you can always contact Jetpack Care for help. Our team is always here to assist via Slack, phone, or email!