> ## Documentation Index
> Fetch the complete documentation index at: https://help.jetpack3pl.com/llms.txt
> Use this file to discover all available pages before exploring further.
# BigCommerce Integration
> Connect your BigCommerce store to Jetpack for automatic product syncing, order importing, and inventory management.
Integrating your BigCommerce store with Jetpack enables seamless order fulfillment by automatically syncing products, importing orders, and updating inventory levels in real-time. The integration connects directly through your Jetpack dashboard and requires minimal setup.

About ShipBob Integration References
During setup, you'll authorize the "ShipBob" app in your BigCommerce store. This is expected—Jetpack has licensed ShipBob's integration infrastructure to provide reliable connections. Your data flows seamlessly to your Jetpack dashboard.
## Prerequisites
Before connecting BigCommerce to Jetpack, ensure you have:
* **Active BigCommerce store** with admin access
* **Jetpack merchant account** with login credentials
***
## Retrieving API Credentials from BigCommerce
Before connecting BigCommerce to Jetpack, you need to create API credentials in your BigCommerce store. These credentials allow Jetpack to securely access your store's data.
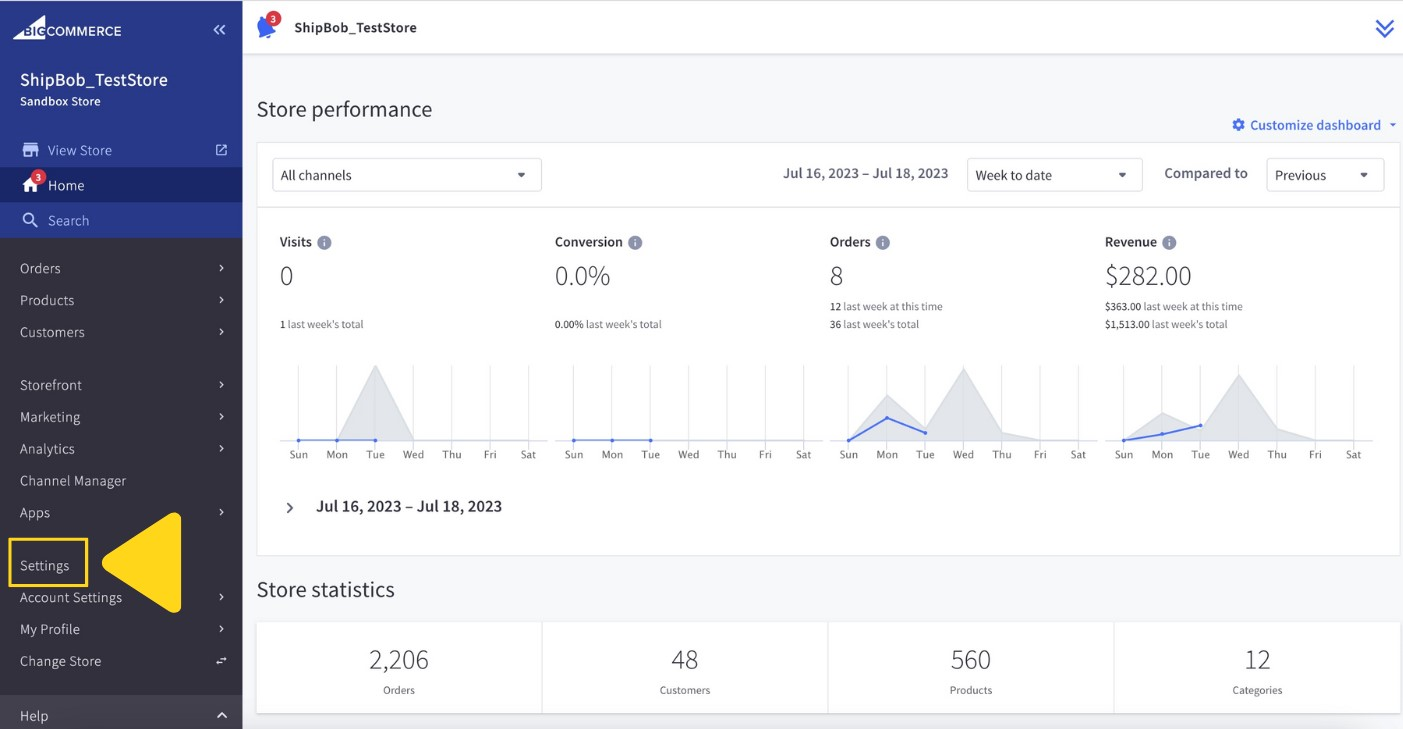
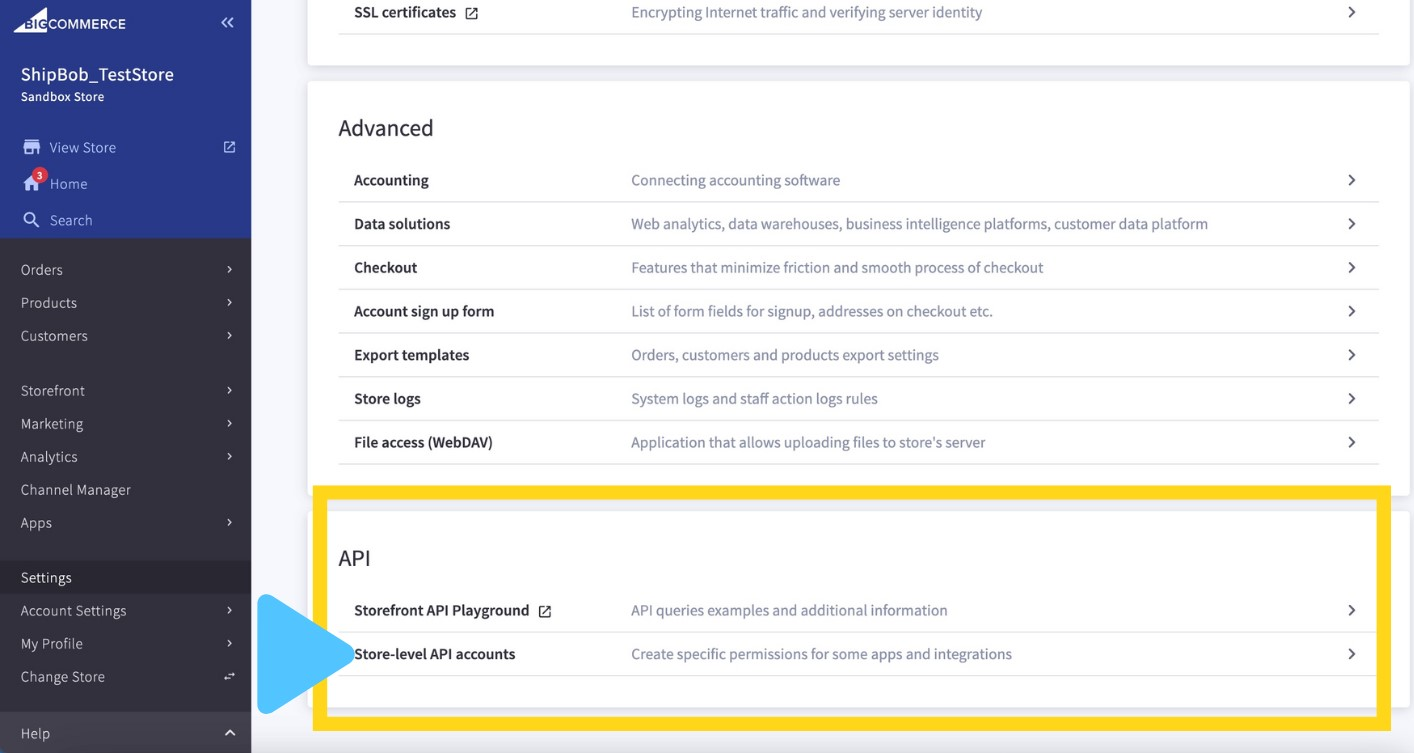
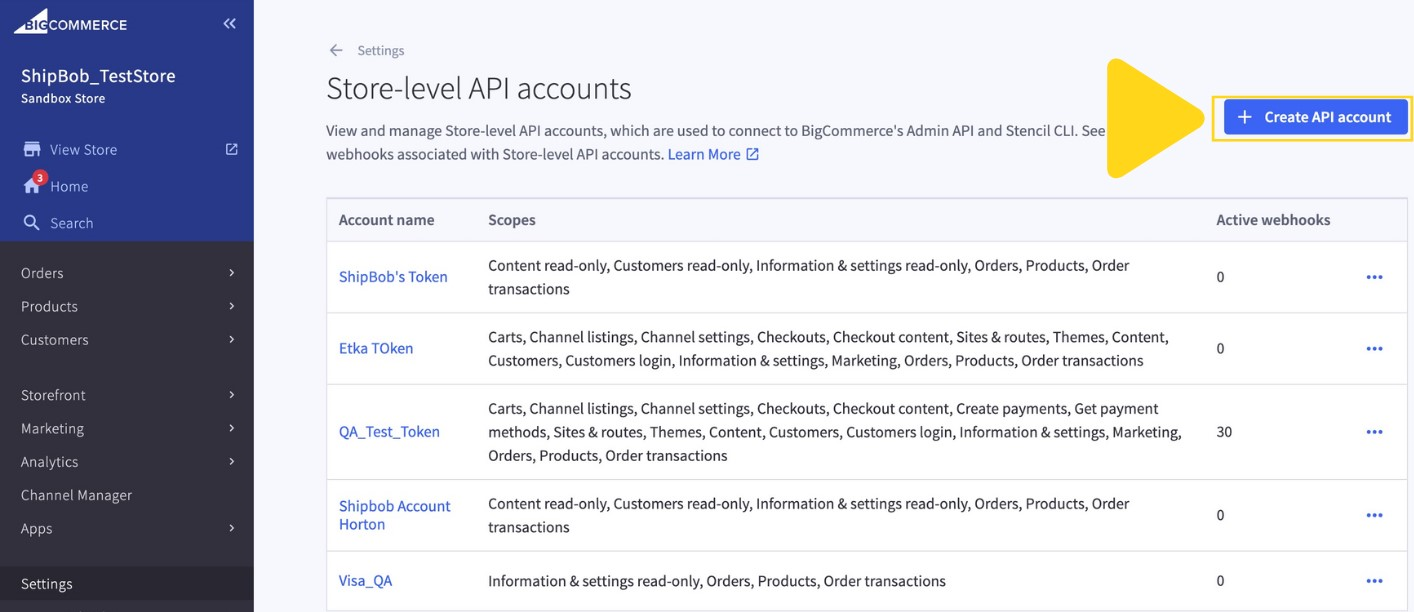 On the Create API Account page, note that the Token type is preset to **V2/V3 API token**. Do not change this.
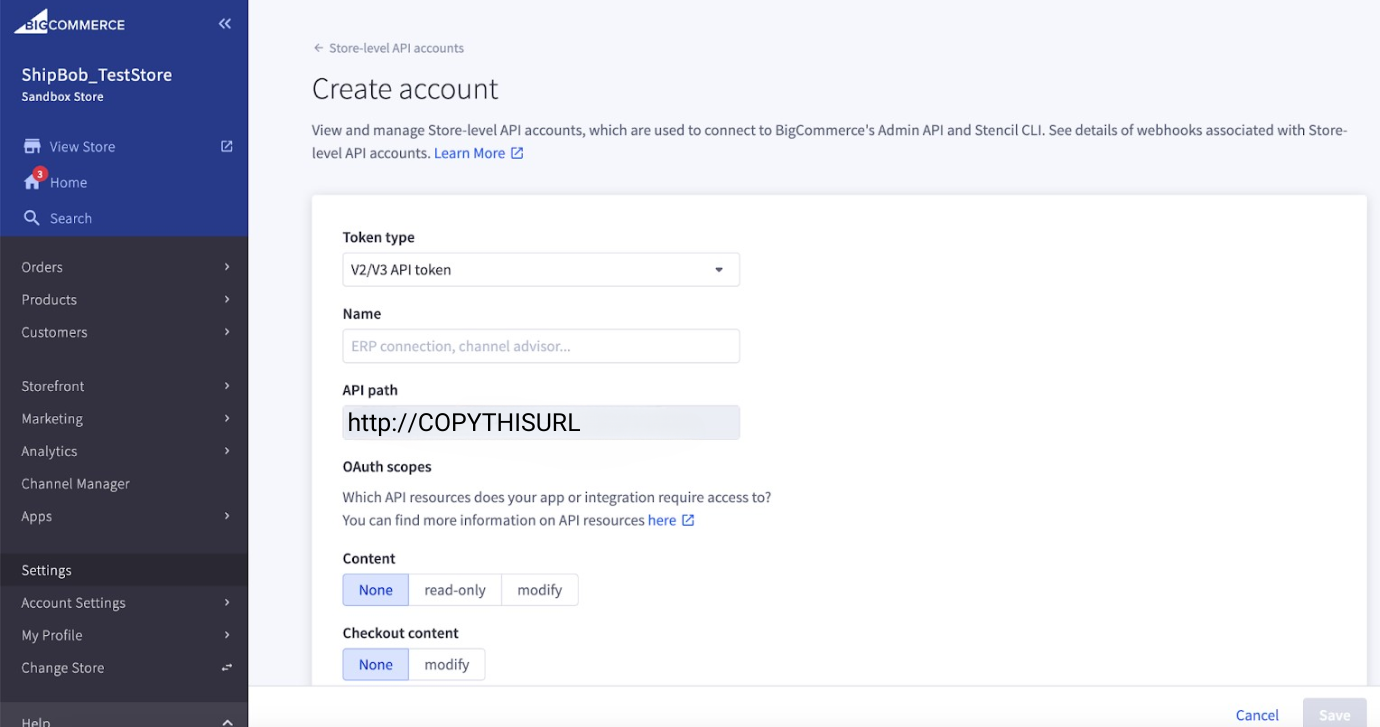 Enter a descriptive name (e.g., "Jetpack-Integration" or "ShipBob-Integration").
**Save your API Path URL immediately** — it displays as **[http://COPYTHISURL](http://COPYTHISURL)** in the form. This URL cannot be retrieved later.
Enter a descriptive name (e.g., "Jetpack-Integration" or "ShipBob-Integration").
**Save your API Path URL immediately** — it displays as **[http://COPYTHISURL](http://COPYTHISURL)** in the form. This URL cannot be retrieved later.
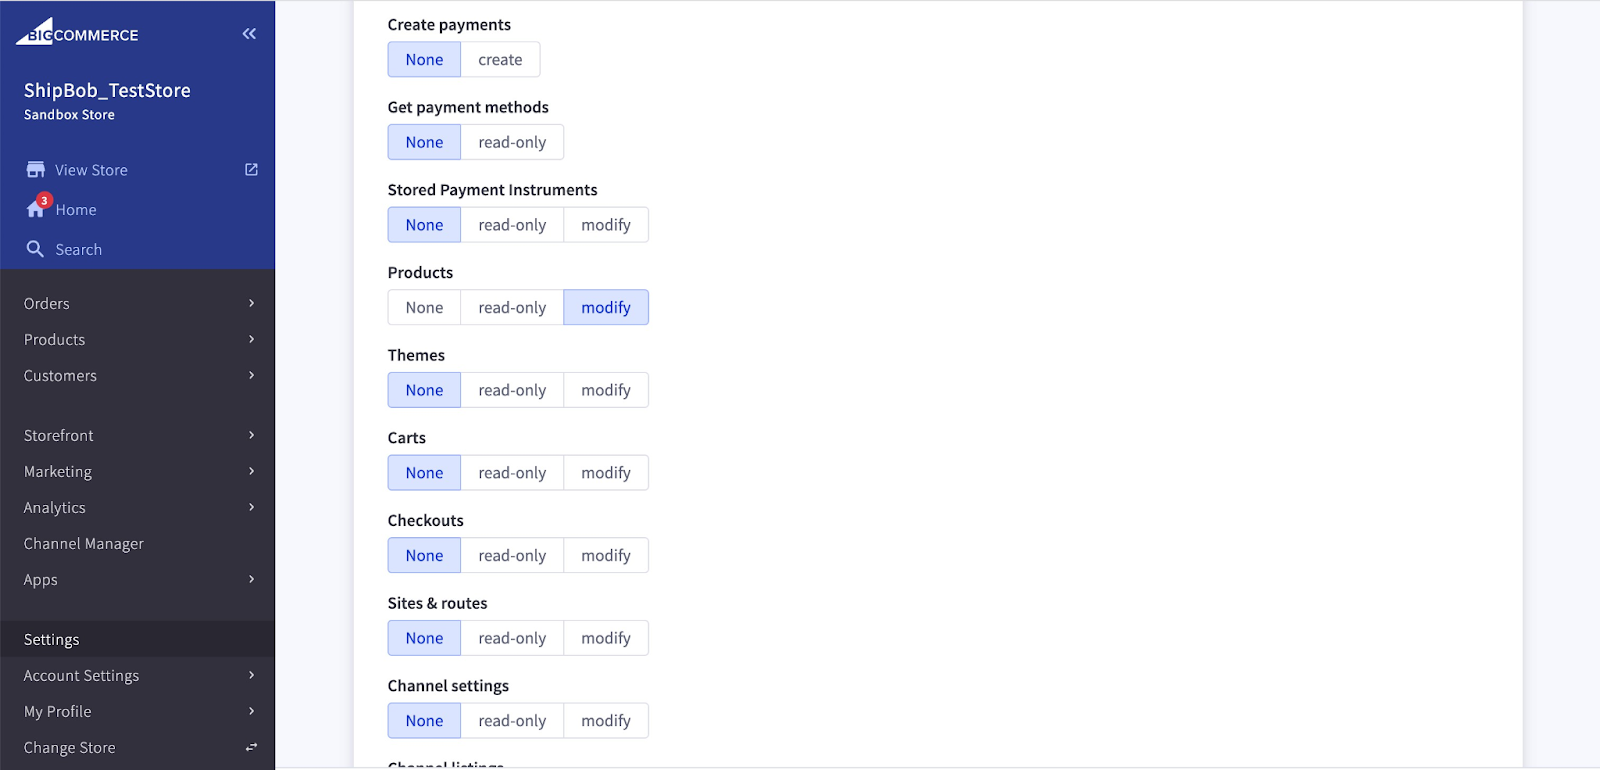 Set the following permissions:
* **Content**: read-only
* **Checkout content**: None
* **Customers**: read-only
* **Customers login**: None
* **Information & settings**: read-only
* **Marketing**: None
* **Orders**: modify
* **Order transactions**: modify
* **Products**: modify
* **Store Inventory**: modify
* **Fulfillment Methods**: modify
* **Order Fulfillment**: modify
* **All other settings**: None
Click **Save**.
Set the following permissions:
* **Content**: read-only
* **Checkout content**: None
* **Customers**: read-only
* **Customers login**: None
* **Information & settings**: read-only
* **Marketing**: None
* **Orders**: modify
* **Order transactions**: modify
* **Products**: modify
* **Store Inventory**: modify
* **Fulfillment Methods**: modify
* **Order Fulfillment**: modify
* **All other settings**: None
Click **Save**.
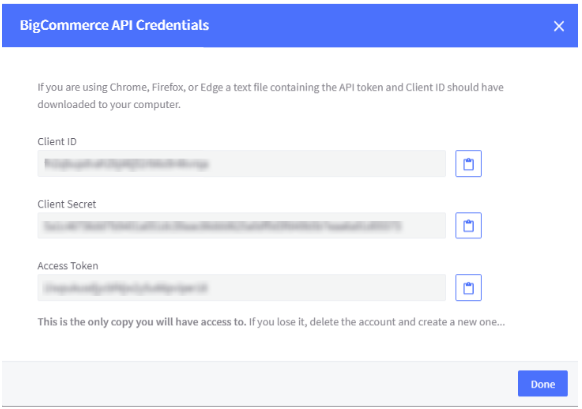 A pop-up will display your **Client ID**, **Client Secret**, and **Access Token**.
**Save these details immediately** (browsers like Chrome, Firefox, or Edge may automatically download them as a text file).
This is the only time you'll have access to the Client Secret and Access Token. If you lose them, you'll need to delete the account and create a new one.
***
## Linking BigCommerce to Jetpack
Once you have your API credentials from BigCommerce, you can link your store to Jetpack.
A pop-up will display your **Client ID**, **Client Secret**, and **Access Token**.
**Save these details immediately** (browsers like Chrome, Firefox, or Edge may automatically download them as a text file).
This is the only time you'll have access to the Client Secret and Access Token. If you lose them, you'll need to delete the account and create a new one.
***
## Linking BigCommerce to Jetpack
Once you have your API credentials from BigCommerce, you can link your store to Jetpack.
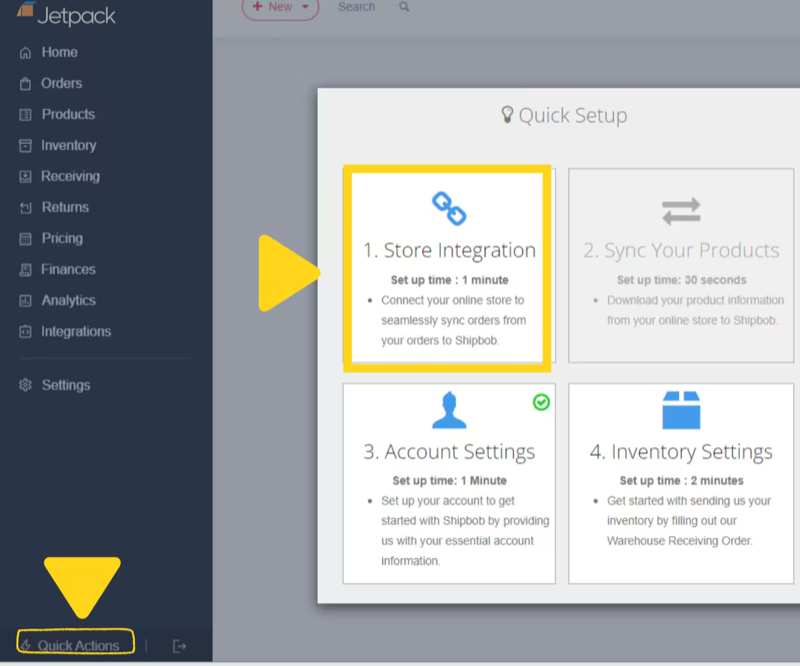
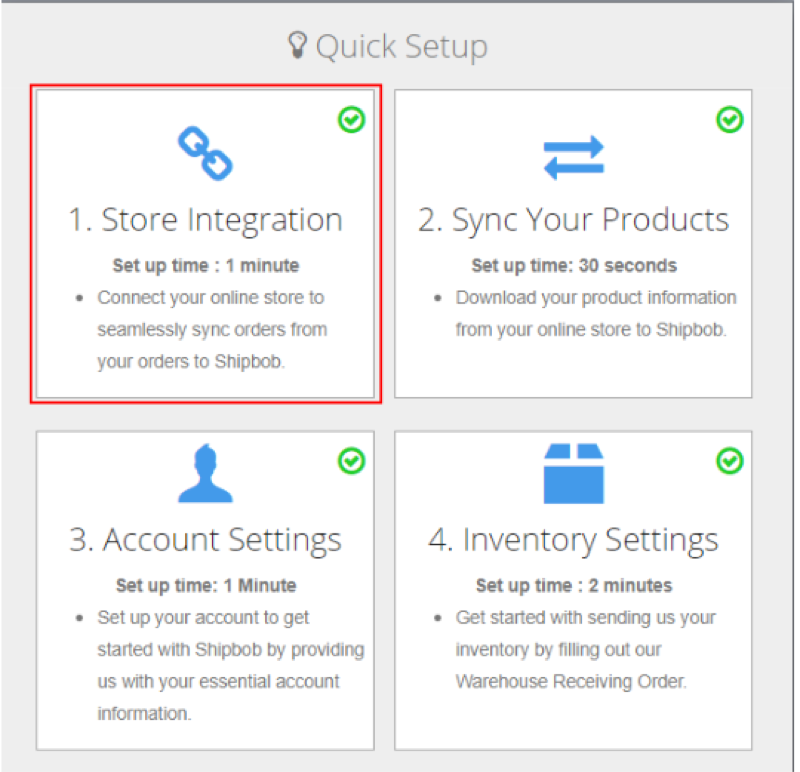
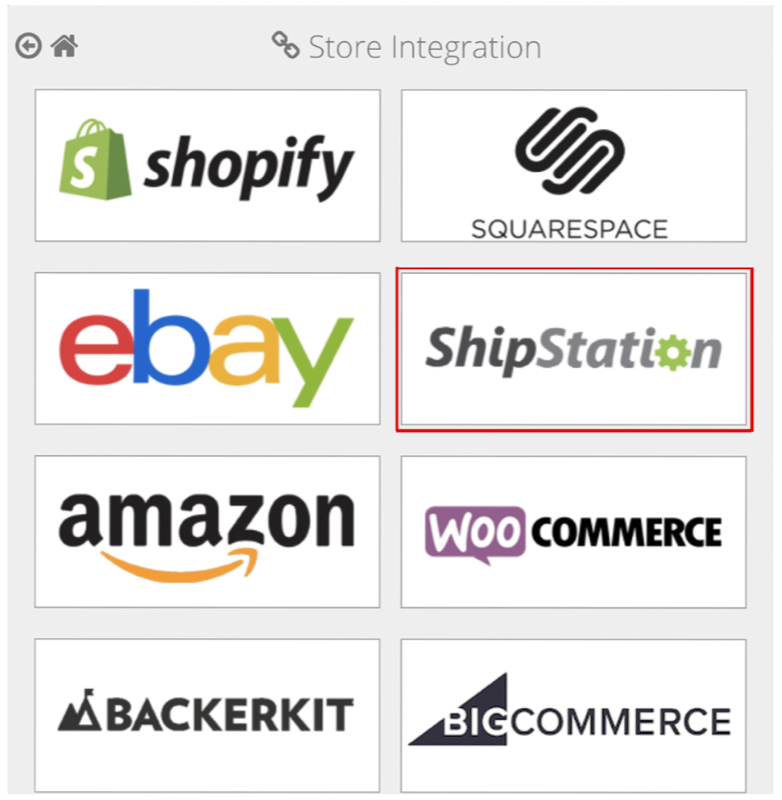
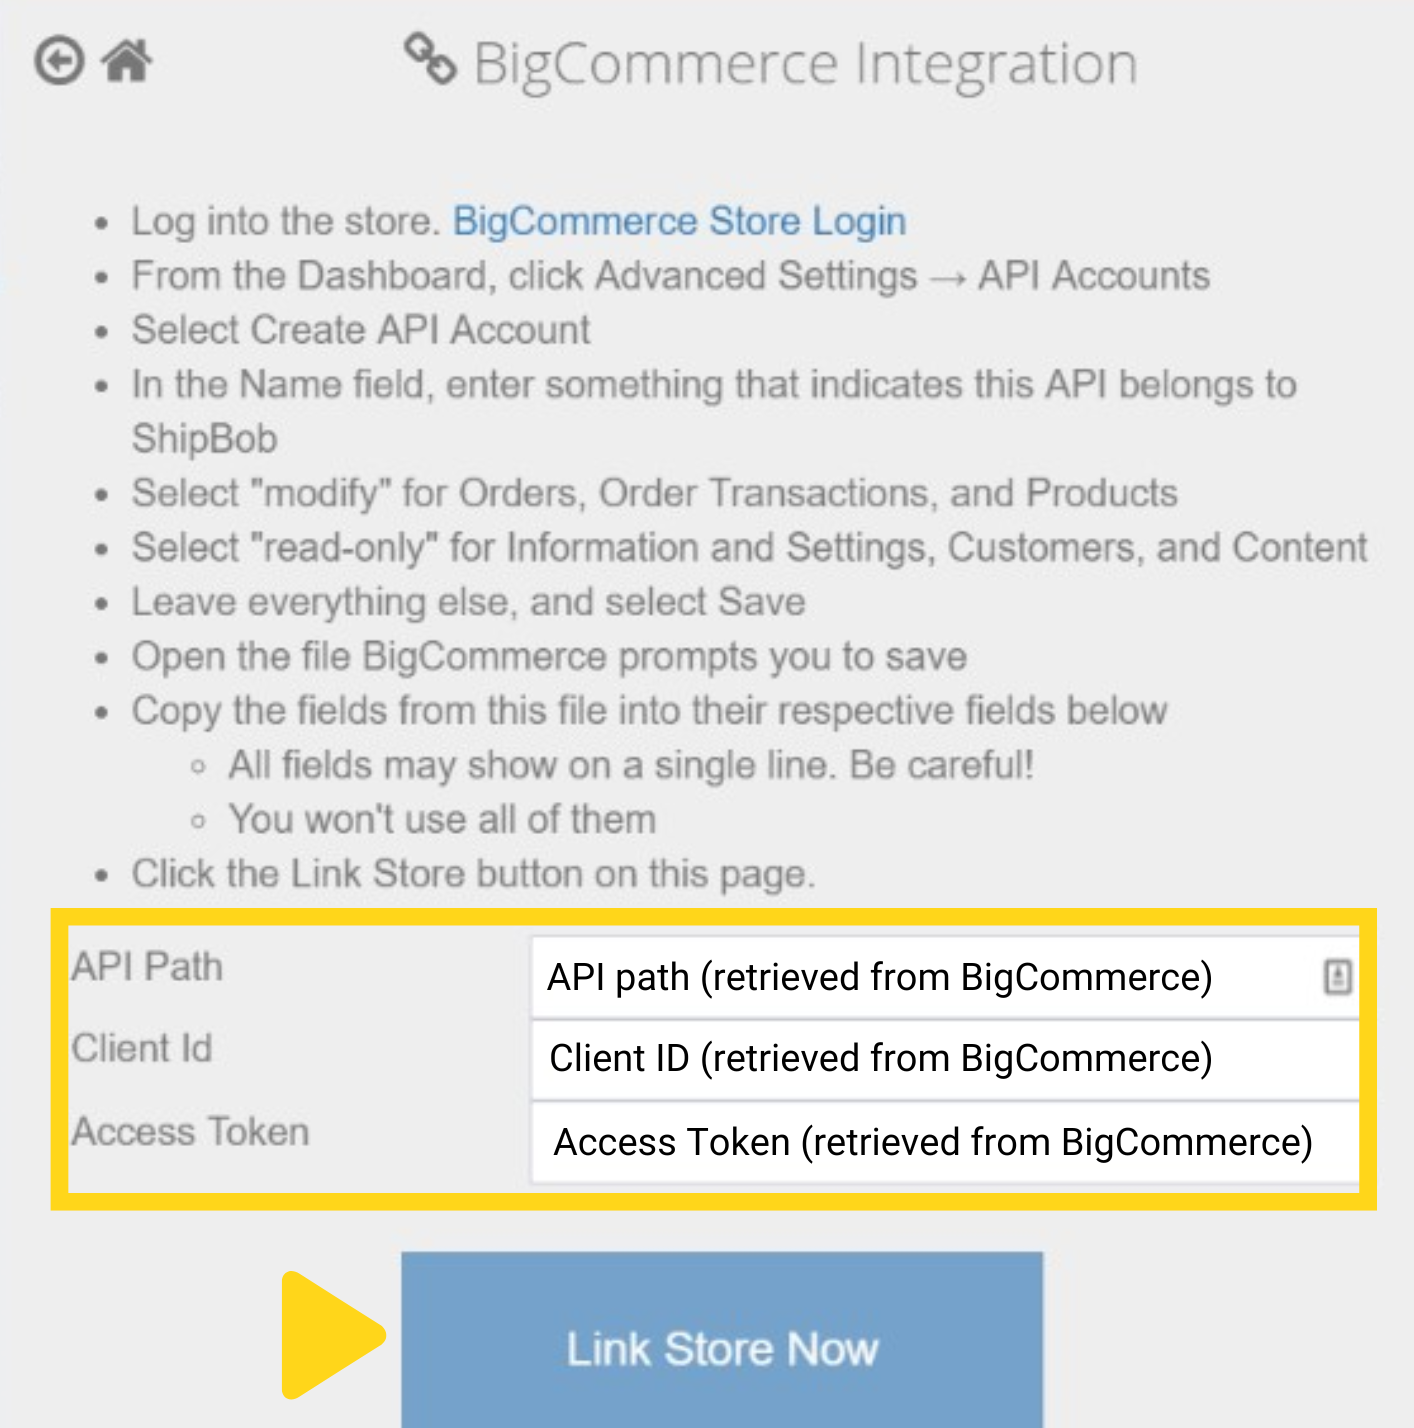 Enter the following information you saved from BigCommerce:
* **API Path** (retrieved from BigCommerce)
* **Client ID** (retrieved from BigCommerce)
* **Access Token** (retrieved from BigCommerce)
Click **Link Store Now**.
You will be redirected back to Jetpack's Integrations page.
Your BigCommerce integration will now show as **Connected**.
During the initial setup, you can choose to sync existing products automatically from your BigCommerce store to Jetpack. For future updates, you can use the Quick Setup option to sync products.
***
## Syncing Products
BigCommerce products can be synced to Jetpack during initial setup or at any time using the Quick Setup option.
### How Product Syncing Works
* **Unique Identifier**: Jetpack uses the SKU from BigCommerce as the unique identifier for syncing products. If no SKU is provided, the automatically generated product ID from BigCommerce is used.
* **Product Variants**: In BigCommerce, product variants (e.g., different sizes or colors) are optional. Jetpack will import each variant as a unique product with its own Inventory ID.
* **Product Images**: When products are synced, their images from BigCommerce are automatically imported to Jetpack. Any changes to product images in BigCommerce will update in the Jetpack dashboard.
Do not change or edit the Product code/SKU in BigCommerce after syncing, as it may result in duplicate entries in Jetpack.
***
## Enabling Automatic Order Import
Jetpack can automatically import orders from BigCommerce every 30 minutes, or you can import orders manually as needed.
### Setting Up Automatic Order Import
Go to **Settings > Account Settings > Store Management** tab.
Check the **Fetch Orders Every 30 minutes** box for your BigCommerce store.
Select the **Start shipping date** using the calendar picker. Jetpack can import orders from up to the past 120 days.
Click **Save** to enable automatic order import.
Only orders with valid shipping addresses, without exclusion rules, and in the status of **Awaiting Fulfillment** will be imported from BigCommerce.
### Manually Importing Orders
You can also import orders manually from your BigCommerce store:
Enter the following information you saved from BigCommerce:
* **API Path** (retrieved from BigCommerce)
* **Client ID** (retrieved from BigCommerce)
* **Access Token** (retrieved from BigCommerce)
Click **Link Store Now**.
You will be redirected back to Jetpack's Integrations page.
Your BigCommerce integration will now show as **Connected**.
During the initial setup, you can choose to sync existing products automatically from your BigCommerce store to Jetpack. For future updates, you can use the Quick Setup option to sync products.
***
## Syncing Products
BigCommerce products can be synced to Jetpack during initial setup or at any time using the Quick Setup option.
### How Product Syncing Works
* **Unique Identifier**: Jetpack uses the SKU from BigCommerce as the unique identifier for syncing products. If no SKU is provided, the automatically generated product ID from BigCommerce is used.
* **Product Variants**: In BigCommerce, product variants (e.g., different sizes or colors) are optional. Jetpack will import each variant as a unique product with its own Inventory ID.
* **Product Images**: When products are synced, their images from BigCommerce are automatically imported to Jetpack. Any changes to product images in BigCommerce will update in the Jetpack dashboard.
Do not change or edit the Product code/SKU in BigCommerce after syncing, as it may result in duplicate entries in Jetpack.
***
## Enabling Automatic Order Import
Jetpack can automatically import orders from BigCommerce every 30 minutes, or you can import orders manually as needed.
### Setting Up Automatic Order Import
Go to **Settings > Account Settings > Store Management** tab.
Check the **Fetch Orders Every 30 minutes** box for your BigCommerce store.
Select the **Start shipping date** using the calendar picker. Jetpack can import orders from up to the past 120 days.
Click **Save** to enable automatic order import.
Only orders with valid shipping addresses, without exclusion rules, and in the status of **Awaiting Fulfillment** will be imported from BigCommerce.
### Manually Importing Orders
You can also import orders manually from your BigCommerce store:
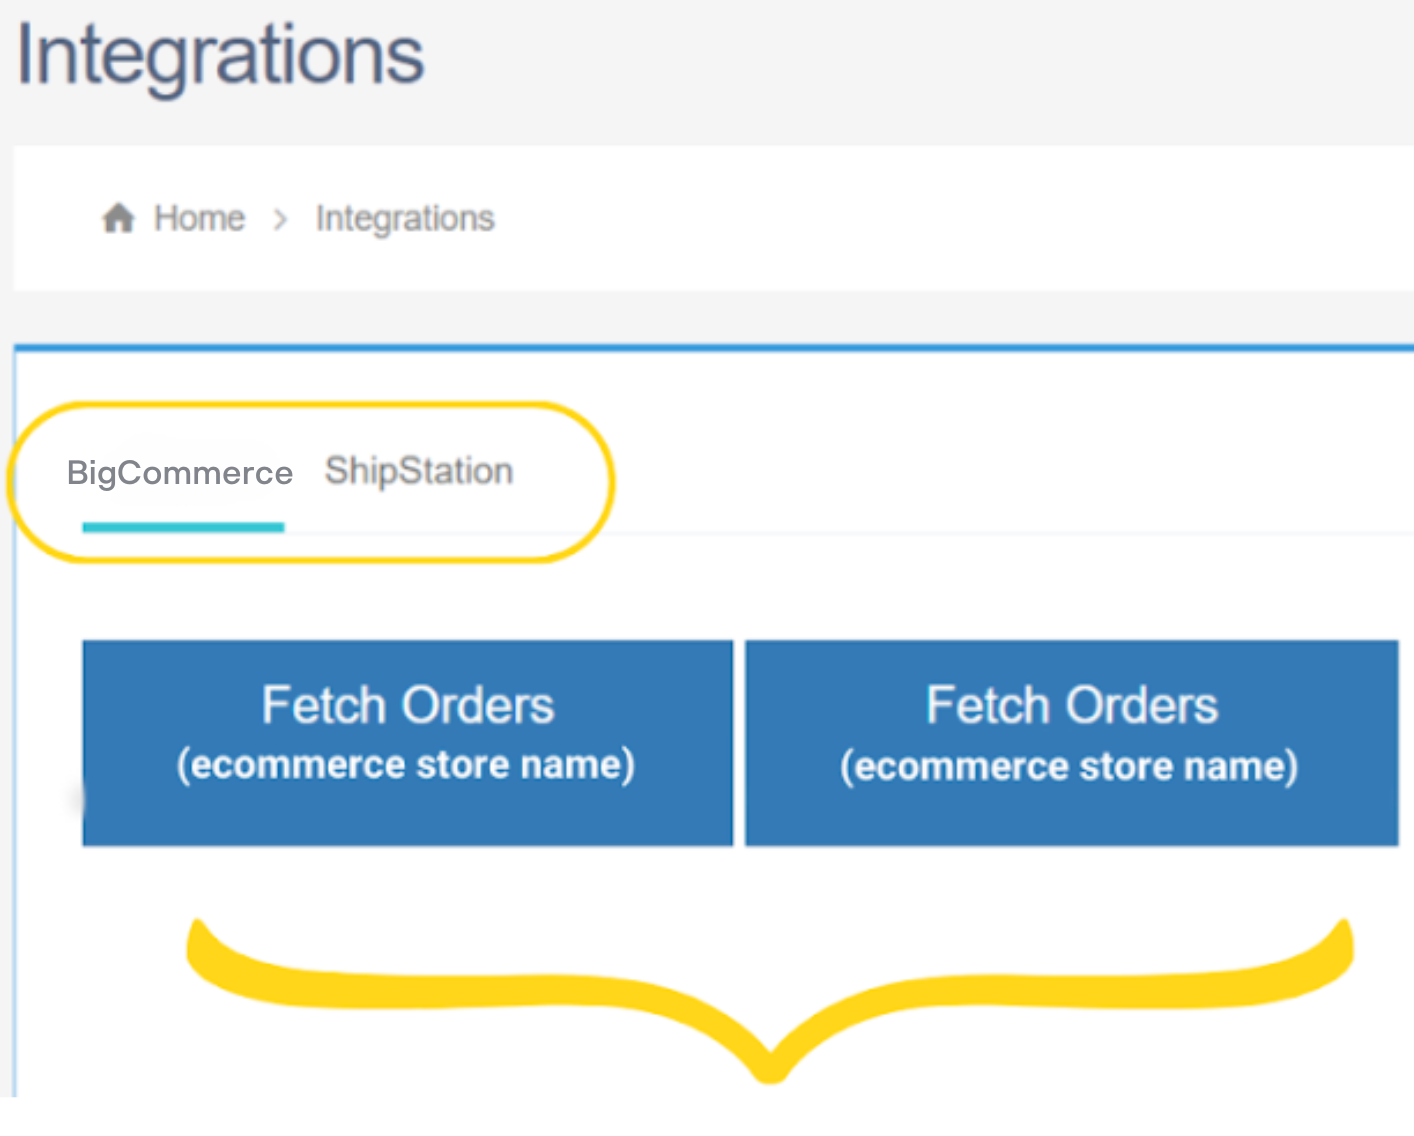 Your available orders will load.
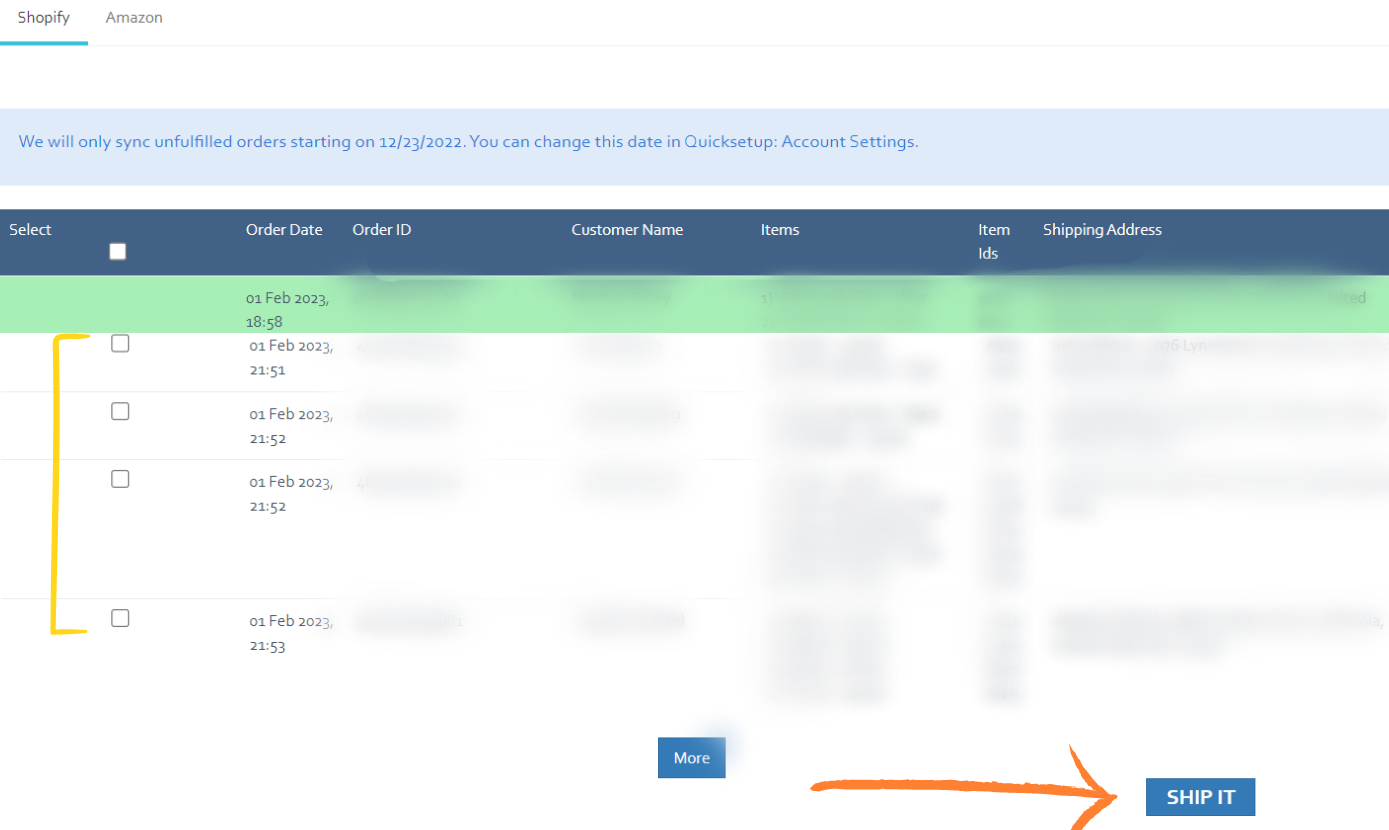 Select the orders you want to import, then click **SHIP IT** to complete the process.
***
## Enabling Inventory Sync
Jetpack can automatically update inventory levels back to BigCommerce every 15 minutes. You need to enable inventory tracking in BigCommerce first, then enable the sync in Jetpack.
### Enabling Inventory Tracking in BigCommerce
Click **Products** in the left-hand navigation, then select a product and click **View**.
Select the orders you want to import, then click **SHIP IT** to complete the process.
***
## Enabling Inventory Sync
Jetpack can automatically update inventory levels back to BigCommerce every 15 minutes. You need to enable inventory tracking in BigCommerce first, then enable the sync in Jetpack.
### Enabling Inventory Tracking in BigCommerce
Click **Products** in the left-hand navigation, then select a product and click **View**.
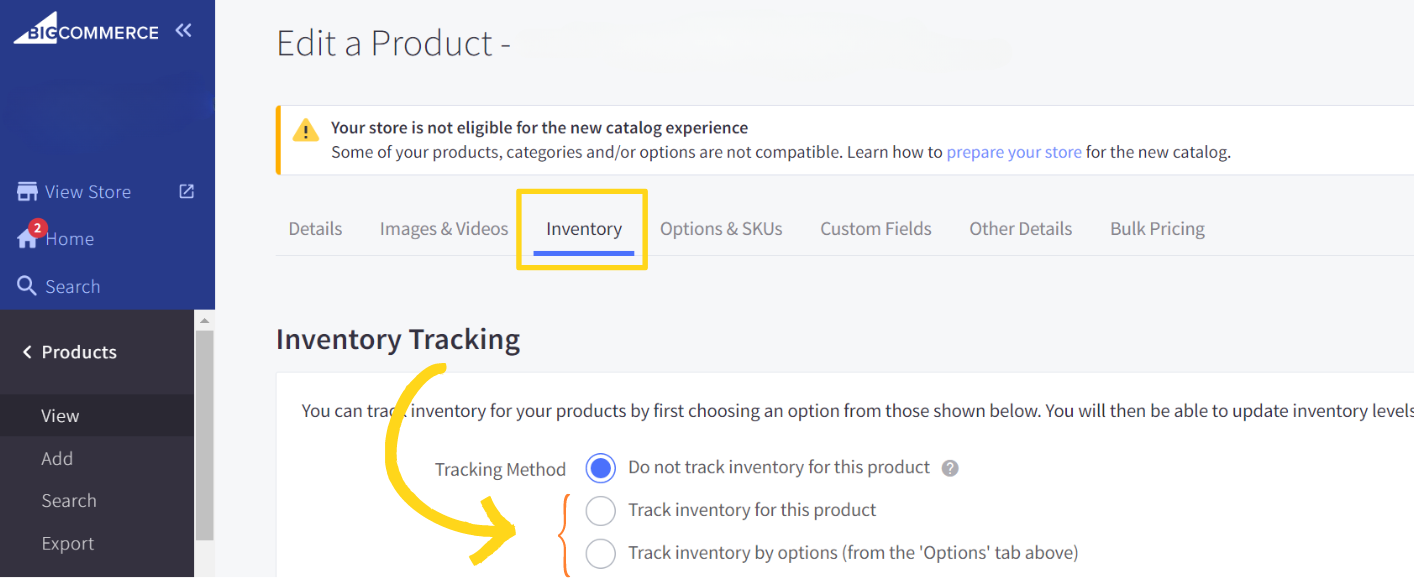 Ensure **Track inventory for this product** (or **Track inventory by options** for variants) is selected.
The stock level will update automatically after syncing with Jetpack.
### Enabling Inventory Sync in Jetpack
Ensure **Track inventory for this product** (or **Track inventory by options** for variants) is selected.
The stock level will update automatically after syncing with Jetpack.
### Enabling Inventory Sync in Jetpack
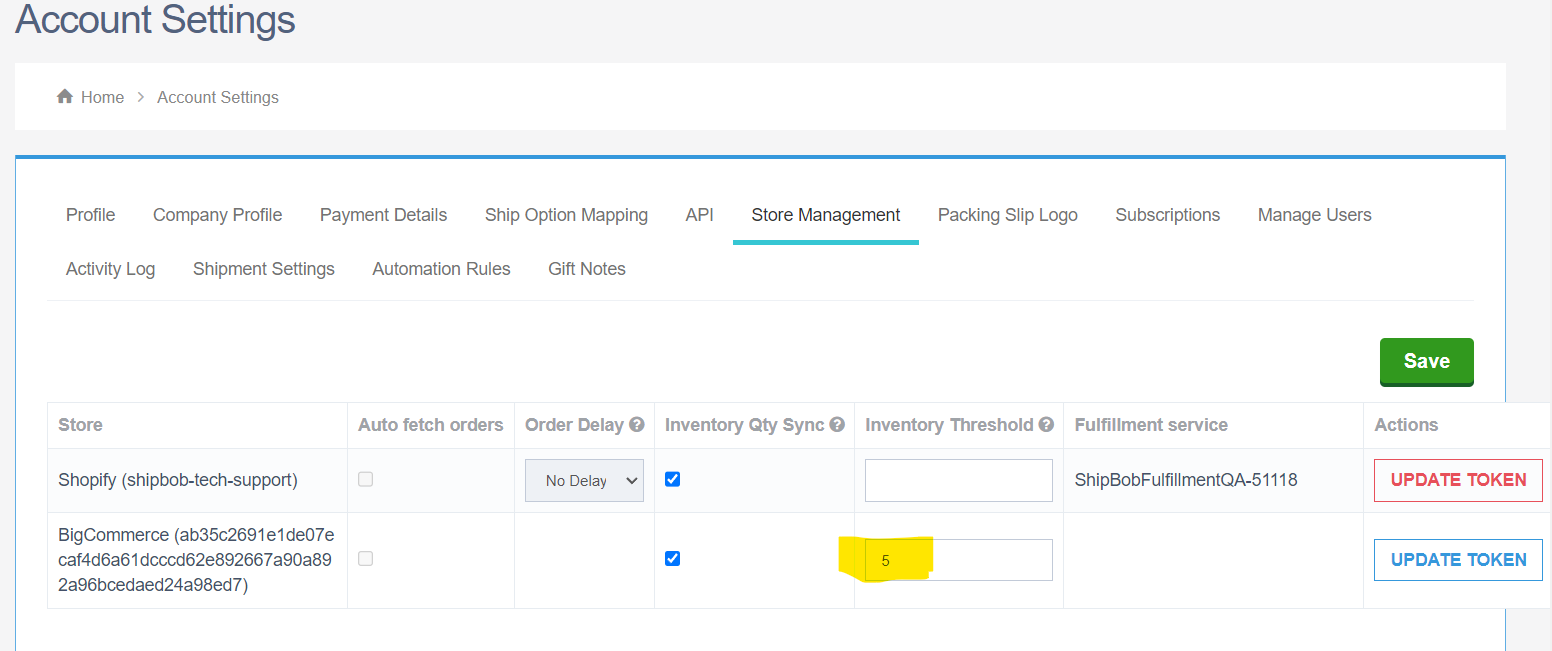 Go to **Settings > Account Settings > Store Management** tab.
Check the box under **Inventory QTY Sync** for your BigCommerce store.
Click **Save** to enable automatic inventory syncing.
### How Inventory Sync Works
Jetpack automatically updates inventory levels for both bundles and non-bundles to BigCommerce every 15 minutes:
* **For non-bundled products**: The sellable quantity is calculated as Fulfillable Quantity minus Exception Quantity.
* **For bundled products**: The sync uses the product within the bundle that has the least available units to determine the total number of bundles that can be fulfilled.
### Optional: Inventory Threshold (Safety Buffer)
You can set an inventory threshold to apply a safety buffer when syncing inventory quantities with BigCommerce. When inventory levels fall below the set value, Jetpack will post a sellable quantity of 0 to BigCommerce.
To enable inventory thresholds:
***
## Ship Option Mapping
Before Jetpack can fulfill orders, you must map your BigCommerce shipping methods to Jetpack ship options. This ensures orders ship using the correct carrier service based on the customer's selection at checkout.
[Learn how to configure Ship Option Mapping here](/fulfillment/account-setup/shipping-preferences/choosing-default-carriers).
***
## Verifying Your Integration
After installation and configuration, create a test order to verify the integration is working correctly:
After confirming your integration works, cancel the test order in your Jetpack dashboard to avoid fulfillment charges.
***
## BigCommerce Integration Features
### Automatic Tracking Number Updates
When Jetpack ships an order, the integration automatically updates BigCommerce with tracking information:
* Tracking number syncs to the order in BigCommerce
* Order status updates to "Shipped"
* BigCommerce sends a shipment notification email to the customer with the tracking link
* Tracking updates are visible in both the BigCommerce admin and customer account
### Product Variants Support
BigCommerce product variants (such as size, color, or style options) sync to Jetpack automatically:
* Each variant is treated as a separate SKU in Jetpack
* Variant options are appended to the product name in Jetpack's Product Catalog
* Inventory is tracked separately for each variant
### Gift Messages and Order Comments
**Gift Messages**: Any gift messages added in BigCommerce sync to Jetpack and are included on the packing slip when the order ships.
**Order Comments**: Comments added to orders in BigCommerce sync to Jetpack and appear in the order details.
### Split Shipments
If an order ships from multiple Jetpack fulfillment centers or in multiple packages:
* Each shipment is updated in BigCommerce separately
* Each tracking number is added to the order
* The customer receives separate tracking notifications for each shipment
### Returns Processing
Jetpack does not automatically create return orders in BigCommerce. To process returns:
1. Create the return order in Jetpack (manually or via API)
2. Once processed, manually mark the order as returned or refunded in BigCommerce if needed
***
## Supported BigCommerce Features
| Feature | Supported |
| ---------------------------------------- | ---------------------------------------------- |
| **Product variants** | Yes |
| **Custom fields** | Yes |
| **Gift messages** | Yes |
| **Order comments** | Yes |
| **Multiple stores** | Yes (each store connects separately) |
| **BigCommerce Multi-Location Inventory** | Yes (requires configuration with Jetpack Care) |
***
## BigCommerce Integration FAQs
Orders typically sync within 15 minutes of being placed in BigCommerce. Only orders with "Awaiting Fulfillment" status are imported to Jetpack.
Yes, you can connect multiple BigCommerce stores to a single Jetpack account. Each store must be connected separately through the Integrations page.
Product updates in BigCommerce sync immediately to Jetpack's Product Catalog, including changes to product names, SKUs, weights, dimensions, and images.
Yes, if you use BigCommerce's multi-location inventory feature, contact Jetpack Care to configure which Jetpack fulfillment centers sync to which BigCommerce locations.
If orders aren't syncing, verify that: (1) the order status in BigCommerce is "Awaiting Fulfillment", (2) the order is paid and complete, and (3) your integration shows as "Connected" on the Integrations page. Contact Jetpack Care if issues persist.
***
## Let's Dive Deeper
View all supported ecommerce platforms
Learn how product syncing works
Understand order import methods
Manage and troubleshoot integrations
Configure shipping method mappings
Configure your Product Catalog
Go to **Settings > Account Settings > Store Management** tab.
Check the box under **Inventory QTY Sync** for your BigCommerce store.
Click **Save** to enable automatic inventory syncing.
### How Inventory Sync Works
Jetpack automatically updates inventory levels for both bundles and non-bundles to BigCommerce every 15 minutes:
* **For non-bundled products**: The sellable quantity is calculated as Fulfillable Quantity minus Exception Quantity.
* **For bundled products**: The sync uses the product within the bundle that has the least available units to determine the total number of bundles that can be fulfilled.
### Optional: Inventory Threshold (Safety Buffer)
You can set an inventory threshold to apply a safety buffer when syncing inventory quantities with BigCommerce. When inventory levels fall below the set value, Jetpack will post a sellable quantity of 0 to BigCommerce.
To enable inventory thresholds:
***
## Ship Option Mapping
Before Jetpack can fulfill orders, you must map your BigCommerce shipping methods to Jetpack ship options. This ensures orders ship using the correct carrier service based on the customer's selection at checkout.
[Learn how to configure Ship Option Mapping here](/fulfillment/account-setup/shipping-preferences/choosing-default-carriers).
***
## Verifying Your Integration
After installation and configuration, create a test order to verify the integration is working correctly:
After confirming your integration works, cancel the test order in your Jetpack dashboard to avoid fulfillment charges.
***
## BigCommerce Integration Features
### Automatic Tracking Number Updates
When Jetpack ships an order, the integration automatically updates BigCommerce with tracking information:
* Tracking number syncs to the order in BigCommerce
* Order status updates to "Shipped"
* BigCommerce sends a shipment notification email to the customer with the tracking link
* Tracking updates are visible in both the BigCommerce admin and customer account
### Product Variants Support
BigCommerce product variants (such as size, color, or style options) sync to Jetpack automatically:
* Each variant is treated as a separate SKU in Jetpack
* Variant options are appended to the product name in Jetpack's Product Catalog
* Inventory is tracked separately for each variant
### Gift Messages and Order Comments
**Gift Messages**: Any gift messages added in BigCommerce sync to Jetpack and are included on the packing slip when the order ships.
**Order Comments**: Comments added to orders in BigCommerce sync to Jetpack and appear in the order details.
### Split Shipments
If an order ships from multiple Jetpack fulfillment centers or in multiple packages:
* Each shipment is updated in BigCommerce separately
* Each tracking number is added to the order
* The customer receives separate tracking notifications for each shipment
### Returns Processing
Jetpack does not automatically create return orders in BigCommerce. To process returns:
1. Create the return order in Jetpack (manually or via API)
2. Once processed, manually mark the order as returned or refunded in BigCommerce if needed
***
## Supported BigCommerce Features
| Feature | Supported |
| ---------------------------------------- | ---------------------------------------------- |
| **Product variants** | Yes |
| **Custom fields** | Yes |
| **Gift messages** | Yes |
| **Order comments** | Yes |
| **Multiple stores** | Yes (each store connects separately) |
| **BigCommerce Multi-Location Inventory** | Yes (requires configuration with Jetpack Care) |
***
## BigCommerce Integration FAQs
Orders typically sync within 15 minutes of being placed in BigCommerce. Only orders with "Awaiting Fulfillment" status are imported to Jetpack.
Yes, you can connect multiple BigCommerce stores to a single Jetpack account. Each store must be connected separately through the Integrations page.
Product updates in BigCommerce sync immediately to Jetpack's Product Catalog, including changes to product names, SKUs, weights, dimensions, and images.
Yes, if you use BigCommerce's multi-location inventory feature, contact Jetpack Care to configure which Jetpack fulfillment centers sync to which BigCommerce locations.
If orders aren't syncing, verify that: (1) the order status in BigCommerce is "Awaiting Fulfillment", (2) the order is paid and complete, and (3) your integration shows as "Connected" on the Integrations page. Contact Jetpack Care if issues persist.
***
## Let's Dive Deeper
View all supported ecommerce platforms
Learn how product syncing works
Understand order import methods
Manage and troubleshoot integrations
Configure shipping method mappings
Configure your Product Catalog

Questions? Contact Jetpack Care.
If you have any questions or run into issues, you can always contact Jetpack Care for help. Our team is always here to assist via Slack, phone, or email!