> ## Documentation Index
> Fetch the complete documentation index at: https://help.jetpack3pl.com/llms.txt
> Use this file to discover all available pages before exploring further.
# Importing Your Orders
> Learn all the ways to get orders into Jetpack for fulfillment, from automatic syncing to bulk importing and manual order creation.
Once your inventory is received and available in Jetpack Fulfillment Centers, you're ready to start fulfilling orders. Jetpack offers multiple methods to import orders into the system, from fully automatic syncing with your integrated store to manual order creation for B2B and wholesale shipments.
## Order Import Methods Overview
Jetpack supports four primary methods for importing orders, each designed for different use cases:
| Import Method | How It Works | Best For | Setup Complexity |
| ----------------------------- | ------------------------------------------------------------------------------------------------------------------------------------------------------------ | --------------------------------------------------------------- | --------------------------------------- |
| **Automatic Syncing** | - Orders sync automatically from integrated stores
- Happens within minutes of order placement
- No manual intervention required
| D2C ecommerce stores, daily order volume | Low - Configure once during integration |
| **Manual Syncing** | - Manually trigger order sync from integrated stores
- Select specific orders to import
- On-demand import control
| Selective order fulfillment, testing, troubleshooting | Low - Use dashboard controls |
| **Bulk Excel Import** | - Upload orders via Excel template
- Supports B2B and B2C orders
- Maximum quantity limits apply
| Wholesale orders, non-integrated platforms, large order batches | Medium - Template formatting required |
| **Individual Order Creation** | - Create orders one at a time in dashboard
- Full control over order details
- Supports B2C, B2B, and FBA orders
| Test orders, one-off shipments, custom B2B orders | Low - Simple form entry |
For most merchants, **automatic syncing** is the most efficient method. Set it up during your store integration and orders will flow seamlessly from your ecommerce platform to Jetpack for fulfillment.
***
## Automatic Order Syncing from Ecommerce Integrations
Automatic syncing is the primary way B2C merchants fulfill orders through Jetpack. When enabled, new orders from your integrated store flow automatically into the Jetpack system for fulfillment.
### How Automatic Syncing Works
When a customer places an order on your integrated ecommerce platform:
1. **Order syncs to Jetpack** - Within minutes, the order appears in your Jetpack dashboard
2. **Order processing begins** - Based on your automation rules, Jetpack selects carrier, shipping speed, and packaging
3. **Order fulfills from nearest FC** - Inventory allocates from the optimal Fulfillment Center
4. **Tracking updates automatically** - Tracking numbers push back to your store and notify customers
5. **Inventory decrements in real-time** - Your store's inventory count updates as orders ship
### Supported Platforms for Automatic Syncing
Automatic order syncing is available for all major ecommerce integrations:
* **Shopify** - Full automation with real-time syncing
* **Amazon** - Seller Central orders (FBA and FBM)
* **BigCommerce** - Complete order automation
* **WooCommerce** - WordPress store integration
* **Adobe Commerce (Magento)** - Enterprise platform support
* **eBay, Walmart, TikTok, Temu** - Marketplace order syncing
For platform-specific configuration, see the [Store Integration Overview](/fulfillment/account-setup/integrating-store).
### Enabling Automatic Syncing
Automatic syncing is configured during your initial store integration setup. To verify or enable automatic syncing:
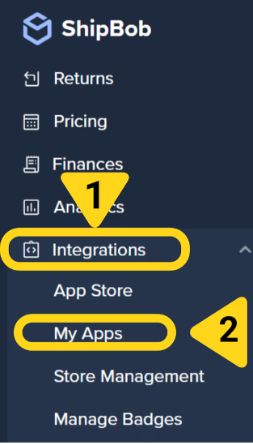 Choose **Connection Settings** from the menu.
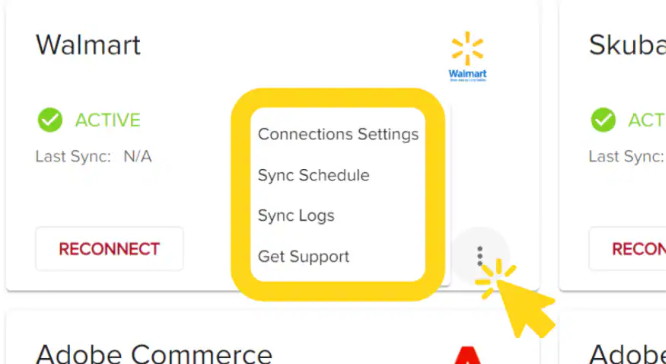 Select a **Start Shipping date** (this can be a date in the past up to 120 days, or a future date).
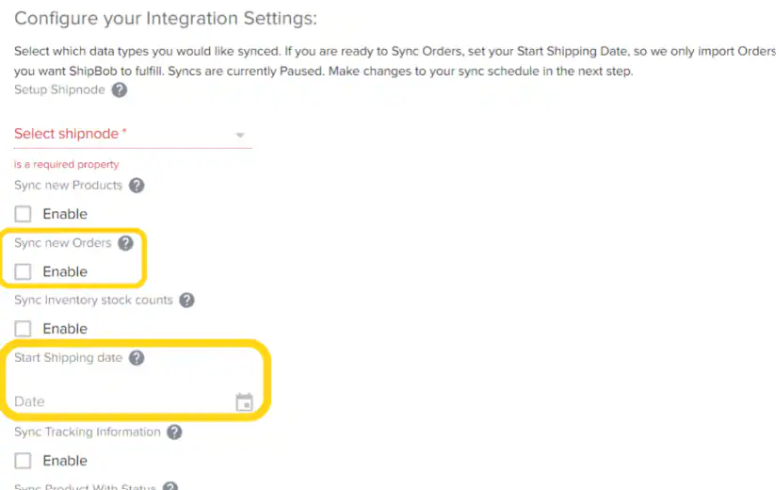 Before enabling automatic syncing for the first time, send a test order through your store to verify the connection works correctly. This ensures orders flow properly and automation rules apply as expected.
***
## Manual Order Syncing from Ecommerce Integrations
Manual syncing gives you control over which orders import from your integrated stores. This is useful when:
* Testing your integration setup
* Selectively fulfilling orders (e.g., only certain SKUs or order types)
* Troubleshooting order sync issues
* Holding orders temporarily before fulfillment
### How to Manually Sync Orders
**From the Jetpack dashboard:**
Additional menu options will appear.
You will be redirected to the Orders page.
Before enabling automatic syncing for the first time, send a test order through your store to verify the connection works correctly. This ensures orders flow properly and automation rules apply as expected.
***
## Manual Order Syncing from Ecommerce Integrations
Manual syncing gives you control over which orders import from your integrated stores. This is useful when:
* Testing your integration setup
* Selectively fulfilling orders (e.g., only certain SKUs or order types)
* Troubleshooting order sync issues
* Holding orders temporarily before fulfillment
### How to Manually Sync Orders
**From the Jetpack dashboard:**
Additional menu options will appear.
You will be redirected to the Orders page.
 Each integration appears as its own tab. Choose your store from the drop-down menu.
Orders that have already been imported are marked with a gray checkbox.
Each integration appears as its own tab. Choose your store from the drop-down menu.
Orders that have already been imported are marked with a gray checkbox.
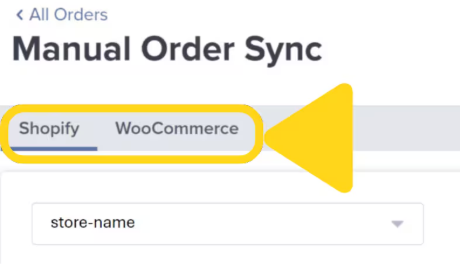 Click the **Sync** button next to each order you want to import—or select multiple orders and click **Sync Orders** at once.
Orders will appear in your **Orders** page within minutes.
### When Manual Syncing Makes Sense
| Scenario | Why Use Manual Sync | Example |
| ------------------------- | ------------------------------------------------------- | ------------------------------------------------ |
| **Testing Integration** | Verify orders sync correctly before enabling automation | Import 1-2 test orders to confirm data accuracy |
| **Selective Fulfillment** | Only fulfill specific order types or products | Sync only wholesale orders, hold retail orders |
| **Troubleshooting** | Diagnose why specific orders didn't auto-sync | Manually sync problem orders to identify issues |
| **Temporary Holds** | Pause auto-sync during inventory transitions | Manually sync orders after new inventory arrives |
Even when manually syncing orders, your automation rules still apply. Orders will process according to your configured shipping preferences, carrier selection, and fulfillment rules.
***
## Bulk Order Import via Excel Template
Bulk importing allows you to upload multiple orders at once using an Excel template. This method is essential for B2B wholesale orders, orders from non-integrated platforms, or large order batches that don't come through a connected integration.
### When to Use Bulk Import
| Use Case | Description |
| ---------------------------- | --------------------------------------------------------------------------------------------------------------------------------------------------------------------- |
| **B2B Wholesale Orders** |
Click the **Sync** button next to each order you want to import—or select multiple orders and click **Sync Orders** at once.
Orders will appear in your **Orders** page within minutes.
### When Manual Syncing Makes Sense
| Scenario | Why Use Manual Sync | Example |
| ------------------------- | ------------------------------------------------------- | ------------------------------------------------ |
| **Testing Integration** | Verify orders sync correctly before enabling automation | Import 1-2 test orders to confirm data accuracy |
| **Selective Fulfillment** | Only fulfill specific order types or products | Sync only wholesale orders, hold retail orders |
| **Troubleshooting** | Diagnose why specific orders didn't auto-sync | Manually sync problem orders to identify issues |
| **Temporary Holds** | Pause auto-sync during inventory transitions | Manually sync orders after new inventory arrives |
Even when manually syncing orders, your automation rules still apply. Orders will process according to your configured shipping preferences, carrier selection, and fulfillment rules.
***
## Bulk Order Import via Excel Template
Bulk importing allows you to upload multiple orders at once using an Excel template. This method is essential for B2B wholesale orders, orders from non-integrated platforms, or large order batches that don't come through a connected integration.
### When to Use Bulk Import
| Use Case | Description |
| ---------------------------- | --------------------------------------------------------------------------------------------------------------------------------------------------------------------- |
| **B2B Wholesale Orders** | - Large wholesale shipments to retail partners
- Bulk orders with multiple SKUs and quantities
- Orders with custom shipping requirements
|
| **Non-Integrated Platforms** | - Orders from sales channels without direct Jetpack integration
- Custom order management systems
- Manual order entry from sales reps
|
| **Marketplace Orders** | - Orders from smaller marketplaces
- International marketplaces without integrations
|
### Bulk Import Limits and Guidelines
Jetpack's bulk import feature has specific limits and formatting requirements:
| Requirement | Limit/Guideline |
| ----------------------------- | --------------------------------------------------------------------------------------------------------------------------------------------------- |
| **Maximum Orders per Upload** | Varies by account type (typically 1,000-5,000 orders) |
| **File Format** | Excel (.xlsx) or CSV (.csv) |
| **Required Fields** | - Order number (unique identifier)
- SKU(s) and quantities
- Shipping name and address
- Shipping method or speed
|
| **Optional Fields** | - Gift notes
- Custom order tags
- Requested ship date
- Special handling instructions
|
| **Template Download** | Available in dashboard under **Orders > Bulk Import** |
### How to Bulk Import Orders
**From the Jetpack dashboard:**
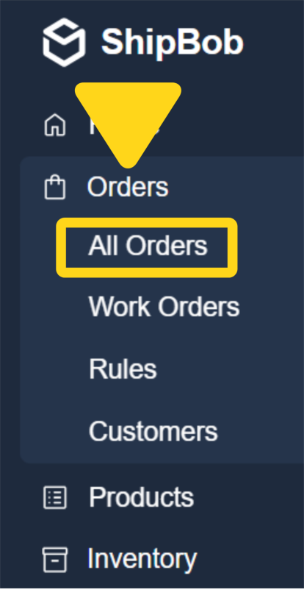
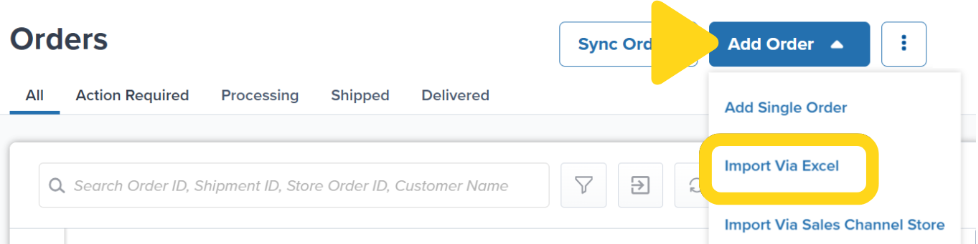 Fill in your order details following the template format:
* One row per order line item
* Include all required fields
* Use exact SKU names as they appear in your Product Catalog
* Format addresses correctly with all required fields
Fill in your order details following the template format:
* One row per order line item
* Include all required fields
* Use exact SKU names as they appear in your Product Catalog
* Format addresses correctly with all required fields
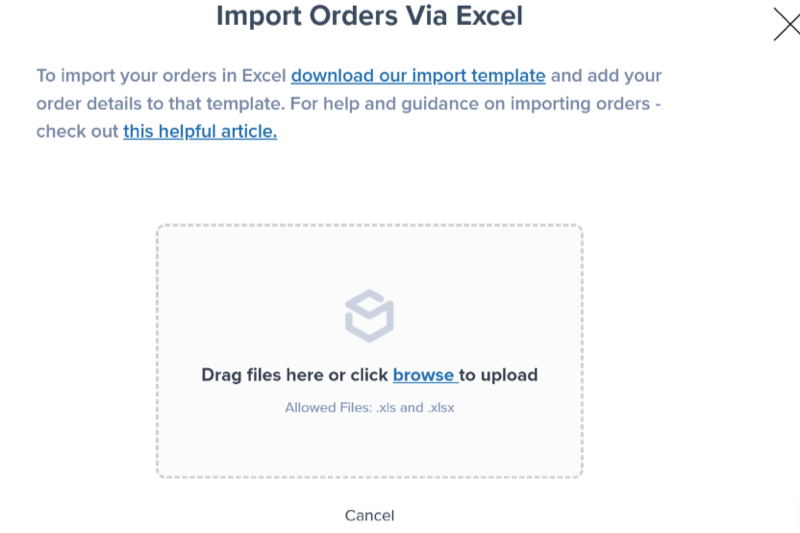 Review that the total number of orders matches what you expect.
Orders will appear in your **Orders** page within a few minutes and begin processing according to your automation rules.
All SKUs in your bulk import must exactly match SKUs in your Product Catalog. Mismatched SKUs will cause import errors. Verify your SKU names before uploading.
### Bulk Import Best Practices
* **Test with small batches first** - Upload 5-10 orders to verify template formatting before large uploads
* **Use consistent formatting** - Match address formats, date formats, and field naming conventions
* **Validate SKUs beforehand** - Export your Product Catalog and cross-check SKU names
* **Include all required fields** - Missing fields cause validation errors and delay processing
* **Check for duplicate order numbers** - Duplicate order numbers will be rejected or overwrite existing orders
***
## Individually Creating Manual Orders
For one-off orders, test orders, or custom B2B shipments, you can create orders individually directly in the Jetpack dashboard. This gives you complete control over every order detail.
### Types of Manual Orders
Jetpack supports creating three types of manual orders:
| Order Type | Description | Common Uses |
| ------------------------------ | -------------------------------------------------------------------------------------------------------------------------------------------- | ----------------------------------------------------- |
| **B2C (Direct-to-Consumer)** |
Review that the total number of orders matches what you expect.
Orders will appear in your **Orders** page within a few minutes and begin processing according to your automation rules.
All SKUs in your bulk import must exactly match SKUs in your Product Catalog. Mismatched SKUs will cause import errors. Verify your SKU names before uploading.
### Bulk Import Best Practices
* **Test with small batches first** - Upload 5-10 orders to verify template formatting before large uploads
* **Use consistent formatting** - Match address formats, date formats, and field naming conventions
* **Validate SKUs beforehand** - Export your Product Catalog and cross-check SKU names
* **Include all required fields** - Missing fields cause validation errors and delay processing
* **Check for duplicate order numbers** - Duplicate order numbers will be rejected or overwrite existing orders
***
## Individually Creating Manual Orders
For one-off orders, test orders, or custom B2B shipments, you can create orders individually directly in the Jetpack dashboard. This gives you complete control over every order detail.
### Types of Manual Orders
Jetpack supports creating three types of manual orders:
| Order Type | Description | Common Uses |
| ------------------------------ | -------------------------------------------------------------------------------------------------------------------------------------------- | ----------------------------------------------------- |
| **B2C (Direct-to-Consumer)** | - Single-item or multi-item orders
- Ships to residential addresses
- Standard ecommerce order format
| Test orders, manual customer orders, gift shipments |
| **B2B (Business-to-Business)** | - Wholesale orders to business addresses
- Often larger quantities
- May include custom packaging or labeling
| Wholesale shipments, retail distribution, trade shows |
| **FBA (Amazon FBA Prep)** | - Orders prepared for Amazon FBA shipment
- Includes FBA labeling and prep
- Ships to Amazon fulfillment centers
| Amazon FBA inventory replenishment, FBA prep services |
### How to Create a Manual Order
**From the Jetpack dashboard:**
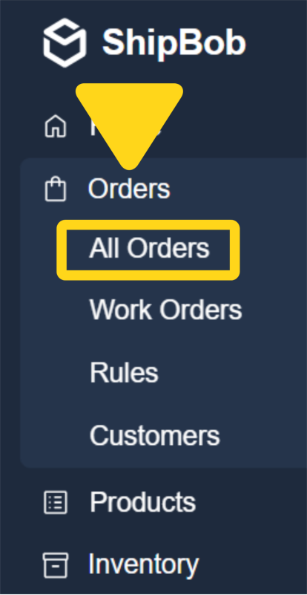
Select **All Orders** from the expanded menu options.
 Choose **Business** (B2B), **Consumer** (B2C), or **Amazon FBA**.
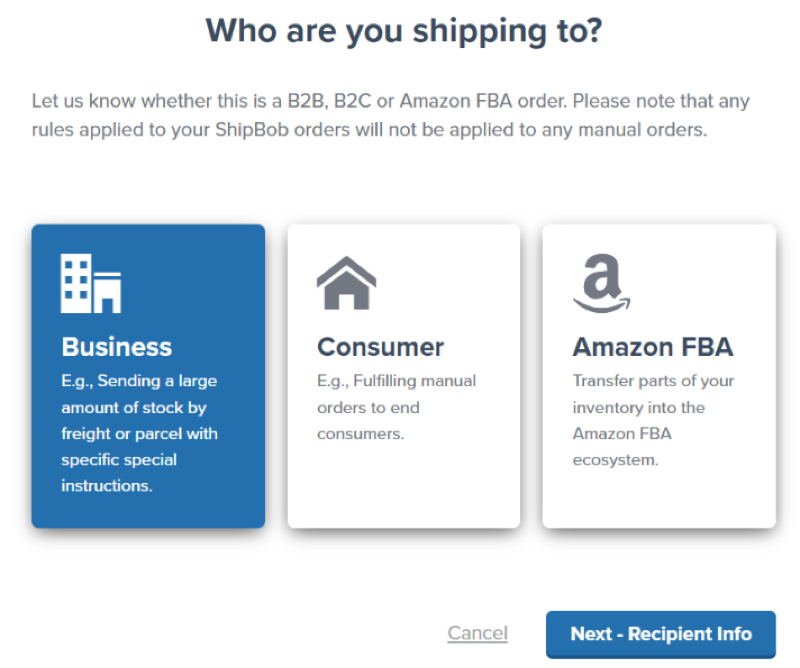 Review and edit recipient information if needed, then click **Next**.
Jetpack validates the address and notifies you if the address is invalid.
On the **New Order Draft** page, add products by typing their names or selecting from the dropdown list. Input the quantity for each product.
The order will appear in your **Orders** page and begin processing immediately (unless you set a future ship date).
### Manual Order Best Practices
* **Use for testing** - Create manual test orders to verify product configuration, packaging, and shipping settings
* **Custom B2B orders** - Manually create orders for wholesale customers with specific requirements
* **One-off shipments** - Sample orders, replacements, promotional shipments
* **FBA prep** - Create FBA orders when you need Jetpack to prep inventory for Amazon
Like all orders in Jetpack, manually created orders still respect your automation rules for carrier selection, packaging preferences, and fulfillment routing—unless you override settings at the order level.
***
## Order Status and Monitoring
After orders are imported (regardless of method), you can monitor their progress through the order lifecycle:
| Order Status | What It Means | What Happens Next |
| ------------------------ | ------------------------------------------------------------------------------------------------------------------- | ----------------------------------------------------------- |
| **Awaiting Fulfillment** |
Review and edit recipient information if needed, then click **Next**.
Jetpack validates the address and notifies you if the address is invalid.
On the **New Order Draft** page, add products by typing their names or selecting from the dropdown list. Input the quantity for each product.
The order will appear in your **Orders** page and begin processing immediately (unless you set a future ship date).
### Manual Order Best Practices
* **Use for testing** - Create manual test orders to verify product configuration, packaging, and shipping settings
* **Custom B2B orders** - Manually create orders for wholesale customers with specific requirements
* **One-off shipments** - Sample orders, replacements, promotional shipments
* **FBA prep** - Create FBA orders when you need Jetpack to prep inventory for Amazon
Like all orders in Jetpack, manually created orders still respect your automation rules for carrier selection, packaging preferences, and fulfillment routing—unless you override settings at the order level.
***
## Order Status and Monitoring
After orders are imported (regardless of method), you can monitor their progress through the order lifecycle:
| Order Status | What It Means | What Happens Next |
| ------------------------ | ------------------------------------------------------------------------------------------------------------------- | ----------------------------------------------------------- |
| **Awaiting Fulfillment** | - Order imported and queued
- Waiting for inventory allocation
- Not yet released to FC
| Order moves to Processing once released |
| **Processing** | - Order released to Fulfillment Center
- Being picked and packed
| Order ships within SLA timeframe |
| **Shipped** | - Order has left the FC
- Tracking number generated
- In carrier's possession
| Order in transit to customer |
| **Action Required** | - Order needs attention
- Could be address issue, inventory shortage, special handling
| Resolve issue in dashboard, then order continues processing |
| **Completed** | - Order delivered successfully
- Fulfillment cycle complete
| No further action needed |
Learn more about order statuses in the [Order Status Overview](/fulfillment/d2c/order-status) or how to handle issues in [Orders With Action Required](/fulfillment/d2c/orders-action-required).
***
## Choosing the Right Import Method
Not sure which import method is best for your business? Use this decision guide:
**Recommended Method**: Automatic Order Syncing
Set up your store integration and enable automatic order syncing. This is the most efficient method for daily order fulfillment and requires no manual intervention.
See: [Store Integration Overview](/fulfillment/account-setup/integrating-store)
**Recommended Methods**: Bulk Excel Import or Individual B2B Order Creation
* Use **Bulk Import** for recurring wholesale orders or large order batches
* Use **Manual B2B Order Creation** for one-off wholesale shipments
See: [Creating Manual B2B/Wholesale Orders](/fulfillment/b2b/creating-manual-b2b-orders)
**Recommended Method**: Manual FBA Order Creation or Automated FBA Integration
* Use **Manual FBA Order Creation** for occasional FBA prep needs
* Set up **Automated FBA Shipments** for regular FBA replenishment
See: [Creating Automated FBA Shipments](/fulfillment/b2b/amazon-fba/creating-automated-fba-shipments)
**Recommended Methods**: Bulk Excel Import or Manual Syncing via Middleware
* Use **Bulk Import** to upload orders from multiple sources in batches
* Consider integrating a middleware platform like Order Desk or ShipStation that connects to Jetpack
See: [Other Integrations](/fulfillment/account-setup/other-integrations/order-desk)
**Recommended Method**: Manual Order Creation
Create 1-2 test orders manually to verify:
* Product configuration is correct
* Shipping settings work as expected
* Automation rules apply properly
* Order flow end-to-end functions correctly
See: Creating B2C orders in the dashboard
***
## Troubleshooting Order Import Issues
If orders aren't importing as expected, check these common issues:
| Problem | Possible Causes | How to Fix |
| ----------------------------------- | ----------------------------------------------------------------------------------------------------------------- | ------------------------------------------------------------------------------------------------------------------------------------------------------------------------------------------- |
| **Orders not auto-syncing** | - Integration disconnected
- Sync schedule disabled
- Store API credentials changed
| - Check integration connection status
- Re-authenticate store connection
- Verify sync schedule is enabled
|
| **Bulk import validation errors** | - Invalid SKUs (don't match catalog)
- Missing required fields
- Incorrect formatting
| - Download fresh template
- Verify SKU names match Product Catalog exactly
- Ensure all required fields are filled
|
| **Orders stuck in Action Required** | - Address validation failed
- Insufficient inventory
- Product configuration issues
| - View order details for specific issue
- Correct address or product configuration
- See [Orders With Action Required](/fulfillment/d2c/orders-action-required)
|
| **Duplicate orders importing** | - Manual sync after auto-sync
- Multiple sync sources enabled
| - Avoid manual syncing if auto-sync is enabled
- Check for duplicate integration connections
|
For additional help, contact Jetpack Care via your Slack channel or support email.
***
## Let's Dive Deeper
Back to the Account Setup overview
Detailed D2C order import guide
B2B order creation instructions
Navigate and manage orders in your dashboard
Understanding order statuses and lifecycle
Platform-specific integration setup guides

Questions? Contact Jetpack Care.
If you have any questions or run into issues, you can always contact Jetpack Care for help. Our team is always here to assist via Slack, phone, or email!