> ## Documentation Index
> Fetch the complete documentation index at: https://help.jetpack3pl.com/llms.txt
> Use this file to discover all available pages before exploring further.
# User Management Settings
> Add, edit, and manage users in your Jetpack account, assign roles with specific permissions, and control access to your fulfillment operations.
User Management Settings allow you to control who has access to your Jetpack account and what they can do within the platform. By adding users with specific roles, you can grant appropriate access to team members, partners, and service providers while maintaining security and operational control.
## What Is User Management?
User Management is the process of adding, editing, and removing users from your Jetpack account. Each user has:
* **Individual login credentials** - Unique email and password
* **Assigned role** - Determines permissions and access levels
* **Personal profile** - Name, contact information, and security settings
* **Activity tracking** - Login history and actions taken in the dashboard
Proper user management ensures the right people have the right access to your fulfillment operations.
***
## User Roles and Permissions
Jetpack offers four user roles, each with different permission levels:
| Role | Who Should Have This Role | Key Permissions | Common Use Cases |
| ----------------------------------- | -------------------------------------------------------------------------------------------------------- | ------------------------------------------------------------------------------------------------------------------------------------------------------------------------------------------------------------------------------------------------------------- | ---------------------------------------------------------------- |
| **Account Owner** | - Business owner
- CEO or primary decision maker
- Only one per account
| - Full access to all settings and features
- Can edit company profile settings
- Can add/edit/remove all users
- Can view billing and invoices
- Can contact Jetpack Care for account changes
| Primary account administrator and billing contact |
| **Client Admin** | - Operations manager
- Fulfillment director
- Senior team members
| - Full access to operational settings
- Can edit company profile settings
- Can add/edit/remove users (except Account Owner)
- Can manage products, orders, inventory
- Can configure integrations and shipping rules
| Day-to-day operations management and team administration |
| **Customer Success & Supply Chain** | - Logistics coordinators
- Operations specialists
- Team leads
| - Can view and manage orders
- Can view and manage inventory
- Can create and manage WROs
- Can manage products and SKUs
- Cannot edit user settings or company profile
- Cannot access billing
| Daily fulfillment operations without administrative access |
| **Customer Success** | - Customer support agents
- Junior team members
- Read-only monitoring users
| - Can view orders and order status
- Can view inventory levels
- Can view product catalog
- Cannot edit orders, inventory, or products
- Cannot access settings or billing
| Customer support and order tracking without editing capabilities |
Assign the **least privileged role** that allows users to complete their job responsibilities. This follows security best practices and prevents accidental changes by users who don't need editing permissions.
***
## Accessing User Management Settings
To view and manage users in your account:
Click **Users**, **User Management**, or **Team**.
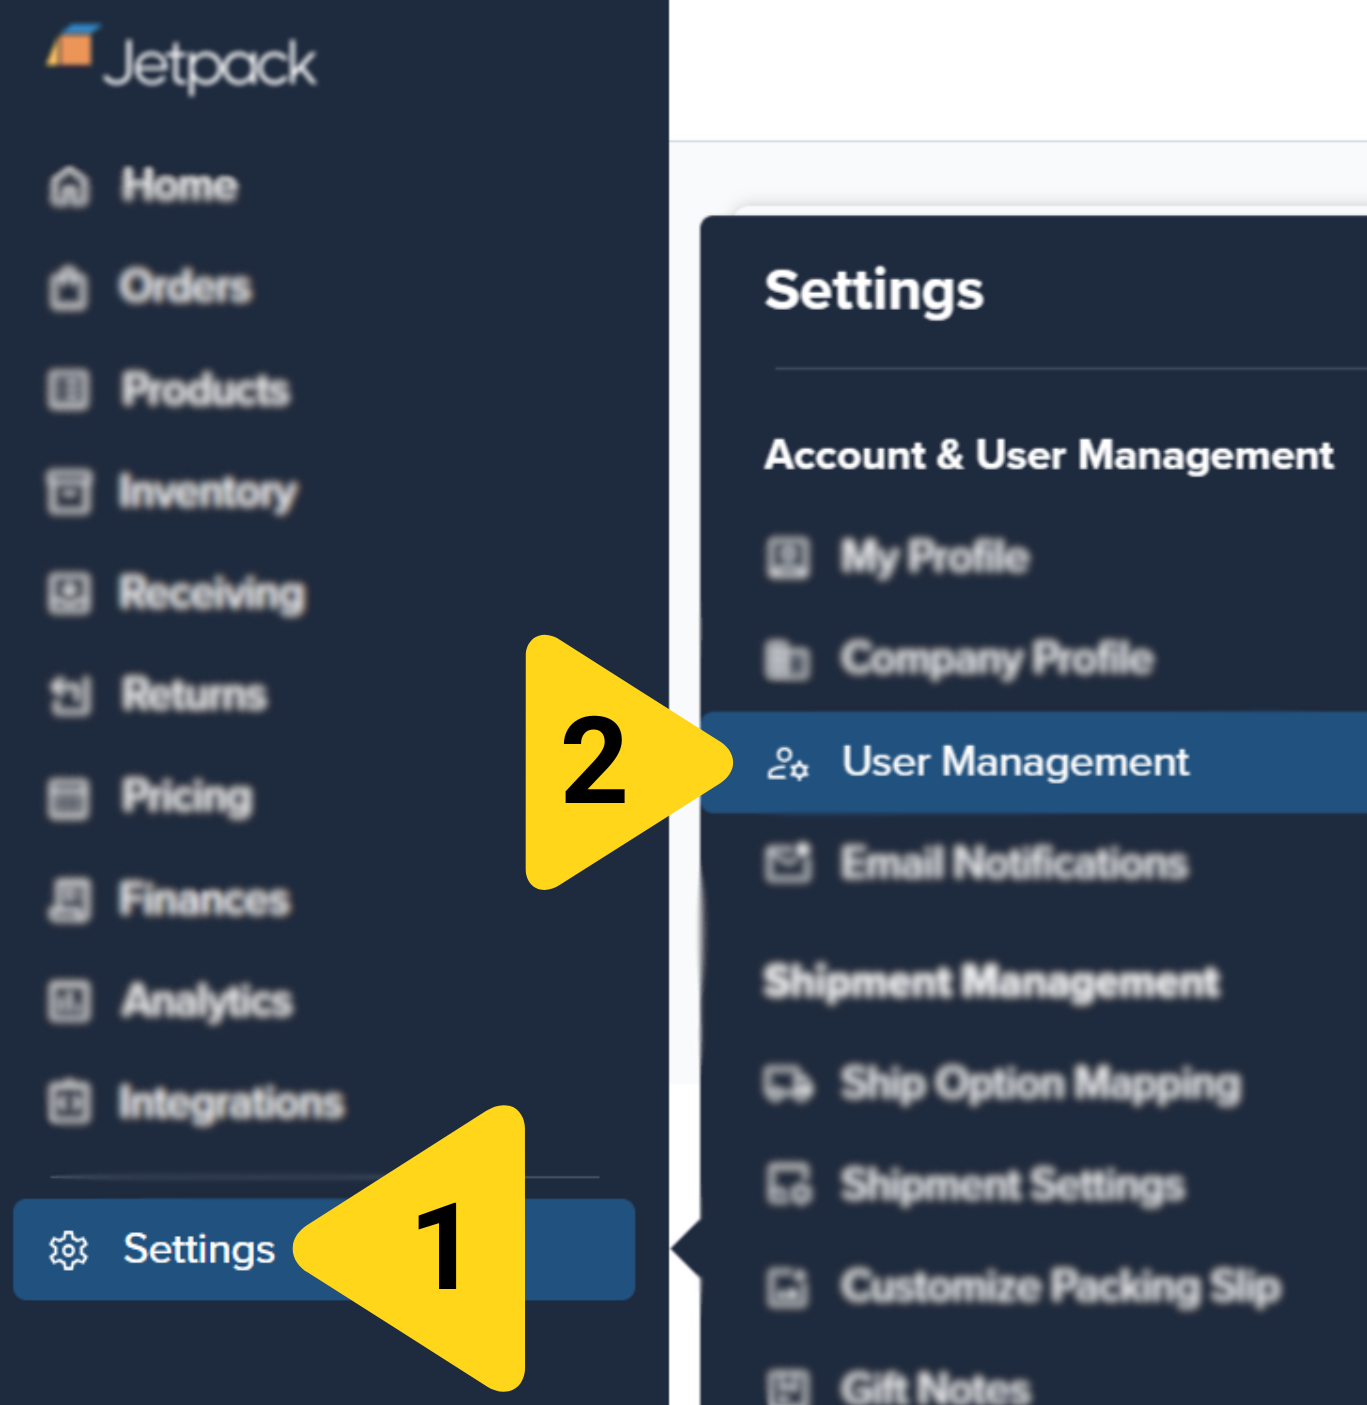 You'll see a list of all users in your account with their:
* Name
* Email address
* Role
* Status (Active, Pending Invitation, Deactivated)
* Last login date
You'll see a list of all users in your account with their:
* Name
* Email address
* Role
* Status (Active, Pending Invitation, Deactivated)
* Last login date
 Only **Account Owners** and **Client Admins** can access User Management Settings and add, edit, or remove users. If you don't see this option in your Settings menu, contact your Account Owner or Admin.
***
## Adding New Users
To add a new user to your Jetpack account:
Navigate to **Settings > Users** or **User Management**.
Click **Add User**, **Invite User**, or **+ New User**.
Only **Account Owners** and **Client Admins** can access User Management Settings and add, edit, or remove users. If you don't see this option in your Settings menu, contact your Account Owner or Admin.
***
## Adding New Users
To add a new user to your Jetpack account:
Navigate to **Settings > Users** or **User Management**.
Click **Add User**, **Invite User**, or **+ New User**.
 **Enter required user information:**
* **First Name** - User's given name
* **Last Name** - User's surname
* **Email Address** - User's login email (must be unique, not already in your account)
* **User Role** - Select from Account Owner, Client Admin, Customer Success & Supply Chain, or Customer Success
**Enter required user information:**
* **First Name** - User's given name
* **Last Name** - User's surname
* **Email Address** - User's login email (must be unique, not already in your account)
* **User Role** - Select from Account Owner, Client Admin, Customer Success & Supply Chain, or Customer Success
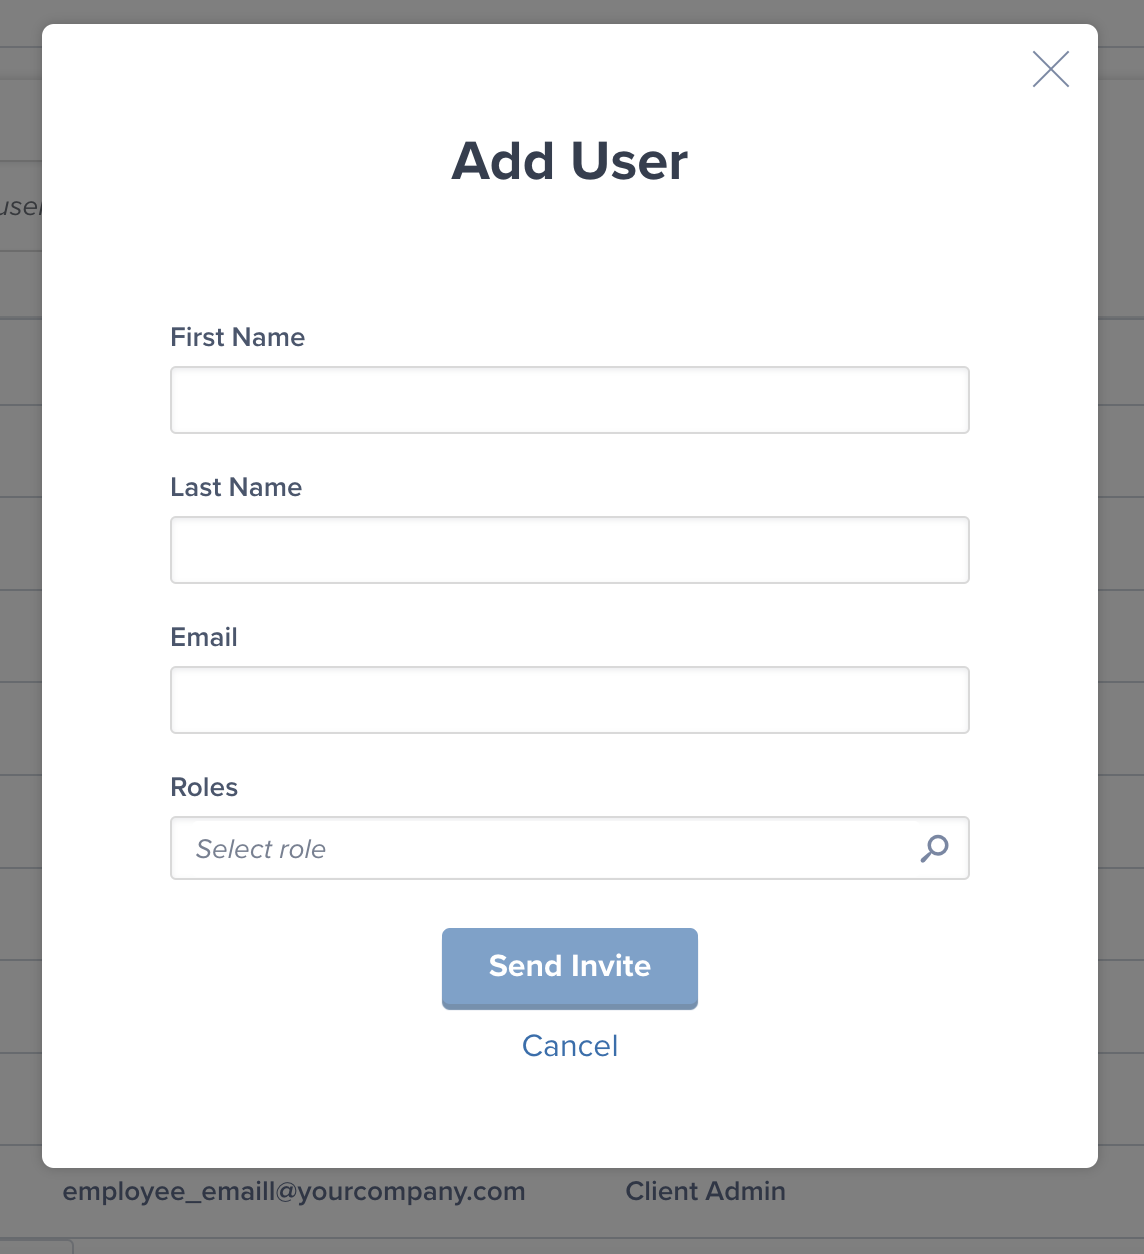 Click **Send Invitation** or **Add User**.
**What happens next:**
1. **Invitation email sent** - Jetpack sends an invitation email to the user's email address
2. **User receives invitation** - The email contains a unique invitation link and instructions
3. **User creates account** - The user clicks the link and completes account setup:
* Creates a password
* Sets up profile information
* Optionally enables two-factor authentication (or required if MFA is enforced)
4. **User account activated** - Once setup is complete, the user can log in with their email and password
**Invitation status:**
While an invitation is pending (user hasn't created their account yet):
* User status shows **Pending Invitation** in User Management
* User cannot log in until they complete account setup
* You can resend the invitation or revoke it if needed
After sending an invitation, notify the new user directly (via Slack, phone, or separate email) to watch for the invitation email. Invitation emails sometimes end up in spam folders.
***
## Editing Existing Users
To modify information for an existing user:
Navigate to **Settings > Users** or **User Management**.
Find the user you want to edit in the user list.
Click the **Edit** button, pencil icon, or three-dot menu next to their name.
**Editable fields:**
* **First Name** - Update the user's first name
* **Last Name** - Update the user's last name
* **User Role** - Change the user's assigned role
Click **Send Invitation** or **Add User**.
**What happens next:**
1. **Invitation email sent** - Jetpack sends an invitation email to the user's email address
2. **User receives invitation** - The email contains a unique invitation link and instructions
3. **User creates account** - The user clicks the link and completes account setup:
* Creates a password
* Sets up profile information
* Optionally enables two-factor authentication (or required if MFA is enforced)
4. **User account activated** - Once setup is complete, the user can log in with their email and password
**Invitation status:**
While an invitation is pending (user hasn't created their account yet):
* User status shows **Pending Invitation** in User Management
* User cannot log in until they complete account setup
* You can resend the invitation or revoke it if needed
After sending an invitation, notify the new user directly (via Slack, phone, or separate email) to watch for the invitation email. Invitation emails sometimes end up in spam folders.
***
## Editing Existing Users
To modify information for an existing user:
Navigate to **Settings > Users** or **User Management**.
Find the user you want to edit in the user list.
Click the **Edit** button, pencil icon, or three-dot menu next to their name.
**Editable fields:**
* **First Name** - Update the user's first name
* **Last Name** - Update the user's last name
* **User Role** - Change the user's assigned role
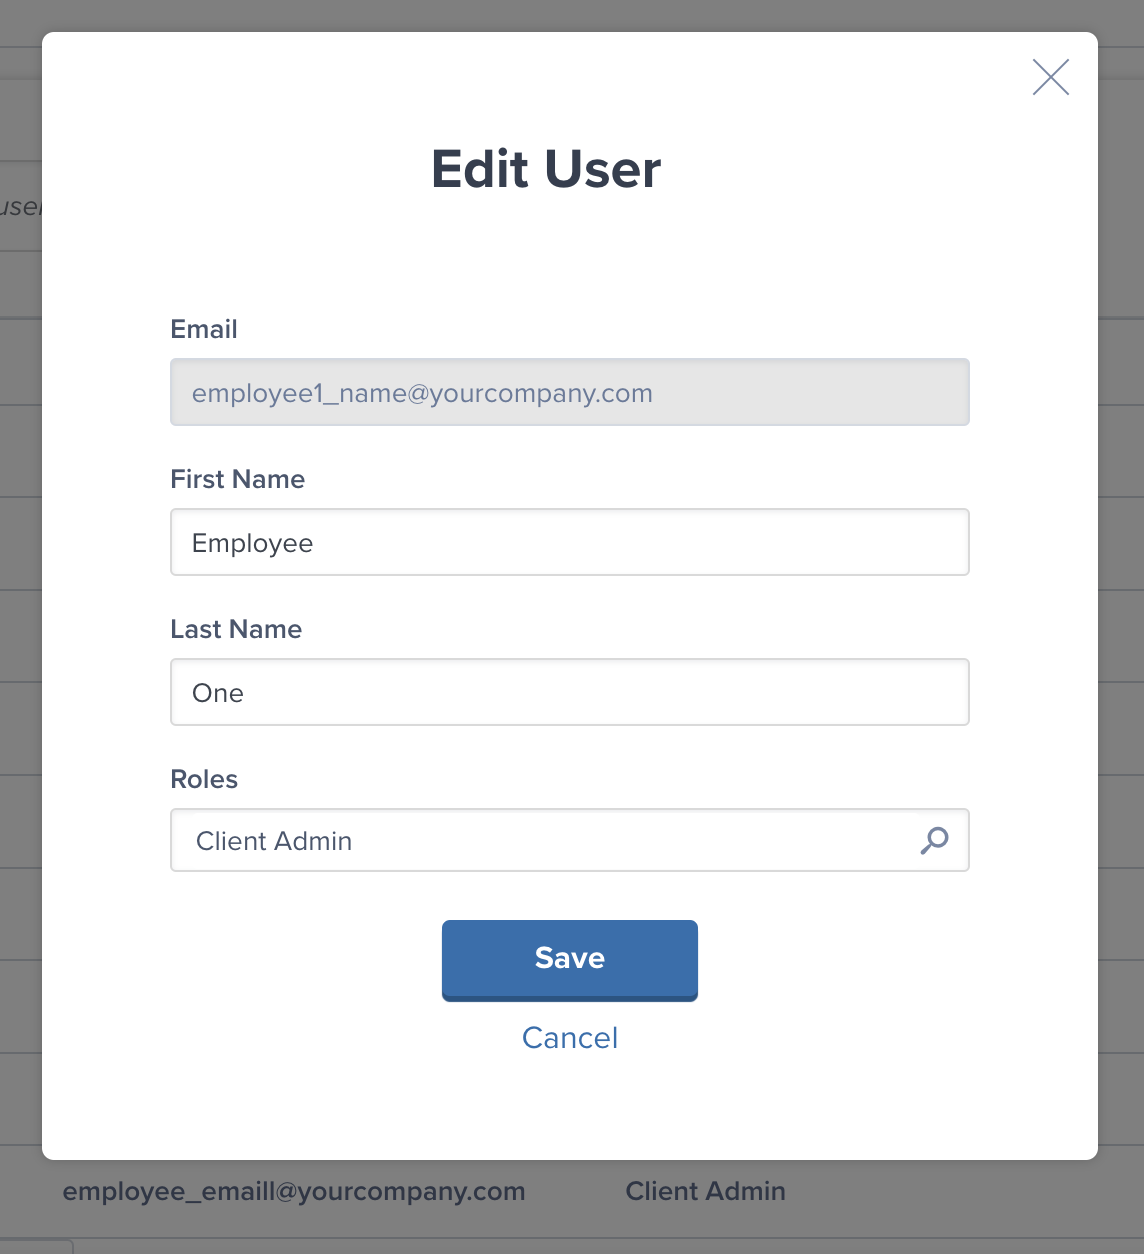 Click **Save** or **Update User**.
**What you can edit:**
* User's first and last name
* User's assigned role (upgrade or downgrade permissions)
**What you cannot edit:**
* User's email address (must remove user and re-invite with new email)
* User's password (users change their own passwords in [My Profile Settings](/fulfillment/account-setup/accounts-users/my-profile-settings))
* User's MFA settings (users manage their own MFA in profile settings)
When you change a user's role, their permissions update immediately. If you downgrade a user from Admin to a lower role, they'll lose access to settings and features requiring Admin permissions.
***
## Removing Users
To remove a user from your Jetpack account:
Navigate to **Settings > Users** or **User Management**.
Find the user you want to remove in the user list.
Click the **Delete** button, trash icon, or three-dot menu next to their name.
Select **Remove User**, **Deactivate**, or **Delete**.
A dialog will ask you to confirm.
* Warning: This action cannot be undone
* The user will immediately lose access to your Jetpack account
Click **Save** or **Update User**.
**What you can edit:**
* User's first and last name
* User's assigned role (upgrade or downgrade permissions)
**What you cannot edit:**
* User's email address (must remove user and re-invite with new email)
* User's password (users change their own passwords in [My Profile Settings](/fulfillment/account-setup/accounts-users/my-profile-settings))
* User's MFA settings (users manage their own MFA in profile settings)
When you change a user's role, their permissions update immediately. If you downgrade a user from Admin to a lower role, they'll lose access to settings and features requiring Admin permissions.
***
## Removing Users
To remove a user from your Jetpack account:
Navigate to **Settings > Users** or **User Management**.
Find the user you want to remove in the user list.
Click the **Delete** button, trash icon, or three-dot menu next to their name.
Select **Remove User**, **Deactivate**, or **Delete**.
A dialog will ask you to confirm.
* Warning: This action cannot be undone
* The user will immediately lose access to your Jetpack account
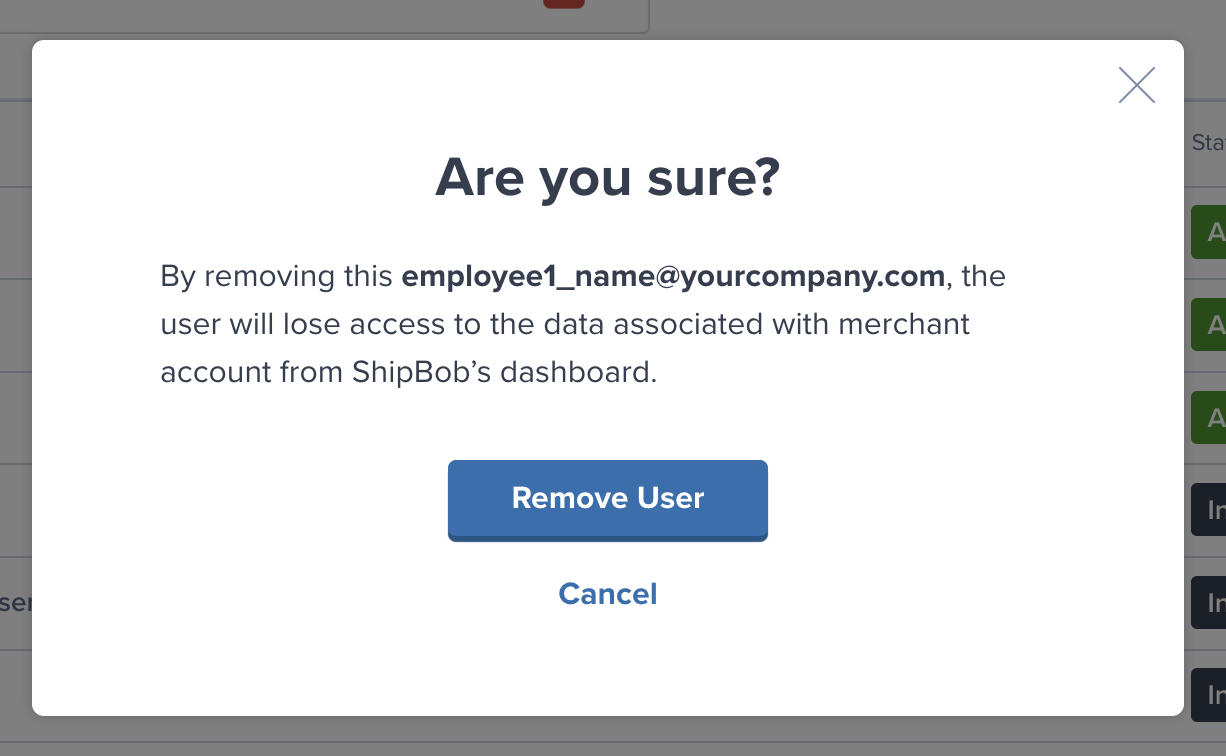 Click **Confirm** or **Remove User**.
**What happens when you remove a user:**
| Aspect | What Happens After Removal |
| ------------------- | ----------------------------------------------------------------------------------------------------------------------------------------------------------------------------------------------- |
| **Login Access** |
Click **Confirm** or **Remove User**.
**What happens when you remove a user:**
| Aspect | What Happens After Removal |
| ------------------- | ----------------------------------------------------------------------------------------------------------------------------------------------------------------------------------------------- |
| **Login Access** | - User can no longer log in to your Jetpack account
- Existing sessions are terminated immediately
- User receives no notification of removal
|
| **Historical Data** | - User's name remains on historical records (orders they created, notes they added, etc.)
- Past activity is not deleted or anonymized
- Audit trails remain intact
|
| **User Account** | - User's email address can be re-invited later if needed
- If re-invited, user must create a new password
- Previous profile settings do not carry over
|
| **Billing** | - You are not billed for deactivated users
- User seat is freed for new team members
|
You cannot remove your own user account. Contact another Admin or the Account Owner to deactivate your account if needed.
***
## Revoking Pending Invitations
If you've sent an invitation to a user who hasn't yet created their account, you can revoke the invitation:
Navigate to **Settings > Users** or **User Management**.
Find the user with **Pending Invitation** status.
Click the **Revoke Invitation** or **Cancel** button next to their name.
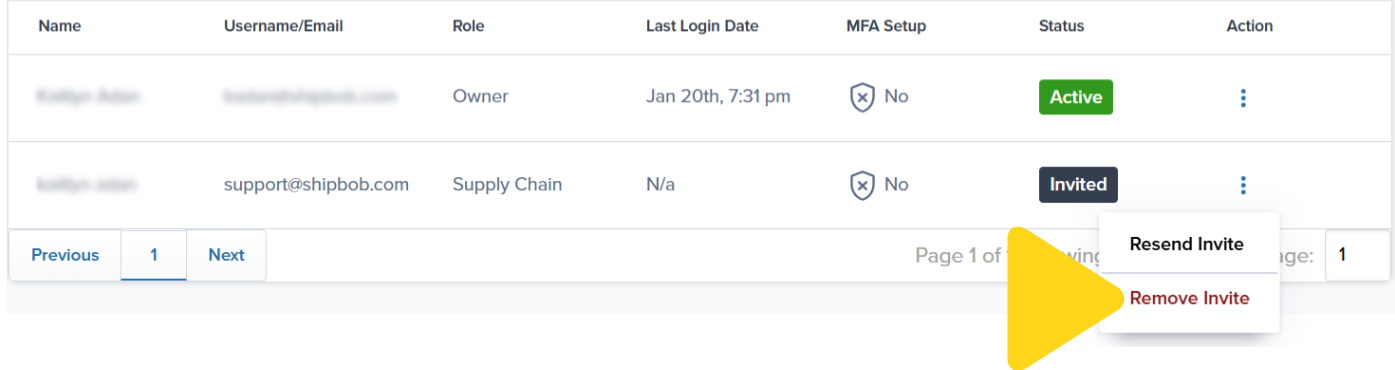 **What happens when you revoke an invitation:**
* The invitation link in the user's email becomes invalid
* The user cannot create an account using that invitation
* The user is removed from your pending user list
* You can send a new invitation to the same or different email address if needed
**Common reasons to revoke invitations:**
* You invited the wrong email address
* The user is no longer joining your team
* You want to change the user's assigned role before they activate their account
User invitations typically expire after 7 days for security reasons. If an invitation has expired, simply send a new invitation to the user—the old one is automatically invalidated.
***
## Monitoring User Activity
To view which users are actively using your Jetpack account:
Navigate to **Settings > Users** or **User Management**.
Review the user list, which shows:
* **Last Login** - When the user last logged into Jetpack
* **Status** - Active, Pending Invitation, or Deactivated
* **Role** - Current assigned permissions
**User status indicators:**
| Status | What It Means | Action Needed |
| ---------------------- | ----------------------------------------------------- | -------------------------------------------------------------------------------------------------------------------------------------------- |
| **Active** | User account is activated and can log in | No action needed |
| **Pending Invitation** | User was invited but hasn't created their account yet |
**What happens when you revoke an invitation:**
* The invitation link in the user's email becomes invalid
* The user cannot create an account using that invitation
* The user is removed from your pending user list
* You can send a new invitation to the same or different email address if needed
**Common reasons to revoke invitations:**
* You invited the wrong email address
* The user is no longer joining your team
* You want to change the user's assigned role before they activate their account
User invitations typically expire after 7 days for security reasons. If an invitation has expired, simply send a new invitation to the user—the old one is automatically invalidated.
***
## Monitoring User Activity
To view which users are actively using your Jetpack account:
Navigate to **Settings > Users** or **User Management**.
Review the user list, which shows:
* **Last Login** - When the user last logged into Jetpack
* **Status** - Active, Pending Invitation, or Deactivated
* **Role** - Current assigned permissions
**User status indicators:**
| Status | What It Means | Action Needed |
| ---------------------- | ----------------------------------------------------- | -------------------------------------------------------------------------------------------------------------------------------------------- |
| **Active** | User account is activated and can log in | No action needed |
| **Pending Invitation** | User was invited but hasn't created their account yet | - Resend invitation if needed
- Confirm user received the invitation email
- Revoke if user is no longer joining
|
| **Deactivated** | User account was removed and cannot log in | - Re-invite if user should be reactivated
- No action needed if removal was intentional
|
Review your user list quarterly to ensure only current team members have access. Remove users who have left your company or no longer need access to Jetpack.
***
## Let's Dive Deeper
Manage account-level settings for your organization
Manage your personal user information and security
Back to the Account Setup overview
Connect your store and third-party tools
Configure how your orders are packed and shipped
Navigate the Jetpack platform effectively

Questions? Contact Jetpack Care.
If you have any questions or run into issues, you can always contact Jetpack Care for help. Our team is always here to assist via Slack, phone, or email!