> ## Documentation Index
> Fetch the complete documentation index at: https://help.jetpack3pl.com/llms.txt
> Use this file to discover all available pages before exploring further.

# Company Profile Settings

> Manage your company's account-level settings including company name, sender labels, invoice preferences, and multi-factor authentication enforcement.

<div className="page-intro">
  Company Profile Settings control account-level configurations that apply to your entire Jetpack account. These settings manage your company's identifying information, communication preferences, and security policies—all of which affect how your business appears to customers and how your team accesses the platform.
</div>

## What Are Company Profile Settings?

Company Profile Settings are your organization's master account configurations. Unlike individual user settings, these apply across your entire Jetpack account and determine:

* **Company Identity** - How your business name appears in the Jetpack dashboard
* **Account Contact Information** - Primary email for account-level communications
* **Customer-Facing Branding** - Custom sender labels that appear on shipping labels
* **Financial Preferences** - Invoice delivery frequency and format
* **Security Policies** - Multi-factor authentication requirements for all users

These settings are typically managed by Account Owners or Client Admins and affect all users within your organization.

***

## Accessing Company Profile Settings

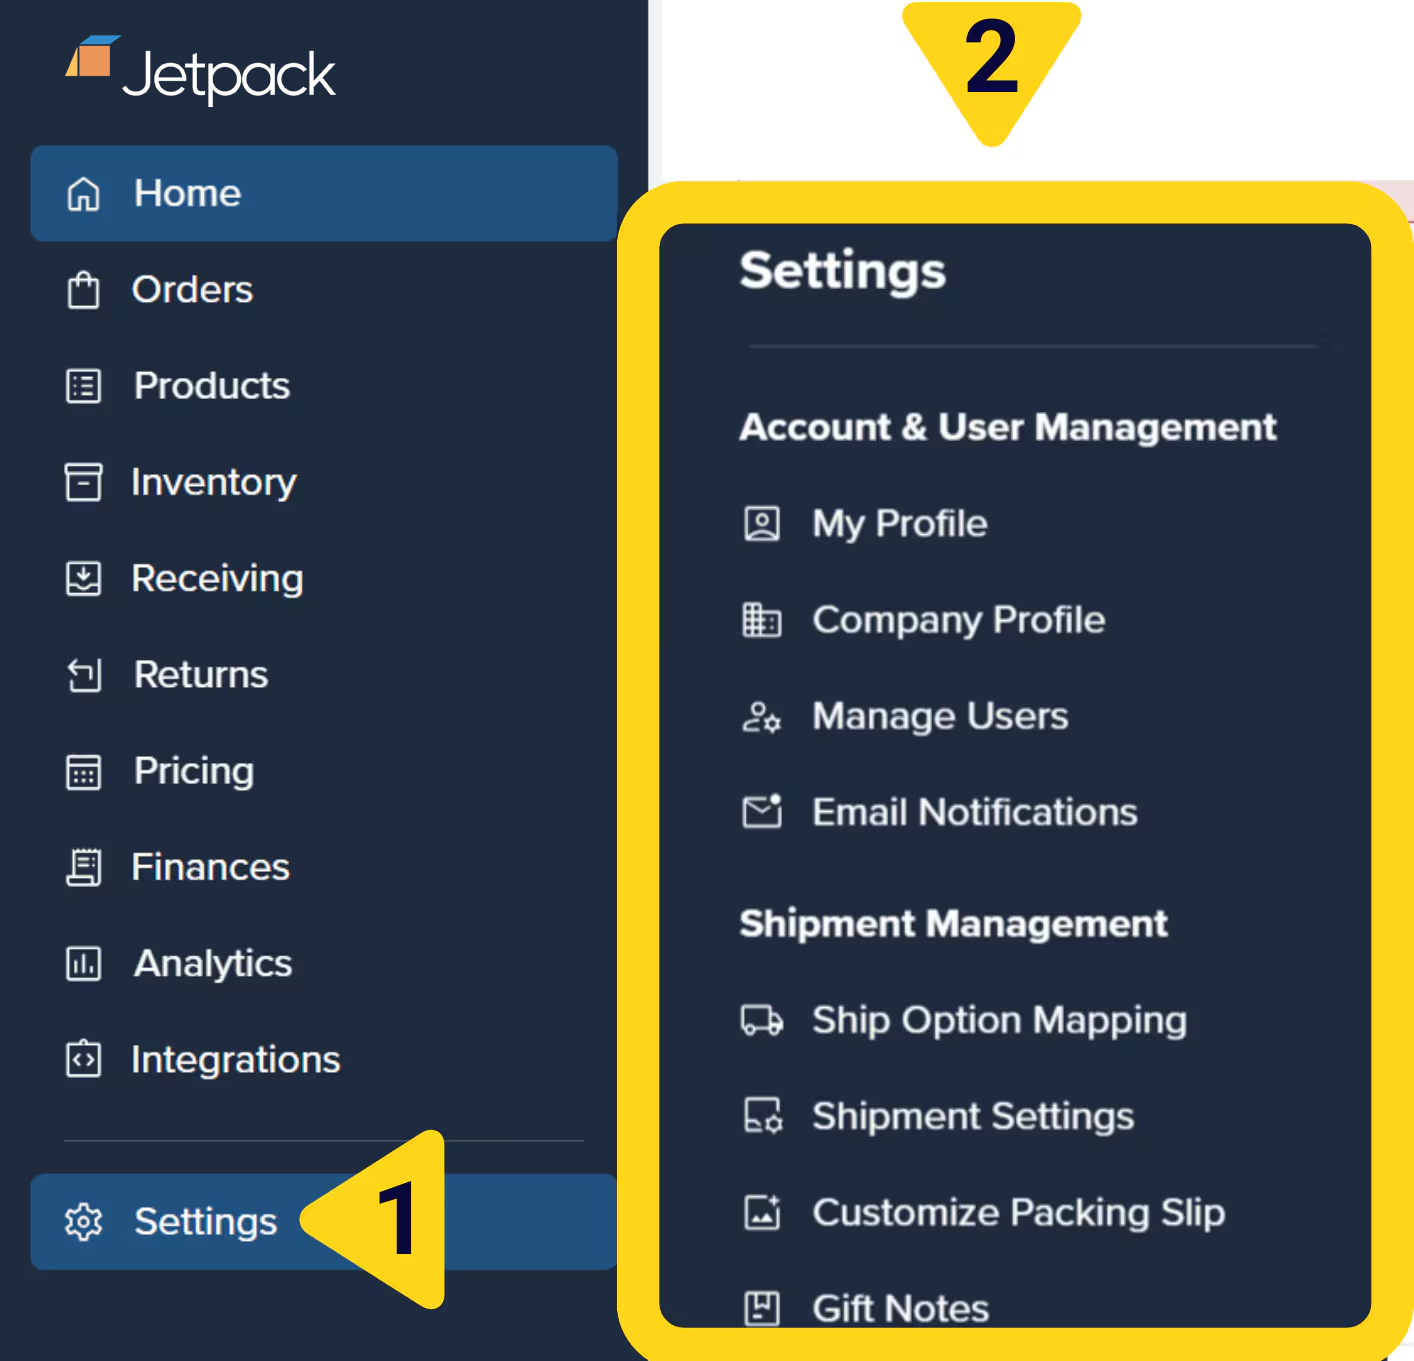
To view and edit your Company Profile Settings:

<Steps>
  <Step title="Log in to your dashboard" />

  <Step title="Navigate to Settings" />

  <Step title="Open Company Profile settings">
    Click **Company Profile** or **Account Settings**.

    <img src="https://mintcdn.com/jetpack/7RWLx3sOtyE-8irP/fulfillment/account-setup/images/company-profile-settings-navigation.png?fit=max&auto=format&n=7RWLx3sOtyE-8irP&q=85&s=42311fc1776c3b15b102f88e255d6c95" alt="Navigation showing Settings menu with Company Profile option highlighted" className="screenshot" width="1414" height="1361" data-path="fulfillment/account-setup/images/company-profile-settings-navigation.png" />
  </Step>

  <Step title="View configuration options">
    You'll see all available company-level configuration options.
  </Step>
</Steps>

<Info title="Permission Requirements">
  Only users with **Account Owner** or **Client Admin** roles can edit most Company Profile Settings. Some settings (like Account Email Id) can only be modified by Jetpack Care for security reasons.
</Info>

***

## Available Company Profile Settings

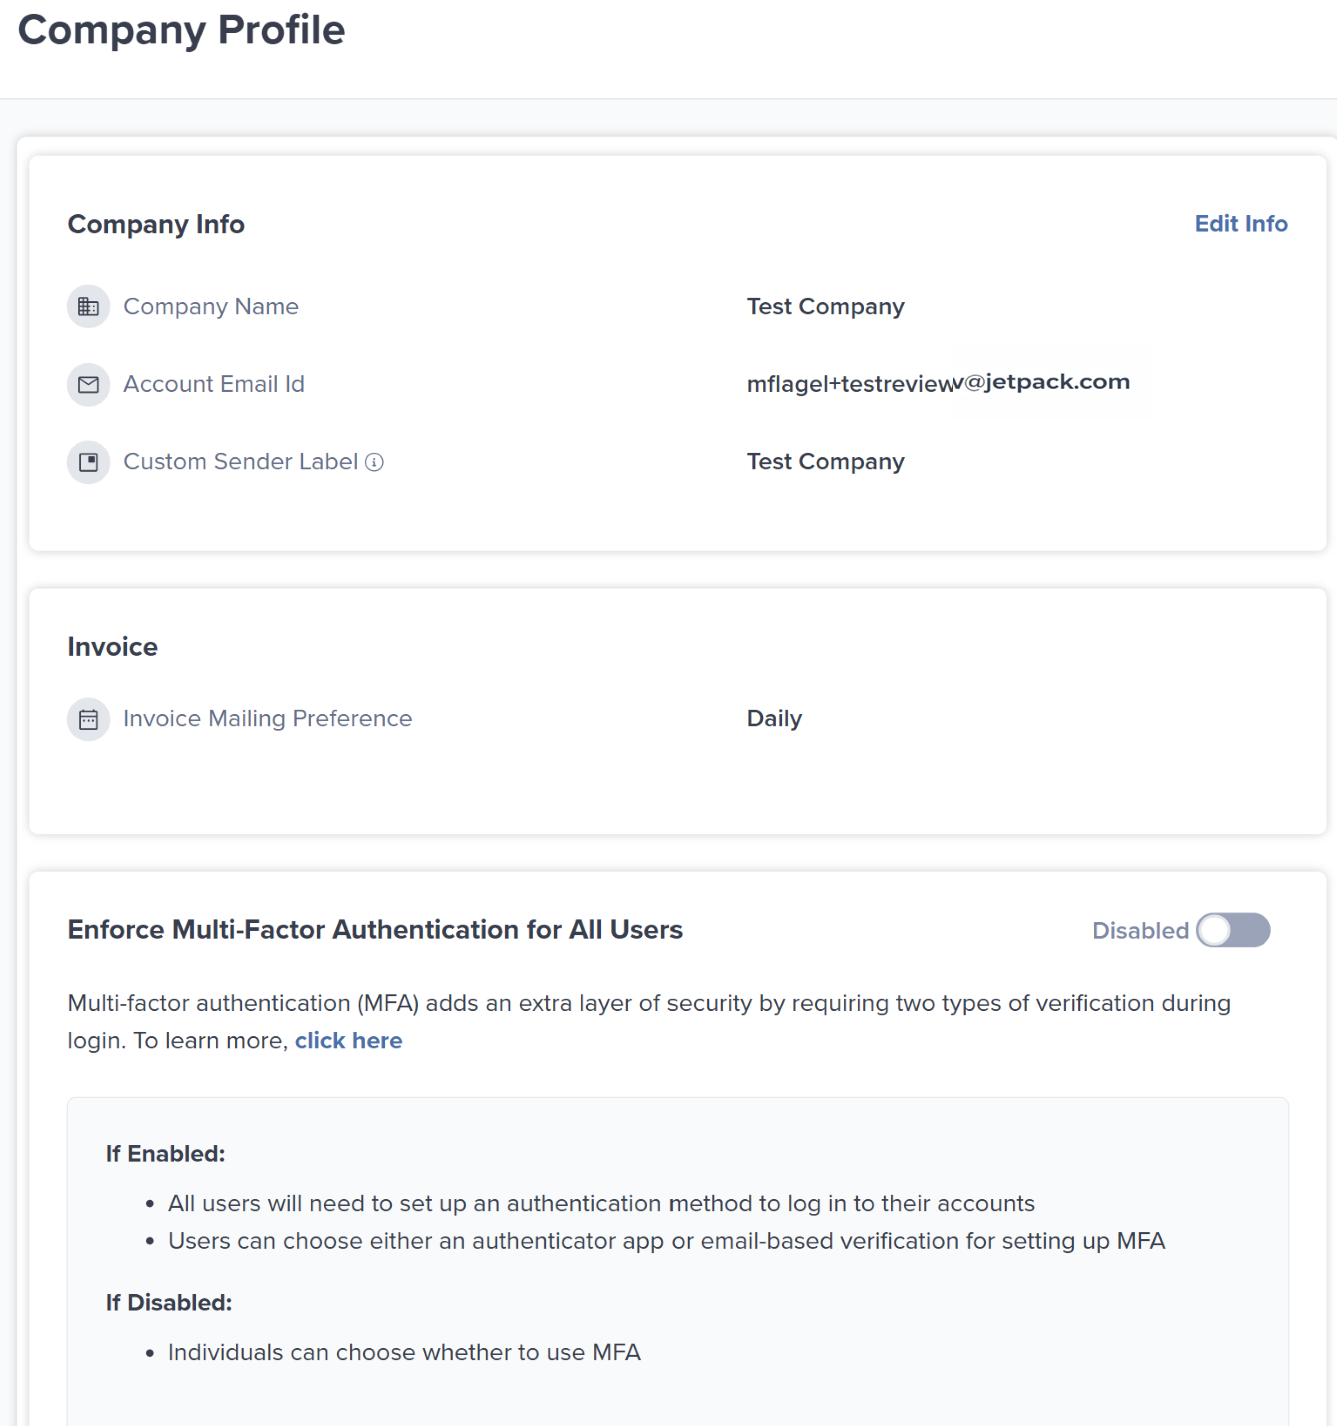
<img src="https://mintcdn.com/jetpack/7RWLx3sOtyE-8irP/fulfillment/account-setup/images/company-profile-settings-overview.png?fit=max&auto=format&n=7RWLx3sOtyE-8irP&q=85&s=6b9931a6c7959b124f4929f2dac05c32" alt="Company Profile Settings page showing all configuration options" className="screenshot" width="1337" height="1426" data-path="fulfillment/account-setup/images/company-profile-settings-overview.png" />

Your Company Profile Settings page contains the following configuration options:

<table className="reversed-column-widths-4col">
  <thead>
    <tr>
      <th>Setting</th>
      <th>What It Controls</th>
      <th>Who Can Edit</th>
      <th>Typical Use Case</th>
    </tr>
  </thead>

  <tbody>
    <tr>
      <td><strong>Company Name</strong></td>
      <td>Your business name as displayed in the Jetpack dashboard</td>
      <td>Account Owner, Client Admin</td>
      <td>Updating after rebrand or legal name change</td>
    </tr>

    <tr>
      <td><strong>Account Email Id</strong></td>
      <td>Primary email address for account owner</td>
      <td>Jetpack Care only</td>
      <td>Changing account ownership or primary contact</td>
    </tr>

    <tr>
      <td><strong>Custom Sender Label</strong></td>
      <td>Name printed on shipping labels as the sender</td>
      <td>Account Owner, Client Admin</td>
      <td>White-labeling shipments with your brand name</td>
    </tr>

    <tr>
      <td><strong>Invoice Mailing Preference</strong></td>
      <td>How often you receive billing invoices</td>
      <td>Not editable (set during onboarding)</td>
      <td>Receiving consolidated invoices for accounting</td>
    </tr>

    <tr>
      <td><strong>Enforce Two-Step Authentication</strong></td>
      <td>Requires all users to enable MFA</td>
      <td>Account Owner, Client Admin</td>
      <td>Strengthening account security across your team</td>
    </tr>
  </tbody>
</table>

***

## Company Name

Your **Company Name** appears throughout the Jetpack dashboard and identifies your account in communications with Jetpack Care.

**What it affects:**

* Dashboard branding and display name
* Internal account identification
* Communications from Jetpack Care
* Reporting and analytics exports

**How to update:**

<Steps>
  <Step title="Open Company Profile settings">
    Navigate to **Settings > Company Profile**.
  </Step>

  <Step title="Locate the Company Name field" />

  <Step title="Edit the field">
    Click **Edit** or directly modify the text field.
  </Step>

  <Step title="Enter your new name" />

  <Step title="Save your changes">
    Click **Save** or **Update**.
  </Step>
</Steps>

<Info title="Rebranding Your Account">
  If you've recently rebranded or legally changed your company name, update this field to keep your Jetpack account current. This does not affect your legal billing entity—contact Jetpack Care if your billing information needs updating.
</Info>

***

## Account Email ID

The **Account Email Id** is the primary email address associated with your account owner. This email receives critical account notifications, security alerts, and billing communications.

**What it's used for:**

* Account ownership verification
* Security notifications (password resets, MFA changes)
* Billing and invoice communications
* Critical account alerts

**How to change:**

The Account Email ID cannot be changed directly through the dashboard for security reasons. To update this email:

<Steps>
  <Step title="Contact Jetpack Care">
    Contact **Jetpack Care** via Slack, phone, or email.
  </Step>

  <Step title="Request email change" />

  <Step title="Verify your identity">
    Verification may require confirmation from your current email address.
  </Step>

  <Step title="Wait for confirmation">
    Jetpack Care will update the email and notify you when complete.
  </Step>
</Steps>

<Warning title="Security Verification Required">
  For account security, Jetpack Care requires identity verification before changing the Account Email Id. This protects your account from unauthorized access or email hijacking.
</Warning>

***

## Custom Sender Label

The **Custom Sender Label** is the name that appears as the "from" address on shipping labels sent from Jetpack fulfillment centers. This allows you to white-label shipments with your brand name instead of "Jetpack."

**What it affects:**

* Sender name on shipping labels
* Return address label (your brand name + Jetpack FC address)
* Customer perception of shipment origin

**Requirements:**

* **Minimum length**: 5 characters
* **Maximum length**: 35 characters
* **Allowed characters**: Letters (A-Z), numbers (0-9), and spaces only
* **Not allowed**: Special characters like `!@#$%^&*()_+-={}[]|:;"'<>,.?/~`

**How to set your Custom Sender Label:**

<Steps>
  <Step title="Open Company Profile settings">
    Navigate to **Settings > Company Profile**.
  </Step>

  <Step title="Find the Custom Sender Label field" />

  <Step title="Edit the field">
    Click **Edit** or enter text directly.
  </Step>

  <Step title="Enter your sender name">
    Type your desired sender name (e.g., "ACME Store" or "BrandName Fulfillment").
  </Step>

  <Step title="Verify requirements">
    Verify it meets length and character requirements.
  </Step>

  <Step title="Save your changes">
    Click **Save** or **Update**.
  </Step>
</Steps>

**Example:**

| Custom Sender Label | How It Appears on Shipping Label                               |
| ------------------- | -------------------------------------------------------------- |
| `ACME Store`        | **From:** ACME Store<br />123 Jetpack Way, Dallas, TX 75001    |
| `BrandName`         | **From:** BrandName<br />456 Jetpack Blvd, Riverside, CA 92507 |

<Tip title="Branding Best Practices">
  Use your customer-facing brand name (not your legal entity name) for the Custom Sender Label. This creates a seamless unboxing experience where customers recognize your brand immediately.
</Tip>

***

## Invoice Mailing Preference

The **Invoice Mailing Preference** determines how frequently Jetpack sends consolidated billing invoices to your account.

**Available options:**

* **Daily** - Receive invoices every business day
* **Weekly** - Receive invoices once per week (typically Monday)
* **Monthly** - Receive invoices once per month (typically on the 1st)

**What it affects:**

* Email invoice delivery frequency
* Invoice consolidation period
* Accounting workflow timing

**How it's configured:**

The Invoice Mailing Preference is set during your initial onboarding based on your accounting needs. **This setting is not editable** through the dashboard.

**To request a change:**

<Steps>
  <Step title="Contact Jetpack Care">
    Contact **Jetpack Care** via Slack, phone, or email.
  </Step>

  <Step title="Request preference change" />

  <Step title="Specify desired frequency">
    Specify your desired frequency (Daily, Weekly, or Monthly).
  </Step>

  <Step title="Wait for update">
    Jetpack Care will update your preference.
  </Step>
</Steps>

<Info title="Choosing Your Preference">
  Most merchants prefer **Monthly** invoices for simplified accounting and reduced email volume. Choose **Daily** or **Weekly** if your accounting system requires more frequent reconciliation.
</Info>

***

## Enforce Two-Step Authentication for All Users

The **Enforce Two-Step Authentication** setting (also called Multi-Factor Authentication or MFA) requires all users in your account to enable MFA before accessing the Jetpack dashboard.

**What it does:**

* Forces all users to set up MFA during their next login
* Prevents login without MFA verification
* Strengthens account security across your entire team
* Protects against password compromise and unauthorized access

**How MFA works:**

When MFA is enforced, users must provide two forms of verification to log in:

1. **Something they know** - Their password
2. **Something they have** - A time-based one-time password (TOTP) from an authenticator app

**How to enable MFA enforcement:**

<Steps>
  <Step title="Open Company Profile settings">
    Navigate to **Settings > Company Profile**.
  </Step>

  <Step title="Find the MFA toggle">
    Find the **Enforce Two-Step Authentication for All Users** toggle.
  </Step>

  <Step title="Enable the toggle">
    Click the toggle to enable (turns blue/green).
  </Step>

  <Step title="Confirm the action" />

  <Step title="Save your changes">
    Click **Save** or **Confirm**.
  </Step>
</Steps>

**What happens when you enable enforcement:**

* **Existing users with MFA already enabled**: No change—they continue logging in normally
* **Existing users without MFA**: Prompted to set up MFA at next login (cannot access dashboard until MFA is configured)
* **New users**: Required to set up MFA during account activation
* **Account Owners and Admins**: Cannot disable their individual MFA once enforcement is enabled

<Warning title="Communication with Your Team">
  Before enabling MFA enforcement, notify your team in advance. Users without MFA will be locked out until they configure it, which requires access to a smartphone or authenticator app.
</Warning>

**How to disable MFA enforcement:**

<Steps>
  <Step title="Open Company Profile settings">
    Navigate to **Settings > Company Profile**.
  </Step>

  <Step title="Find the MFA toggle">
    Find the **Enforce Two-Step Authentication for All Users** toggle.
  </Step>

  <Step title="Disable the toggle">
    Click the toggle to disable (turns gray).
  </Step>

  <Step title="Confirm the action" />

  <Step title="Save your changes">
    Click **Save** or **Confirm**.
  </Step>
</Steps>

**What happens when you disable enforcement:**

* Users who already have MFA set up can continue using it or disable it in their individual profile settings
* New users are no longer required to enable MFA (but it remains optional)
* Account Owners can still enforce MFA for specific high-privilege roles via User Management Settings

<Tip title="Security Best Practice">
  We strongly recommend enabling MFA enforcement for all Jetpack accounts. MFA significantly reduces the risk of unauthorized access, even if passwords are compromised through phishing or data breaches.
</Tip>

***

## Editing Company Profile Settings

To make changes to any editable Company Profile Setting:

<Steps>
  <Step title="Open Company Profile settings">
    Navigate to **Settings > Company Profile**.
  </Step>

  <Step title="Locate the setting" />

  <Step title="Edit the field">
    Click **Edit** or directly modify the field (depending on the setting).
  </Step>

  <Step title="Make your changes" />

  <Step title="Save your changes">
    Click **Save**, **Update**, or **Confirm**.
  </Step>
</Steps>

**Settings you can edit directly:**

* Company Name
* Custom Sender Label
* Enforce Two-Step Authentication toggle

**Settings requiring Jetpack Care assistance:**

* Account Email Id
* Invoice Mailing Preference

Changes to editable settings take effect immediately upon saving.

***

## Let's Dive Deeper

<CardGroup cols={3}>
  <Card title="My Profile Settings" icon="user-gear" href="/fulfillment/account-setup/accounts-users/my-profile-settings">
    Manage your personal user information and security
  </Card>

  <Card title="User Management Settings" icon="users-gear" href="/fulfillment/account-setup/accounts-users/user-management-settings">
    Add, edit, and manage users in your account
  </Card>

  <Card title="The Onboarding Process" icon="list-check" href="/fulfillment/account-setup">
    Back to the Account Setup overview
  </Card>

  <Card title="Integrations + Apps Overview" icon="grid-2-plus" href="/fulfillment/account-setup/integrations-overview">
    Connect your store and third-party tools
  </Card>

  <Card title="Shipping Preferences Overview" icon="truck-fast" href="/fulfillment/account-setup/shipping-preferences">
    Configure how your orders are packed and shipped
  </Card>

  <Card title="Syncing Your Products" icon="arrows-rotate" href="/fulfillment/account-setup/syncing-products">
    Import and configure your product catalog
  </Card>
</CardGroup>

<div className="jetpack-callout">
  <img src="https://mintcdn.com/jetpack/2iejPNBTYKEx6ntF/images/jetpack-logomark-256.png?fit=max&auto=format&n=2iejPNBTYKEx6ntF&q=85&s=340604ced4add3864f2641341826e1c9" alt="Jetpack" className="jetpack-callout-icon" width="256" height="256" data-path="images/jetpack-logomark-256.png" />

  <div className="jetpack-callout-content">
    <h4 className="jetpack-callout-title">Questions? Contact Jetpack Care.</h4>
    <p className="jetpack-callout-text">If you have any questions or run into issues, you can always contact Jetpack Care for help. Our team is always here to assist via Slack, phone, or email!</p>
  </div>
</div>
